Reduce Image Size on Mac Without Losing Quality
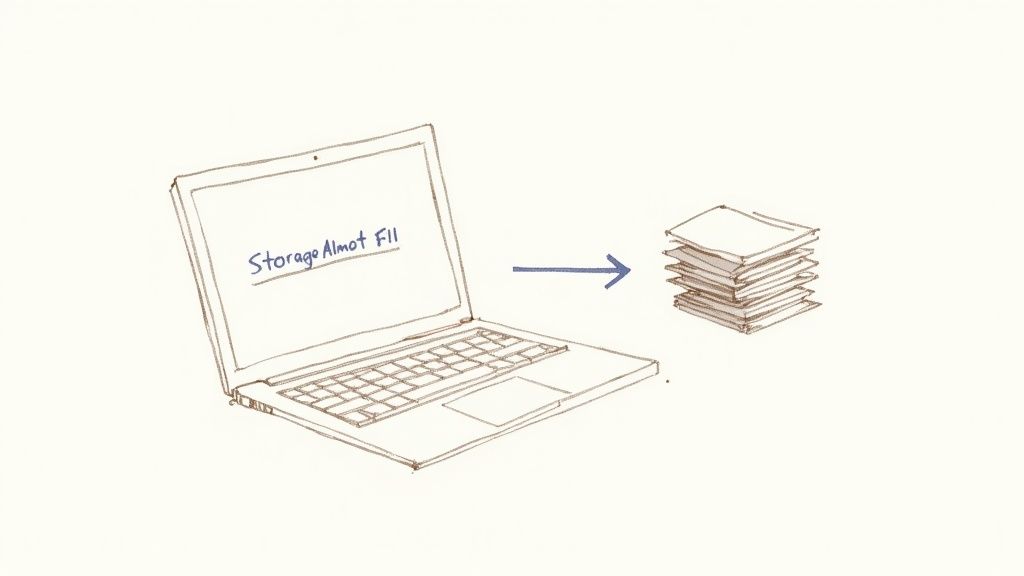
That "Storage Almost Full" alert is a pain every Mac user knows. But the need to shrink your image files isn't just about freeing up your SSD—it’s about making your whole digital life run smoother. It’s the difference between sending an email that goes through instantly and one that bounces back, or having a personal website that loads in a snap versus one that leaves visitors waiting.
Why Smaller Image Files on Your Mac Matter
We've all been there. You try to attach a folder of vacation photos to an email, only to get blocked by a file size limit. Or maybe you've waited... and waited... for a webpage loaded with beautiful but massive images to finally appear. These aren't just little annoyances; they're signs of a bigger problem with oversized files.
The simple truth is that large image files create digital friction. They clog up your workflows, make sharing a hassle, and can even drag down your professional projects. In a world where speed is everything, knowing how to manage image sizes is a fundamental skill.
The Real-World Impact of Large Images
Ignoring image file sizes has bigger consequences than you might think. For one, the number of photos we take is staggering. It's estimated that 1.81 trillion images will be captured this year alone, and a good chunk of them will end up on our devices. With most Mac hard drives sitting between 256GB and 2TB, those photos add up fast, making compression a critical habit. You can find more insights on these trends over on the Compresto blog.
Beyond just storage, here’s how oversized images get in the way of everyday tasks:
- Slower Websites: Heavy images are one of the main reasons websites load slowly. That poor performance doesn't just frustrate visitors; it can also hurt your site's SEO rankings.
- Email and Messaging Limits: Most email services have strict attachment limits, usually around 25MB. Just a few high-resolution photos can easily blow past that.
- Inefficient Backups: The bigger your files, the longer it takes to back them up to iCloud or an external drive. It also means you’re paying for more cloud storage space than you need to.
Learning to reduce image size on your Mac isn't just about saving disk space—it's about optimizing your entire digital life for speed and convenience.
Ultimately, mastering image compression is about removing barriers. It ensures your creative work, personal memories, and professional messages are shared smoothly, turning a potential technical headache into a seamless part of your day.
Using Your Mac’s Built-In Tools for Quick Compression
You probably don't need to download any special software to start shrinking your images. Your Mac already comes packed with powerful, free tools that are perfect for everyday compression tasks, whether you're working on a single photo or a small batch.
One of the most accessible tools is Preview, the app that opens by default whenever you double-click an image or PDF. It’s surprisingly capable and ideal for quick, one-off adjustments. When you open an image in Preview, you get a simple yet effective resizing feature that puts you in control.
Taming Image Size with Preview
Getting started is easy. Just open your image file with Preview. From the menu bar up top, navigate to Tools > Adjust Size. This command opens a small window where the magic happens. Here, you'll see options to change the image's width, height, and resolution.
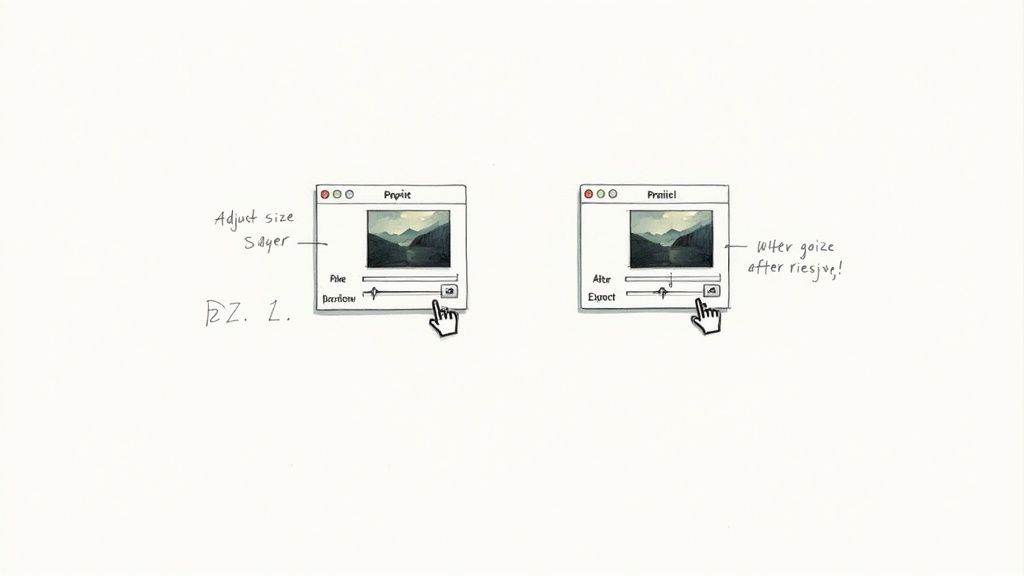
The key thing to watch in this dialog is the "Resulting Size" estimate at the bottom. It updates in real-time as you tweak the settings, giving you instant feedback on how much space you're saving.
Let's break down the most important settings:
- Width & Height: These are the pixel dimensions of your image. For web use, a common width for a blog post image is around 1200 pixels. Reducing these dimensions is the most direct way to make the file size smaller.
- Resolution: Measured in pixels per inch (PPI), this setting is most relevant for printing. For screens, 72 PPI has long been the standard. If your image has a high resolution like 300 PPI (common for print), dropping it to 72 will significantly reduce its file size without any visible quality loss on a monitor.
- Units: You can switch from pixels to other units like inches or percent, which can be handy if you're working with specific print or layout requirements.
For example, imagine you have a 12 MB photo from your iPhone that you want to email. Its dimensions might be over 4000 pixels wide. By changing the width to 1200 pixels in Preview (make sure the "Scale proportionally" box is checked), the resulting size might plummet to under 500 KB—perfect for an attachment.
Using the Photos App for Quick Exports
Another excellent built-in tool is the Photos app. If you already organize your pictures there, it has a simple export function that’s great for resizing images for specific uses like social media posts or email attachments.
The best tool is often the one you already have. Both Preview and Photos offer no-fuss solutions that handle the majority of everyday image compression needs without costing a cent.
Just select one or more images in the Photos library, then go to File > Export > Export [Number] Photos. An export menu will appear with several crucial options for compression.
In the JPEG settings, you can choose a Photo Kind (like JPEG) and then adjust the quality. A "High" quality setting often provides a good balance of detail and file size, but dropping it to "Medium" can shrink the file even more. You can also pick a specific size, like "Medium" or "Small," which correspond to predefined pixel dimensions ideal for quick sharing.
This method is incredibly efficient when you need to prep a whole album of vacation photos to share with family. While these built-in tools are great for basic tasks, more advanced workflows often demand batch processing capabilities that go beyond simple exporting. For those interested in broader file management, learning how to compress files on a Mac can provide a wider set of skills.
Automate Your Workflow and Save Hours of Work
Let's be honest: resizing images one by one is a soul-crushing task. If you’re managing photos for a blog, a client project, or even just organizing a family album, doing it manually is a massive time sink. For anyone dealing with dozens or hundreds of files, automation isn't a luxury—it's how you get your life back.
Luckily, your Mac has some powerful built-in tools that can turn this tedious chore into a one-click affair.
Imagine you've just come back from a trip with 200 high-resolution photos. Instead of opening each one in Preview, you could just right-click the whole batch, hit a custom command, and watch as your Mac resizes them all for the web in seconds. This isn't some complex coding project; it's something you can build yourself with the Shortcuts app.
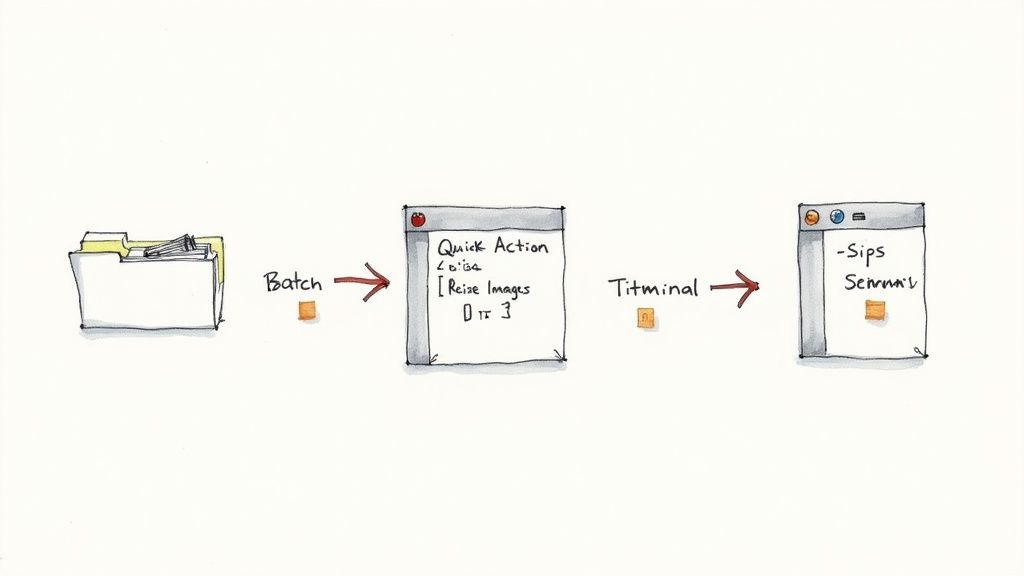
Create Your Own Image Resizing Quick Action
The Shortcuts app is your secret weapon for creating powerful workflows called Quick Actions. These live in your right-click menu, ready to go whenever you need them. Building a simple image resizer is a perfect way to see what Shortcuts can do.
Here’s a quick recipe to get you started:
- Fire up the Shortcuts App: You'll find it in your Applications folder.
- Start a New Shortcut: Just click the
+icon to get going. - Make it a Quick Action: In the sidebar, flick the switch for "Use as Quick Action." Then, tell it to accept "Image files" from the "Finder."
- Add the "Resize Image" Action: Drag this action over from the library. You can set a specific width, like 1200 pixels, and leave the height as "Auto" to keep your photos from getting squished.
- Add the "Save File" Action: This tells your shortcut where to put the finished images. You can have it ask you where to save them each time or pick a default folder.
- Give It a Name: Call it something obvious, like "Resize for Web." Now, it’ll show up whenever you right-click on image files in Finder.
Spending just ten minutes setting up a Quick Action like this can genuinely save you hours down the road. It’s the difference between a productive workflow and a repetitive headache.
For the Power Users: Terminal and Sips
If you're comfortable with the command line, macOS has an incredibly powerful tool called sips (scriptable image processing system). This little utility processes images at lightning speed without ever opening an app. It's the ultimate tool for heavy-duty batch operations.
For example, want to resize every single JPEG in a folder to a maximum width of 800 pixels? Just pop open Terminal and run this one command:
sips -Z 800 *.jpg
That's it. The -Z flag tells it to maintain the aspect ratio, so your images won't get distorted. It might look a little intimidating at first, but sips is unbelievably fast and efficient for chewing through huge numbers of files.
Whether you go with the user-friendly Shortcuts app or the raw power of the Terminal, automation turns a mind-numbing task into a simple click. And if you want to take it even further, you could explore a Mac app to monitor a folder for automatic compression, taking the idea of hands-free optimization to a whole new level.
Optimizing Images for a Faster Website
If you run a website, blog, or online store, image size is more than just a technical detail—it’s a business metric. I can’t tell you how many times I’ve seen a beautiful site crippled by slow load times, and oversized images are almost always the culprit. Slow pages frustrate visitors, hurt your user experience, and can seriously drag down your search engine rankings.
So, getting strategic about how you reduce image size on your Mac before you upload is a non-negotiable step.
This isn't just about making files smaller; it's about finding that perfect sweet spot between crisp visual quality and a tiny file size. Nailing this balance pays off big time in visitor retention and better SEO performance.
Choosing the Right Format for the Web
The very first decision you need to make is picking the right file format for the job. Not all formats are created equal, and each one has specific strengths that make it a better fit for different kinds of images. Getting this right is the foundation of any good optimization workflow.
Here’s a quick rundown of the most common formats you'll encounter:
- JPEG: This is your workhorse for photographs and complex images with lots of colors and gradients. It uses lossy compression, which cleverly discards a bit of data to shrink file sizes dramatically.
- PNG: Best for graphics that need sharp lines, like logos, icons, or screenshots. It's also the format you need for images with a transparent background. PNG uses lossless compression, so it preserves every pixel, but that often means larger files compared to JPEGs.
- WebP & AVIF: These are the modern, next-generation formats built specifically for the web. They blow the older formats out of the water, offering far superior compression and delivering high-quality images at a fraction of the size.
The push to reduce image size on Macs is directly tied to these evolving web standards. A WebP image, for example, can often be 25-35% smaller than a JPEG of similar quality. The even newer AVIF format takes this a step further, offering massive performance gains that are essential for today's fast-loading websites.
A fast website is no longer a luxury—it's an expectation. Prioritizing image optimization shows you respect your visitor's time, which builds trust and encourages them to stick around.
To help you decide, here’s a breakdown of how these formats stack up for web use.
Image Format Comparison for Web Use
Choosing the right format can feel technical, but it really comes down to what you need the image to do. This table compares the most common formats to help you pick the best one for each situation.
| Format | Best For | Compression | Transparency Support |
|---|---|---|---|
| JPEG | Photographs, complex images with gradients | Lossy (Excellent compression for photos) | No |
| PNG | Logos, icons, graphics with sharp lines | Lossless (Preserves detail, larger file sizes) | Yes |
| WebP | A versatile replacement for JPEG & PNG | Both Lossy & Lossless (Superior to older formats) | Yes |
| AVIF | Highest-quality images at the smallest size | Both Lossy & Lossless (Best-in-class compression) | Yes |
As you can see, modern formats like WebP and AVIF offer the best of both worlds—great quality and small file sizes. While browser support is now widespread for WebP, AVIF is still catching up but is definitely the future. For now, a solid strategy is to use WebP as your primary choice and have a JPEG or PNG as a fallback.
Practical File Size Targets
Okay, so how small is small enough? While there's no single magic number that fits every situation, you can follow some general guidelines to keep your web pages lean and zippy. For a broader look at strategies that go beyond the Mac, including resizing techniques, check out this excellent guide on how to optimize images for web performance.
Here are some practical targets I always aim for:
- Full-width hero images: Keep these under 300 KB. This is the first thing users see, so it has to load almost instantly.
- Blog post images: Aim for 100-150 KB. These images add valuable context but should never slow down the reading experience.
- Product photos & thumbnails: Strive to keep these under 80 KB. On e-commerce sites with dozens of product shots, every single kilobyte counts.
Hitting these targets consistently requires a solid workflow. The good news is, all the tools and techniques we're covering in this guide will get you there. And if you’re ready for a deep dive into more advanced strategies, our complete guide on image optimization for the web has everything you need.
Finding the Right Third-Party Compression App
While the built-in tools on your Mac are perfect for quick, one-off jobs, they start to show their limits when you're dealing with professional workflows or big projects. If you need to process hundreds of photos at once, get granular with compression settings, or work with a wider range of file formats, you'll want to turn to a dedicated third-party app.
These specialized tools can be a game-changer for your workflow. They offer features like simple drag-and-drop interfaces, saved presets for your common tasks, and advanced compression algorithms that trim every last kilobyte from an image without destroying its quality. They transform optimization from a chore into a fast, seamless part of your process.
Free Versus Paid Tools
As you start exploring compression apps, you'll quickly find there are great options in both the free and paid camps. Free tools like ImageOptim are fantastic for more casual use. It’s an open-source powerhouse that does a brilliant job with lossless compression, shrinking your images without any noticeable drop in quality. It's a go-to for many Mac users for a reason.
However, paid apps like Squash or Compresto often bring a more powerful feature set to the table. You'll typically get faster processing speeds, support for more formats (including newer ones like AVIF), and handy features like folder monitoring that can automatically compress new files. For a professional, the time you save and the extra control you gain can easily be worth the small investment.
This decision tree gives you a simple way to pick the right web image format, especially when you need to account for transparency.

As the graphic shows, JPEG is usually the best choice for photos without transparency. But when you need that transparent background, PNG and modern formats like WebP give you the flexibility you need.
Key Features to Look For
Not all compression apps are built the same. When you’re weighing your options, zero in on the features that will actually make a difference in your day-to-day work.
- Batch Processing: This is an absolute must-have if you're handling more than a handful of images. The ability to just drag a whole folder onto an app and let it work its magic is a massive time-saver.
- Compression Quality Control: Look for apps that give you a slider or a simple quality setting. This lets you dial in the exact balance between file size and visual quality that your project demands.
- Format Support: Make sure the app can handle the file types you use most often. This could be anything from standard JPEGs and PNGs to modern formats like WebP, or even converting videos to GIFs.
For pros, the right tool can make a huge impact. It's not uncommon for Mac users working with high-res photos to cut file sizes by 70-80% using either lossy or lossless compression. Apps like Squash and ImageOptim put this power right at your fingertips with intuitive interfaces, making storage management and workflow speed a breeze. You can learn more about the advantages of lossless compression tools and how they can streamline your work.
Ultimately, the best tool is the one that fits seamlessly into your routine. A privacy-first app like Compresto, for instance, ensures all processing happens locally on your Mac, which is a critical consideration for anyone handling sensitive client work.
Choosing the right app really comes down to matching its capabilities to your specific needs. Are you a photographer who needs to churn through thousands of RAW files, or a blogger just trying to optimize a dozen JPEGs for a new post? Answering that question will point you straight to the perfect tool.
Mac Image Compression Tool Features
To help you decide, here’s a quick comparison of some popular third-party tools available for macOS. Each one has its own strengths, so think about which features align best with your workflow.
| Tool | Price | Key Feature | Best For |
|---|---|---|---|
| Compresto | Paid (Subscription) | Privacy-first, local batch processing with advanced format support. | Professionals and teams handling sensitive client data. |
| ImageOptim | Free (Open-Source) | Excellent lossless compression, simple drag-and-drop interface. | Casual users and web developers needing quick, quality-preserving optimization. |
| Squash | Paid (One-time) | Fast processing, metadata removal, and a slick, user-friendly design. | Bloggers, social media managers, and anyone wanting a simple, powerful tool. |
| JPEGmini | Paid (Subscription/One-time) | Patented algorithm specifically for reducing JPEG file size without visible quality loss. | Photographers who work primarily with JPEG files. |
This table should give you a solid starting point. Whether you need the raw power and privacy of a paid tool or the straightforward efficiency of a free one, there’s a great Mac app out there that will make your image optimization tasks faster and easier.
Common Questions About Compressing Images on Mac
Even with the best tools, diving into image compression for the first time can bring up a few nagging questions. Getting clear, simple answers helps you make the right choices for your needs, whether you're trying to shrink an image for an email, a presentation, or your website.
Let's tackle some of the most frequent questions we hear.
Will Compressing an Image Ruin Its Quality?
This is the biggest worry for most people, and the short answer is: it depends entirely on how you do it. The key is knowing the difference between lossless and lossy compression.
- Lossless Compression: Think of this like a perfectly packed suitcase. It makes the file smaller by organizing the data more efficiently, but when you "unpack" (open) the image, every single pixel is still there, exactly as it was. Formats like PNG use this method.
- Lossy Compression: This one is a bit more aggressive. It intelligently removes bits of data that the human eye is unlikely to notice, which allows for much smaller file sizes. JPEG is the most common example of this.
For everyday use, a moderate amount of lossy compression gives you a huge size reduction with almost no visible loss in quality. The "ruin" only happens when you crank the compression up way too high, which is why having a quality slider is so important.
What Is the Difference Between Resizing and Compressing?
This is another common point of confusion. While both actions make an image file smaller, they get there in completely different ways.
Resizing changes the physical dimensions of an image (its width and height in pixels). Compressing reduces the file size by optimizing the data within those dimensions.
Imagine you have a massive 4000x3000 pixel photo. Just resizing it to 1200x900 pixels will drastically shrink its file size because there's simply less image information to store.
Compression, on the other hand, keeps the 1200x900 dimensions but makes the file even smaller by applying an algorithm like JPEG. A complete workflow often involves both: first, you resize the image to the dimensions you actually need, and then you compress it to get the final file size just right.
What Are Good Image Sizes for Different Uses?
There’s no single "best" size, but you can follow some reliable guidelines to make sure your images are fit for purpose without being unnecessarily large. Keeping a little cheat sheet handy can save a lot of guesswork.
Here are a few practical targets to aim for:
- Email Attachments: Try to keep individual images under 500 KB. If you're sending a bunch, aim to keep the total attachment size below 10 MB to be safe.
- Social Media (Instagram, Facebook): A width of 1080 to 1200 pixels is usually perfect. The platforms will compress them anyway, so starting with a reasonably sized file is a good move.
- Website Blog Posts: Aim for a width between 1200 and 1500 pixels and a file size under 150 KB. This is key for fast page loads.
- Full-Screen Presentations: A standard 16:9 presentation slide is 1920x1080 pixels. Matching this dimension prevents your software from having to do any awkward scaling.
Keeping these simple rules in mind will help you confidently get your images ready for any destination.
Ready to stop guessing and start compressing like a pro? Compresto offers a fast, privacy-first solution to reduce image size on your Mac with a simple drag-and-drop interface. Try it today and see how much storage you can reclaim. Learn more at https://compresto.app.