How to Compress Files on Mac: Your Complete Toolkit Guide
Why Every Mac User Needs Smart Compression Skills
Let's face it, that "storage almost full" message on your Mac can really kill your flow. Whether you're a photographer dealing with tons of RAW files, a video editor working with 4K footage, or just trying to email some vacation photos, knowing how to compress files smartly is a lifesaver. I've chatted with so many creative folks, and they all agree: compression is their secret weapon.
For freelancers sending large files to clients, compression means faster uploads and happier clients. Students sharing big research projects? Compression keeps those email attachments manageable and avoids inbox overload. And don't forget about cloud storage costs – smaller files equal less money spent each month. When a deadline is looming, efficient file management is key. Trust me, learning to compress files on your Mac is a serious productivity boost.
Now, some folks worry about quality loss when compressing, but that's not always the case. You can shrink a large text file without losing a single character. The same goes for many other file types, especially when you understand the different compression options available on your Mac. Mac users, in particular, tend to work with large media files, which has led to a rise in the use of compression software. Good compression software can drastically reduce file sizes, making transfers faster and saving on cloud storage costs. Discover more insights on Mac compression software.
So, whether you're trying to reclaim valuable disk space, speed up your workflow, or just make file sharing less painful, mastering compression is a must-have skill for every Mac user. We'll explore the built-in Mac tools, Terminal commands, and even some third-party apps that can take your compression skills to the next level.
Mastering Mac's Hidden Compression Superpowers
Your Mac has some serious compression chops hiding just under the surface. Sure, everyone knows the basic right-click "Compress" option, but honestly, that’s just scratching the surface. Let's dive into the built-in Archive Utility and uncover the tricks experienced Mac users rely on. We'll explore why certain file types compress like a dream while others barely budge, and I’ll share some keyboard shortcuts I use to compress files on Mac quickly.
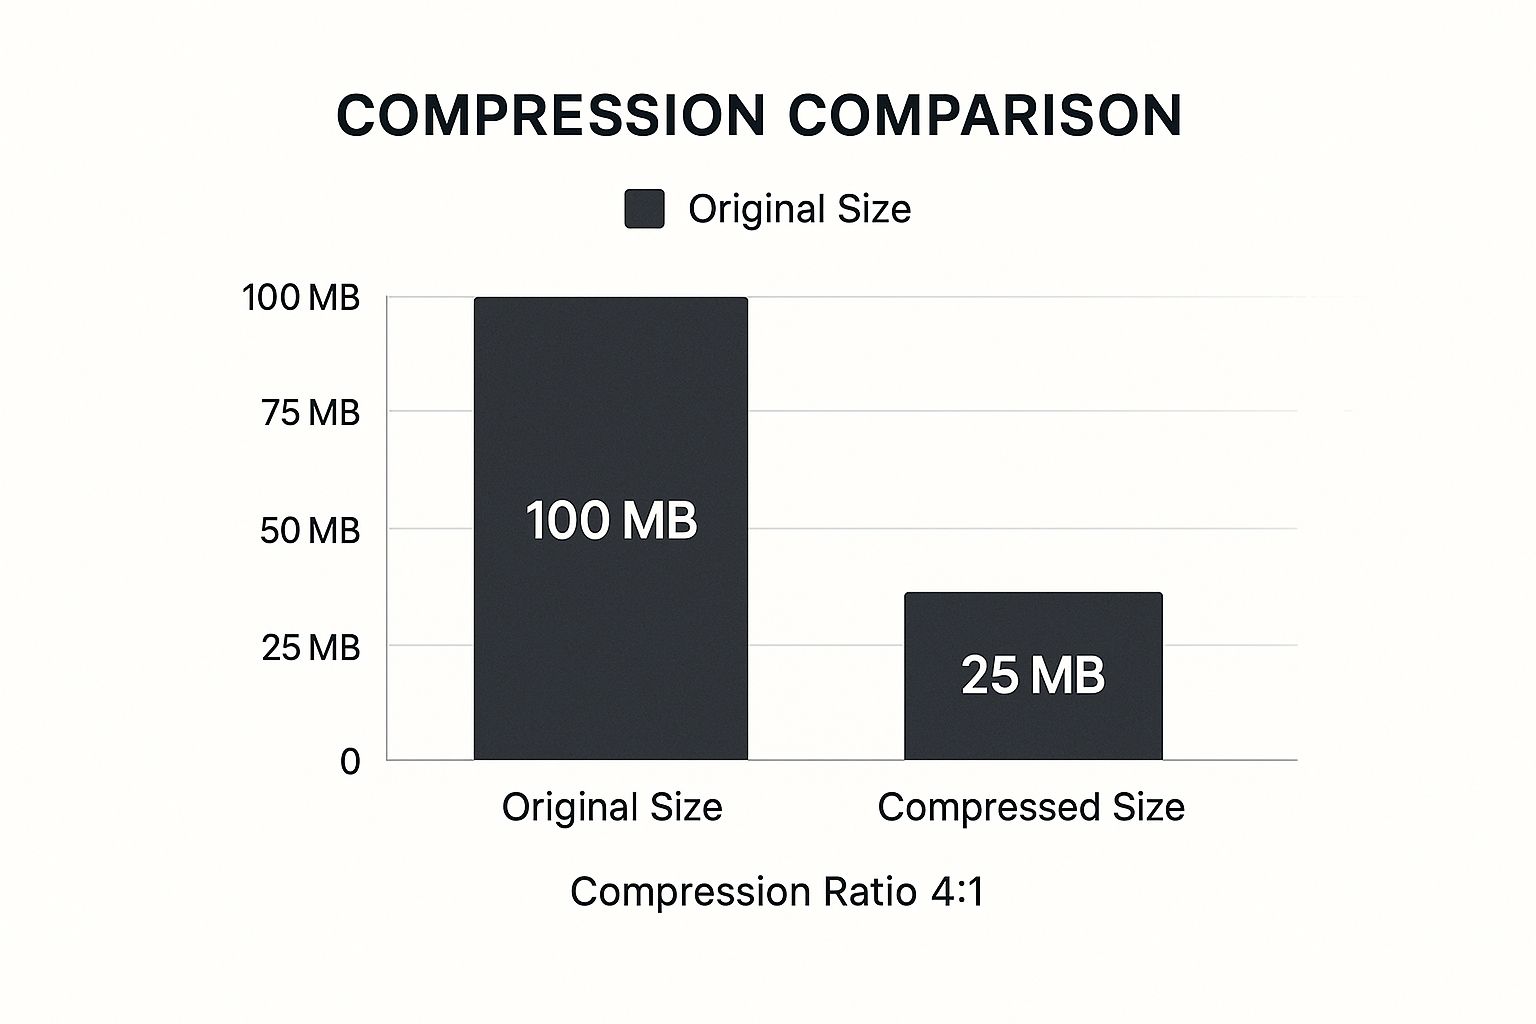
The infographic gives you a visual idea of what compression can do – shrinking a 100MB file down to a mere 25MB. That 4:1 compression ratio can save a ton of space, especially when dealing with large files or mountains of documents. Think cloud storage, backups, or sending large files through email or messaging apps – compression becomes essential. Efficiently compressing files in batches is key, and we'll also look at how to avoid corrupted archives and figure out when the built-in tools are enough versus when you need something more heavy-duty. For more tips on squeezing the most out of your Mac's compression, check out this helpful guide: Compress Files for Mac.
Beyond the Basics: Customizing Compression
Most Mac users don't realize they can fine-tune their compression settings and play around with different archive formats. From adjusting compression levels to choosing between .zip, .tar, and other less common formats, you'll be the boss of how your files get packaged. This is incredibly useful when managing big projects or extensive digital archives.
To help you understand the differences between using Mac's built-in tools versus third-party apps, I've put together this comparison table:
Mac Built-in vs Third-party Compression Comparison Comparing compression ratios, supported formats, and features between macOS native tools and popular third-party solutions
| Feature | macOS Built-in | Third-party Apps (Compresto) | Best Use Case |
|---|---|---|---|
| Compression Ratio | Moderate | High (often better for specific file types) | Third-party for maximum compression, built-in for quick tasks |
| Supported Formats | .zip, .tar (and variations) | Wider range, including .7z, .rar | Third-party for specialized formats |
| Speed | Generally fast | Varies depending on the app and settings | Built-in for simple, quick compression |
| Ease of Use | Simple, right-click options | Can offer advanced features, but may have a learning curve | Built-in for beginners, third-party for advanced users |
| Cost | Free | Free trials available, some are paid | Built-in for basic needs, consider third-party for frequent, high-compression needs |
| Encryption | Basic password protection | More robust encryption options often available | Third-party for sensitive data |
This table highlights the core differences. While the Archive Utility gets the job done for quick compression, third-party apps often offer better compression rates and support more file formats. They can also provide stronger encryption for sensitive data. Think about what you need most – speed and simplicity or maximum compression and security. Choosing the right tool for the job makes all the difference.
Terminal Commands That Change Everything
Okay, now we're getting to the good stuff. I know the Terminal can seem intimidating at first, but trust me, it's a treasure trove of compression power. Think of it like unlocking a secret level in your Mac.
For those of you tired of typing the same long commands over and over, check out Text Expander Mac. It's a lifesaver, especially when dealing with complex Terminal commands.
Basic Zip Compression in Terminal
Let's start with something simple. To compress files using the zip utility, just type this in:
zip archive.zip file1.txt file2.pdf image.jpg
This creates a zip file (named archive.zip in this case) containing all the files you listed. Pro tip: Use wildcards like *.txt to zip up all text files in a folder at once. Super handy!
Stepping Up Your Game With tar and gzip
Want something a bit more heavy-duty? The classic combo of tar (tape archiver) and gzip is your best bet. This is the standard way to compress and archive on Unix-based systems like macOS.
tar -czvf archive.tar.gz folder1 folder2
This creates a compressed archive called archive.tar.gz containing both folder1 and folder2. The -czvf flags might look cryptic, but they just mean create, compress, verbose (show you what’s happening), and file. This method is great for both solid compression and archiving entire folder structures.
Password-Protecting Your Archives
Dealing with sensitive information? You can easily password-protect your zip archives using the -e flag. Here's how:
zip -e secure.zip important_files/*
The Terminal will then prompt you to enter and confirm a password. This encrypts everything inside the archive. Remember, choose a strong password! No "password123" allowed.
Excluding Specific Files
Sometimes you need to compress a folder but leave out certain files. The --exclude flag with zip is perfect for this:
zip -r project.zip project_folder --exclude ".tmp" ".bak"
This zips up the project_folder but skips all those pesky temporary and backup files. This keeps your archives clean and organized – especially helpful for projects with tons of temporary files. This kind of precise control is one of the reasons the Terminal is so powerful.
When Third-Party Tools Make All the Difference
Sometimes, the compression tools built into your Mac just don't cut it. If you're dealing with unusual file types or need more control over how your files are compressed, third-party apps can be a real game-changer. Apps like Compresto, made specifically for Mac, often have more advanced algorithms and features that go beyond the basics.
I've found that some third-party tools are amazing at compressing certain file types, like images or videos, getting file sizes way smaller than the built-in Archive Utility. This is a lifesaver when I'm working with large media files. Bash scripts can automate compression tasks, simplifying workflows, and tools like a Bash Code Generator can be helpful for creating them. Plus, many of these apps offer batch processing, so you can compress tons of files without breaking a sweat. This has been incredibly useful when I'm preparing big batches of photos for clients.
Features That Matter
So, how do you know if a third-party compression tool is worth the money? Look for things like preview capabilities, so you can see how compression will affect the file quality before you actually compress it. Solid format support is also key, especially if you work with less common archive types like .7z or .rar. And don’t forget to check for integration with cloud services. Being able to sync seamlessly with your cloud storage can really simplify your workflow.
You might be interested in this: how to compress files without losing quality. Third-party apps often give you finer control over compression levels, letting you find the sweet spot between file size and quality. Some even offer lossless compression for those file types where keeping every single detail is absolutely critical. Understanding these features will help you decide if sticking with the built-in tools is enough, or if a premium compression app would be a valuable addition to your Mac toolbox.
Understanding the Mac Compression Software Boom
The world of compression software has changed. Remember when "zipping" a file was the big deal? Now, it's a whole different ballgame, especially for Mac users. Working with large design files or videos on a Mac really highlights the need for good compression. Think about it: high-res images, 4K video, complex design docs – these things gobble up storage space like crazy.
So, naturally, we need better compression tools. And that demand has led to some seriously cool innovations. We're seeing tighter integration with macOS, tools designed specifically for Mac file types, and features that simplify the whole compression process. For example, some apps now integrate directly with cloud services like Dropbox – compress and upload in one go. Others focus on lossless compression for specific file types, like RAW images, so you shrink the file size without losing any image quality.
This growth is real. The global data compression software market (including Mac tools) hit $1.03 billion in 2023 and is projected to reach $1.11 billion in 2024—that’s a 7.6% jump! Check out the research here.
But this isn't just about market growth; it's about what it means for you. More choices, more specialized tools, and simply better ways to compress files on your Mac. This section will help you see past the marketing hype and find the features that truly make a difference in your workflow. It's about finding the right tool for the job, not just the one with the catchiest slogan.
Tailored Strategies for Every File Type You Handle

Compressing files on your Mac isn't one-size-fits-all. Different file types react to compression in unique ways, and knowing the difference can save you headaches down the road. Let's explore how to approach some common file types you probably work with daily.
Think of text-based files, like Word docs or plain text files, as a bag of chips with lots of air. You can squeeze out that air (compress the file) without crushing the chips (losing data). They compress really well. Image files like JPEGs, on the other hand, are already pretty compact, like a block of wood. Trying to compress them further won't yield dramatic results.
Understanding Compression Ratios
Here's a quick guide to what you can generally expect when compressing different file types on your Mac:
| File Type | Expected Compression | Best Method | Quality Impact |
|---|---|---|---|
| Text (.txt, .doc, .docx) | High (up to 80%) | Built-in Archive Utility, Terminal (zip, gzip) | None |
| Images (.jpg, .png) | Low to Medium (5-30%) | Compresto, Preview app (for PNGs), online tools | Potential for minor quality loss with high compression |
| Videos (.mp4, .mov) | Varies greatly depending on codec and existing compression | Compresto, dedicated video compression software | Noticeable quality loss at high compression |
| Audio (.mp3, .wav) | Similar to video - depends on format | Compresto, audio compression software | Potential quality loss |
| Archives (.zip, .tar.gz) | Minimal, if already compressed. Can be beneficial for combining multiple uncompressed files. | Built-in Archive Utility, Terminal | None, unless the files inside are further compressed |
This table gives you a general idea, but experimenting is key!
Practical Tips for Image Compression
When you do compress images, find the balance between size and quality. Play around with the quality settings in Compresto or whatever tool you're using. You can often shrink images quite a bit while keeping them looking great.
For a mixed bag of files – say, a folder with documents, images, and a video – create a single compressed archive (a .zip or .tar.gz). This keeps things organized and is super helpful for sharing project files or sending client deliverables.
By the way, the need for data compression is booming. The market is projected to hit $4,306.13 million by 2032! Here's a look at the growing data compression market. This just highlights how important file management is, even on powerful machines like Macs.
Knowing how different file types respond to compression lets you make smart choices. Understanding which formats shrink easily, which stay stubborn, and how to handle a mix of files will make you a Mac file management master!
Building Your Personal Mac Compression Strategy
After playing around with different ways to compress files on my Mac, I wanted to share some tips on building a strategy that really works for your workflow. Whether you're occasionally sending files or dealing with tons of media, having a personalized approach is key.
Choosing the Right Tool for the Job
Knowing when to use the built-in Mac tools versus something like Compresto is important. For quickly compressing regular files, the Archive Utility or Terminal commands are perfect. But when I need serious compression, specific formats, or features like batch processing – especially for video (check out this guide on video compressor software for mac) – third-party apps are my go-to. Personally, I love Compresto for image-heavy projects. The compression is amazing, and I don't see any noticeable quality loss. It’s a lifesaver for batch compressing before uploading to the cloud, too.
Troubleshooting and Long-Term Access
Sometimes you run into issues like corrupted archives. This usually happens because of incorrect settings or if something interrupts the process. Just double-check everything and make sure your internet connection is stable, especially if you're using cloud-based tools. For accessing files years down the line, a good naming system for your compressed archives is crucial. I keep mine in a dedicated folder. This keeps things organized and makes finding old projects so much easier.
Automating Your Workflow
Automating compression can be a game-changer. Using Terminal commands or third-party apps, you can schedule compressions, automatically compress certain file types, and even integrate compression into your backups. This frees up so much time and mental energy.
Having a good compression toolkit isn't just about the tools; it's about developing good habits. Regularly cleaning out old archives, updating your software, and tweaking your settings make the whole process smooth and painless. A well-defined strategy makes managing files so much simpler, keeps your storage tidy, and makes sure you can access your files across different platforms for years to come.
Ready to supercharge your Mac's compression? Download Compresto today and see what it can do!