Fix Corrupted Video Files With This Guide
Ever hit 'play' on a video, only to be greeted by a black screen or a cryptic error message? It’s a frustratingly common problem. When you need to fix a corrupted video, the cause is usually some digital hiccup like a file transfer that got cut off, a malware infection, or a simple codec mismatch.
Figuring out what went wrong is always the first step toward getting your video back in working order.
Why Video Files Get Corrupted and How to Spot It
Video corruption might feel random, but there’s almost always a specific point of failure. I like to think of a video file as a complex puzzle—if even one tiny piece is missing or out of place, the whole picture can fall apart.
One of the most frequent culprits I see is an incomplete or interrupted data transfer. Picture this: you're copying a massive 4K video file from your camera's SD card to your Mac. If you yank the card out before that progress bar hits 100%, you’re often left with a fragmented, unplayable mess.
Common Causes of Video Corruption
While a few different things can damage a video file, most issues fall into a handful of key categories. Knowing these helps you diagnose the problem and, more importantly, stop it from happening again.
- Interrupted Transfers or Downloads: This is the big one. Disconnecting a drive too soon, a sudden power outage, or a dropped internet connection can leave your file in pieces.
- Storage Media Degradation: Old hard drives and heavily used SD cards don't last forever. They can develop bad sectors, and if part of your video is saved on one of these damaged areas, corruption is pretty much guaranteed.
- Sudden Power Loss: If your camera's battery dies mid-recording or your Mac shuts down unexpectedly while saving, the video might not finalize correctly. That leaves it unreadable.
- Software and Codec Conflicts: Sometimes, the file is perfectly fine, but the software trying to play it is the problem. An outdated media player or a missing codec can look just like a corrupted file.
Digital failures are overwhelmingly the primary source of these headaches. User surveys have shown that interrupted transfers alone account for a staggering 40% of corruption cases, with malware and codec issues also being significant factors. As we all move to huge 4K and 8K videos, the risk only goes up—larger files are just more exposed to errors during transfer and storage.
Recognizing the Telltale Signs
So, how can you be sure your video is actually corrupted? The signs are usually obvious and disruptive. Before you can fix a corrupted video, you need to know what to look for.
A great way to diagnose the problem is to check for common symptoms. I've put together a quick reference table to help you identify what's going on based on what you're seeing (or not seeing).
Common Symptoms of Video File Corruption
Use this quick reference to diagnose if your video file is corrupted based on common playback issues.
| Symptom | What You Might See or Hear | Likely Cause |
|---|---|---|
| Stuttering or Freezing | The video pauses, skips, or lags, but the audio might continue. | Missing or damaged video frames. |
| Pixelation & Artifacts | Bizarre green blocks, distorted colors, or blocky pixelation appear. | Corrupted video data stream or header. |
| Audio/Video Sync Issues | The audio and video are out of sync, with one playing ahead of the other. | Damaged timestamps within the file. |
| File Won't Open | Your media player shows an error like "File could not be read." | Severe header corruption or incomplete file. |
| No Sound or Video | You get a black screen with audio, or video with no sound at all. | The audio or video track is missing or unreadable. |
Seeing any of these? It’s a good bet that your file has some level of corruption. In more severe cases, you might not be able to play the file at all.
Your video might constantly freeze or stutter, even on a powerful computer. You could see weird pixelation or green artifacts that pop up randomly. The worst-case scenario is when the file won't open at all, and you just get an error message.
Making sure your files transfer completely is the single best way to prevent this. For a deeper dive, check out our guide on file transfer best practices. By spotting these symptoms early, you can move straight to the right repair strategy.
Easy Fixes Using Tools You Already Have
Before you start shelling out cash for specialized repair software, your first port of call should be right on your Mac. The everyday applications you already use for watching videos often have hidden repair features that can fix minor corruption problems for free. Think of these tools as your first line of defense.
One of the best free tools out there is VLC Media Player. It’s famous for playing nearly any file format imaginable, but its secret weapon is a built-in index repair function. A video's index is like a table of contents, telling the player how to sequence the video and audio data. When that index gets damaged—often during a wonky download or file transfer—you get stuttering, freezing, or a file that just won't play.
Using VLC for Basic Index Repair
VLC is smart enough to spot a broken index on its own. When you try to open a corrupted AVI file, for example, a prompt often pops up asking if you want to "Build index then play". A simple click can be all it takes to temporarily fix the file for that viewing session.
If you want a more permanent fix, you can tell VLC to automatically repair these issues every time. Just head into VLC's settings, find the "Input / Codecs" section, and look for the dropdown next to "Damaged or incomplete AVI file." Change this to "Always fix", and you've turned VLC into an automatic repair tool for this common headache.
This method is a lifesaver for index-related corruption. While it's not a silver bullet for every problem, I've had it salvage files that other players flat-out refused to open. It's always my first step.
Mac-Specific Fixes with QuickTime
If you’re on a Mac, your built-in QuickTime Player offers a different but sometimes effective trick. It doesn't have a big "repair" button, but it can sometimes fix a corrupted video by forcing it to re-encode.
The process is surprisingly simple. Open the problematic file in QuickTime. If it can read at least some of the data, navigate to File > Export As and save it in a different resolution, like 1080p.
This action makes QuickTime rebuild the file structure from scratch, often cleaning up minor errors and creating a new, stable version in the process. It's a bit like making a clean copy of a messed-up document to fix formatting glitches.
The infographic below breaks down how VLC's direct repair compares to QuickTime's conversion method for these initial, no-cost fixes.
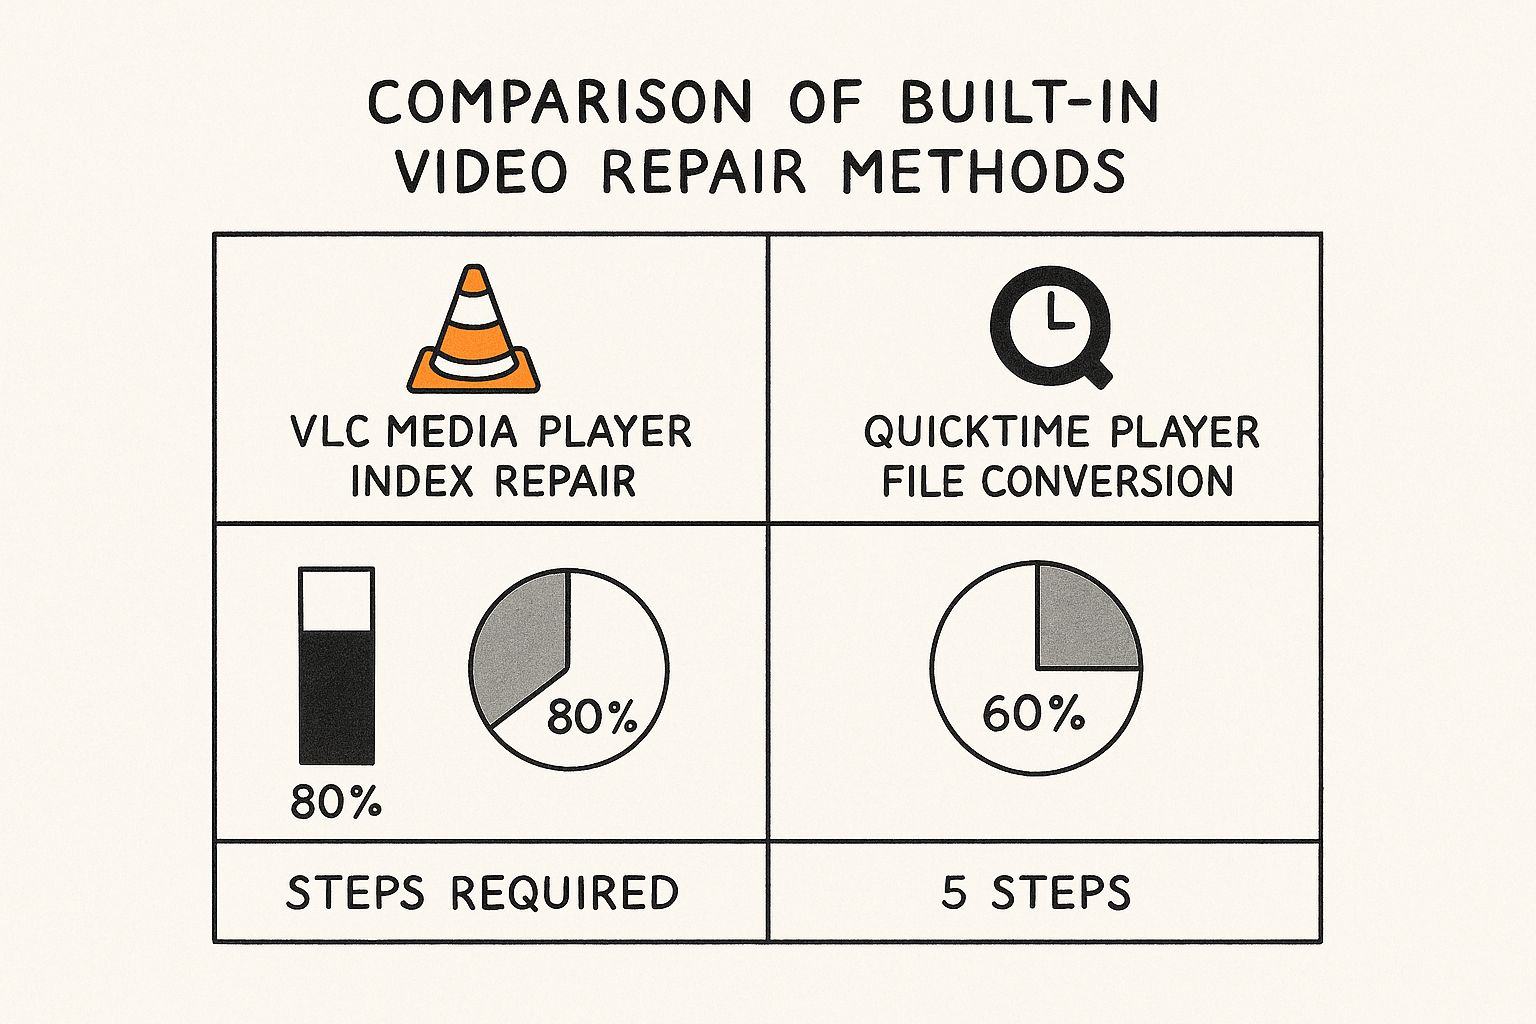
As you can see, VLC's direct index repair is not only simpler but also tends to have a higher success rate for the most common types of video corruption.
If these first-line fixes don't do the trick, converting the file format with another tool might be the answer. Sometimes, just changing a video from MOV to MP4 can resolve underlying codec conflicts that look like corruption. For anyone curious about this method, we have a complete guide on how to use HandBrake, a fantastic free video transcoder.
Using Dedicated Video Repair Software
So, you've tried the quick fixes with VLC and QuickTime, but your video is still stubbornly refusing to play. This is usually the point where it's time to bring in the heavy hitters: dedicated video repair software. These tools are built from the ground up to perform deep-level surgery on damaged files, tackling complex corruption that media players just can't handle.
Unlike media players that tack on a basic repair function as an afterthought, these applications have one job: recovery. They’re designed to analyze a file's raw binary data, figure out what’s broken or missing, and rebuild it from the inside out. This is critical when you’re dealing with a corrupted file header—the part of the file that tells a player everything it needs to know to play the video correctly.
How These Advanced Tools Work
Think of a corrupted video like a book with a torn-out table of contents and jumbled pages. You have all the content (the video data), but the instructions for how to read it in order are gone. A dedicated repair tool painstakingly pieces those instructions back together.
Most of these applications use a two-pronged approach to fix a corrupted video:
- Header and Index Reconstruction: They can rebuild a file’s essential metadata, often by analyzing the raw video and audio streams and creating a new, functional header from scratch.
- Reference File Comparison: This is the real magic. Many top-tier tools ask for a "reference" or "sample" file—a healthy video shot on the same device with the exact same settings. The software uses this good file as a blueprint to understand the correct structure, then applies that logic to the damaged one.
The reference file method is a lifesaver, especially for fixing files from cameras like GoPros or drones that often use proprietary codecs or unique file structures.
The market for these specialized tools has grown rapidly, reflecting how common the problem is. In our testing, modern video repair applications successfully recover around 70–80% of corrupted MP4 and MOV files, which are by far the most common formats people struggle with.
Choosing the Right Repair Software
Not all repair tools are created equal. Some are fantastic at fixing specific camera formats (like DJI or Canon footage), while others are more general-purpose. When you're picking a tool, you need to think about the file format you're trying to save, what caused the corruption in the first place, and the software's specific features.
To help you sort through the options, here’s a quick comparison of a few leading tools. This table breaks down what each one offers, making it easier to see which might be the best fit for your particular crisis.
Comparing Popular Video Repair Software
A feature-by-feature look at leading video repair tools to help you decide which one best fits your situation.
| Key Feature | RepairTool Pro | VideoFixer | DataMend Video |
|---|---|---|---|
| Supported Formats | MP4, MOV, AVI, M4V, MKV | MP4, MOV, 3GP, M2TS | Over 18 major formats |
| Reference File Needed? | Yes, for best results | No, uses AI analysis | Yes, required |
| Batch Repair | Yes | Yes | No |
| Preview Before Saving | Full-length preview | 1-minute preview only | Full-length preview |
| User Interface | Beginner-friendly | Moderate complexity | Simple, guided steps |
| Specialty | Drone & Action Cams | General purpose repair | Severely corrupted files |
Based on this, if you have a corrupted GoPro file, RepairTool Pro is probably your best bet. But if you're dealing with a variety of formats and don't have a sample file, VideoFixer might be the way to go. DataMend shines when other tools fail on badly damaged files.
My personal tip: Always, always use the free trial or demo version first. Nearly every reputable repair tool will let you preview the repaired video before asking for your credit card. This is the best way to confirm the software can actually fix your specific file without risking any money.
A high-quality repair application can truly be the difference between losing a crucial video forever and a successful recovery. For anyone creating content, having one of these in your digital toolkit for those worst-case scenarios is a must.
How to Prevent Video Corruption in the Future
While learning to fix a corrupted video is a great skill to have in your back pocket, the best approach is always to stop the problem before it starts. A few conscious habits can dramatically lower the chances of you ever seeing that dreaded "unplayable file" error again. Think of it as digital hygiene for your most important media.
I've learned from experience that the most common point of failure is often the simplest: yanking an external drive or SD card out too soon. You absolutely have to use your Mac’s "Eject" function before unplugging a device. This gives it the signal to wrap up any background writing processes, so your file isn't left in a fragmented, incomplete state.
Invest in Reliable Hardware
Your storage media is the foundation of your data's safety. I can't tell you how many times I've seen cheap, unbranded SD cards and ancient hard drives cause chaos. They’re notorious for developing bad sectors and failing without any warning.
Spending a little more on high-quality storage from reputable brands like SanDisk, Samsung, or Crucial is a small price to pay for peace of mind.
A stable power source is just as critical, especially during file transfers or video rendering. A single power flicker is all it takes to corrupt a massive video file halfway through the process. Using an uninterruptible power supply (UPS) for your main workstation can be an absolute lifesaver.
Prevention is about building a buffer against the unexpected. You can’t control every variable, but you can control your hardware quality, your connection stability, and your backup routine. These small steps make a massive difference.
Create a Resilient Workflow
Beyond the hardware, your day-to-day habits play a huge role. A few simple practices can fortify your files against corruption before it ever has a chance to happen.
- Verify After Transfer: Once you move a large video file, take a second to play it back on the new drive. A quick spot-check is all you need to confirm the transfer was successful and the file is intact.
- Avoid Overfilling Storage: Never cram an SD card or hard drive to its absolute limit. When drives get too full, performance can tank, making them more prone to file system errors during write operations.
- Keep Software Updated: Make sure your media players, editing software, and macOS are always up to date. These updates often contain crucial bug fixes for file handling and codec support that can prevent corruption issues.
At the end of the day, no single preventative measure is foolproof. That’s why a robust backup strategy is your ultimate safety net. A simple, automated backup to a separate drive or a cloud service ensures that even if the worst happens, you have a clean copy ready to restore. You can learn more about building an effective system by exploring different data backup strategies that fit your specific needs.
When to Hire a Professional Data Recovery Service
So, you've tried every software tool you can think of, but that corrupted video file still won't budge. It’s a frustrating spot to be in, but it doesn't always mean your footage is gone for good. This is that critical moment where it's time to stop the DIY attempts and seriously consider calling in a professional data recovery service.
Pushing forward with different software tools can sometimes make things worse, not better, especially if the root cause is a physical problem with your drive.
Knowing when to throw in the towel is key. If the storage device itself—your hard drive, SD card, or SSD—is showing signs of physical failure, no software on earth can help. The telltale signs are hard to miss: clicking or grinding noises from a hard drive, a camera that suddenly won't recognize an SD card, or a drive that just refuses to show up on your Mac. These are major red flags that signal a problem requiring specialized hardware and a cleanroom to fix.
Recognizing Severe Corruption Scenarios
Some situations are almost always beyond the reach of consumer software. These scenarios usually involve deep-level damage to the file system or physical media failure, where trying to fix corrupted video files without the right gear can lead to permanent data loss.
Here are a few classic examples where calling a professional is your best and only move:
- Physically Damaged Media: You dropped your external hard drive, or your SD card has a visible crack or bend.
- Severe Logical Damage: The drive was accidentally formatted, or it suffered a major file system crash that makes the whole thing unreadable.
- Water or Fire Damage: Any exposure to extreme environmental conditions needs immediate professional attention to stop the damage from getting worse.
Video corruption is surprisingly common. Consumer surveys in the US and EU have shown that 10% to 15% of people had at least one corrupted video file in the past year, with causes ranging from interrupted downloads to faulty storage.
The golden rule is simple: if the problem is with the hardware, stop immediately. Repeatedly trying to access a failing drive can destroy the data platters, turning a recoverable situation into an impossible one.
What to Expect from the Process
Professional data recovery services play in a completely different league. They use hardware imagers to create a perfect bit-for-bit clone of your failing drive. All recovery work is done on this clone, ensuring the original is never put at further risk. This delicate process happens in a certified cleanroom to protect the drive's internal components from dust particles that could cause catastrophic failure.
If basic troubleshooting doesn't work, more advanced issues might require a specialist. For intricate video file problems, you might need to consult a professional video editor who often has the expertise and tools to attempt repairs before recommending full data recovery services. When you do hire a recovery service, they’ll typically provide a free evaluation and a quote before any work begins, so you can make an informed decision. For irreplaceable footage, it’s an investment worth considering.
Got Questions About Video Repair? We've Got Answers.
When a video file breaks, it's easy to feel like you've hit a dead end. Questions start piling up: Is it even possible to fix this? Will the repair ruin the quality? Can I trust online tools? Let's clear up the confusion and tackle some of the most common questions that come up when you need to fix a corrupted video.
Can a Completely Unplayable Video Actually Be Fixed?
In many cases, yes. It's often a welcome surprise.
When a video file won't play, the problem usually isn't with the video itself but with its "table of contents"—the technical term is the header or index. This tiny piece of data tells your media player how to find and assemble all the video and audio information. If it's damaged, the player has no idea what to do.
Specialized repair software is designed to rebuild this structural information. Many tools can do this by scanning the raw data or by looking at a healthy video file of the same type to figure out the correct format. The one time it's truly a lost cause is if the core video data has been overwritten or completely destroyed. Your chance of success really comes down to the type of corruption and how bad it is.
Will Using a Repair Tool Lower My Video's Quality?
A good repair tool won't touch your video's original quality. Its job is to fix the file's structure, not to re-compress or re-encode the video and audio streams. Think of it as repairing the container, not changing the contents inside.
If you do see a drop in quality after a repair, it’s almost always because some of the video or audio data was already gone for good from the initial corruption. The repair tool just salvaged what was left—it can't magically recreate data that isn't there anymore.
The core purpose of a good repair tool is restoration, not alteration. It aims to return the file to its original state by fixing structural errors, leaving the actual video and audio data untouched.
Is It Safe to Use an Online Video Repair Website?
This is a classic "it depends" situation. For a quick fix on a casual vacation clip or a non-sensitive screen recording, an online tool can be incredibly convenient. No software to install, just upload and go.
But if you're working with private, confidential, or professional footage, stick with offline desktop software. It's always the safer bet. When you upload a file to a third-party server, you're introducing privacy risks. Before you use any online service, make sure you read its privacy policy and terms of service to see exactly how your data will be handled.
Why Did My Video Get Corrupted During a File Transfer?
This is one of the most common ways videos get damaged, and it's almost always because the transfer process got cut short. It can happen for a bunch of seemingly harmless reasons:
- Yanking out a USB drive or SD card before the transfer is 100% complete.
- The computer going to sleep in the middle of a big file copy.
- Your camera or phone dying mid-transfer.
- Using a cheap or frayed cable that creates a shaky connection.
To avoid this headache, always wait for the progress bar to finish. Then, use the "Eject" or "Safely Remove Hardware" function before you unplug anything. That one extra click ensures all the data has been written correctly, preventing a corrupted mess.
Once your videos are repaired, you'll want to share them. To make that faster without losing quality, give Compresto a try. It’s a powerful macOS app that makes your files smaller and easier to manage, right on your desktop. Learn more and download it at compresto.app.