A Creator's Guide: How to fix corrupted video files
You can often fix corrupted video files yourself, either by using the built-in repair features of a media powerhouse like VLC or by running the file through specialized video repair software. These tools are surprisingly good at rebuilding broken file indexes or using a healthy reference video to patch up the damaged data.
Why Your Video Files Get Corrupted and How to Spot the Signs
Nothing kills the momentum on a project like a corrupted video file. You hit play, ready to review your footage, but instead of your masterpiece, you get a cryptic error message, a black screen, or a jumble of digital garbage. It's a gut-wrenching moment, but understanding what’s happening behind the scenes is the first real step toward fixing it.
Video corruption isn't just bad luck; it’s a sign that the file's internal structure has been broken. Think of a video file like a meticulously organized book. It has a table of contents (the header and metadata), chapters (the actual video and audio data), and page numbers (the index). When any of those pieces get scrambled or go missing, the whole book becomes unreadable.
Common Culprits Behind File Corruption
Most of the time, video corruption boils down to just a few common culprits. Sudden interruptions are a big one. Imagine you’re exporting a massive 4K video from Final Cut Pro and the power flickers. That tiny blip can stop the software from writing the final, critical bits of data that tell a media player how to assemble and play everything back.
Incomplete file transfers are another notorious troublemaker. Whether you’re pulling a file down from the cloud or copying footage from an SD card, if that process gets cut short, you're left holding a partial file that's missing its proper ending. This happens all the time with cameras—yank out an SD card before the camera has finished writing, and you’ll likely find the last clip is completely unplayable.
And of course, hardware failure is always a factor. Aging hard drives, dodgy USB cables, and worn-out SD cards can all introduce tiny errors during read/write operations. These small, imperceptible glitches can pile up over time until a video file is finally rendered useless.
Recognizing the Telltale Symptoms
Spotting a corrupted file is usually easy, though the signs can vary. The most obvious is a file that just won't open at all, throwing up an error like "File could not be played" or "Unsupported format."
Other times, the file might try to play but runs into serious problems:
- Visual Glitches: You might see distorted colors, pixelated blocks, or strange screen tearing.
- Audio Sync Problems: The audio and video tracks are way off, making dialogue impossible to follow.
- Frozen Playback: The video plays for a few seconds and then just stops, though the audio might keep going.
- Incorrect Duration: Your media player shows the video's length as 0:00 or some other wildly inaccurate number.
These issues are more than just a minor headache; they can have a massive impact, especially in a professional workflow. For instance, corrupted video files can absolutely wreck AI-driven video analysis, a technology baked into many modern editing tools. In fact, one study found that file corruption caused accuracy in these models to plummet by up to 77.1%.
At higher levels of corruption, over 90% of video files became totally unplayable, underscoring just how critical reliable repair methods are. You can dive deeper into how corruption affects AI video models in this detailed study.
To help you quickly pinpoint the problem, here's a quick reference table.
Common Causes of Video Corruption and Their Symptoms
This quick reference guide helps you diagnose the likely cause of your corrupted video based on the symptoms you're experiencing.
| Cause of Corruption | Common Symptoms | First Diagnostic Step |
|---|---|---|
| Incomplete Download/Transfer | File won't open at all, or stops playing abruptly. Player shows incorrect duration. | Compare the file size to the original. A smaller size is a dead giveaway. |
| Header Corruption | Player says "unsupported format" or "cannot play file." The file may appear as 0 bytes. | Try opening it in a hex editor. If the first few bytes are all zeros, the header is likely gone. |
| Index/Container Damage | Video stutters, freezes, or has severe audio/video sync issues. Seeking is impossible. | Use a tool like VLC to attempt rebuilding the file's index on the fly. |
| Bad Sectors on Storage Media | Pixelation, blocky artifacts, or random glitches appear in specific parts of the video. | Run a disk health check on the drive (e.g., Disk Utility on macOS) to check for hardware errors. |
| Codec-Specific Errors | Video plays, but the image is distorted (e.g., wrong colors, "green screen"). Audio is fine. | Check the file's codec information using a tool like MediaInfo and ensure you have the correct codecs installed. |
By matching your symptoms to the potential causes, you can stop guessing and start applying a more targeted fix.
Key Takeaway: Understanding the why behind video corruption—whether it’s a power outage, a faulty SD card, or an incomplete download—helps you choose the right repair strategy instead of just guessing. Recognizing the symptoms early saves valuable time and prevents further data loss.
Diagnosing the Damage: Container Versus Codec Issues
Before you can fix a broken video file, you have to play detective. The first crucial step is figuring out what part of the file is actually damaged. Not all video corruption is created equal, and the problem almost always boils down to one of two culprits: the container or the codec.
Think of a video file like a package you get in the mail. The container (formats like MP4, MOV, or MKV) is the cardboard box. It holds everything together, has the shipping labels (metadata), and tells your computer what’s supposed to be inside. The codec is the actual stuff in the box—the video and audio data, all compressed down.
When the container is busted, your media player can't even "unbox" the video. The file might refuse to open at all, spit out an error message, or show a bizarre duration like 0:00. This is like getting a crushed box with a ripped-off shipping label; the post office has no idea what to do with it.
But if the codec is the issue, the file might open, but the contents are a total mess. You might see psychedelic colors, huge pixelated blocks, or hear audio that sounds like a robot gargling nails. This is like opening the box to find the item inside was shattered in transit. The package got there, but the goods are useless.
Peeking Inside Your Video File
So, how do you tell if you’re dealing with a container or codec problem? You need a tool that can look at the file's blueprint without actually trying to play it. A fantastic, free utility for this is MediaInfo. It reads the file's metadata and gives you the full rundown: container format, video and audio codecs, frame rate, you name it.
If MediaInfo can read the file and spits out all that data, your container is probably fine. The problem is likely with the video or audio streams themselves—a codec issue. If MediaInfo struggles to read the file or shows incomplete or nonsensical information, that’s a huge red flag for container corruption. Understanding the quirks of different containers can also give you clues. You can learn more about Mac video file formats in our detailed guide.
This flowchart breaks down the diagnostic process, helping you trace the problem from the first error to the specific culprit.
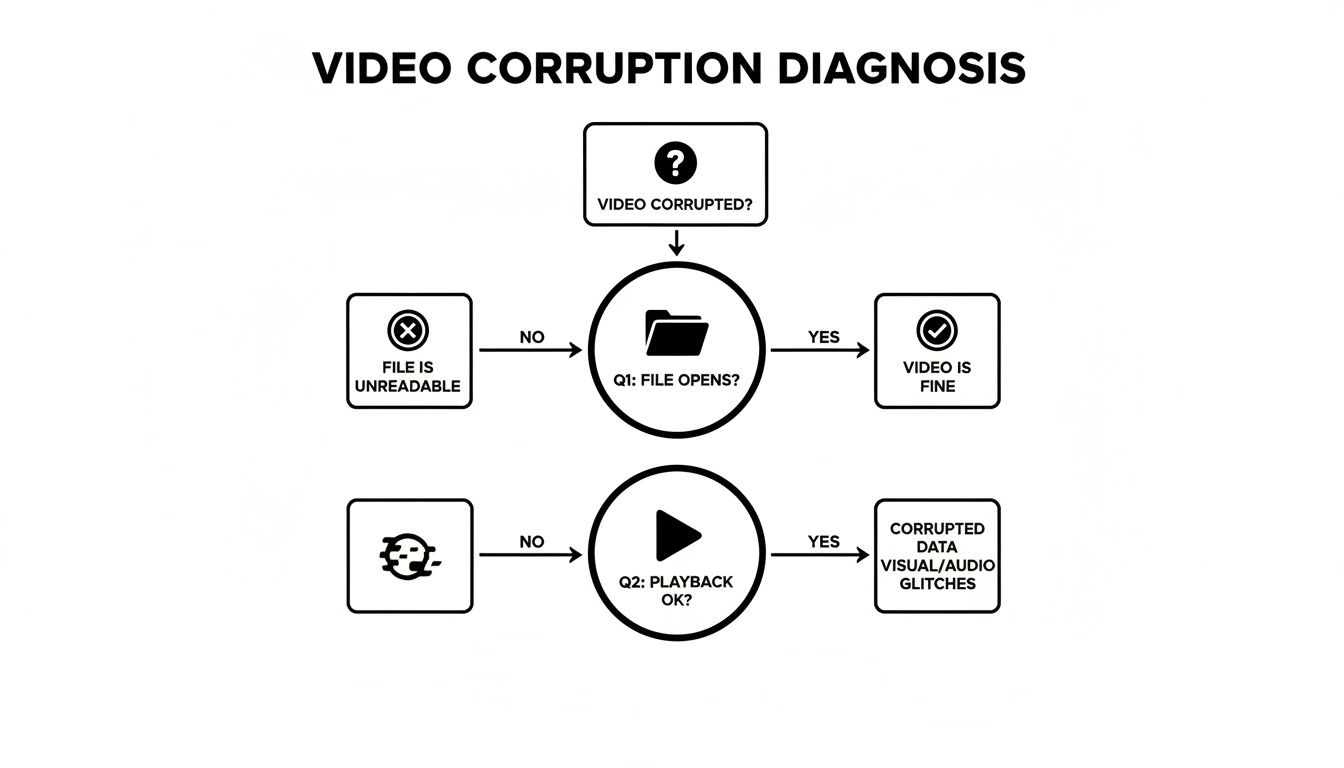
The main takeaway here is that your first big clue is whether the file opens at all. An immediate failure points to a fundamental structural problem (container), while weird playback glitches suggest a data-level issue (codec).
Common Scenarios and Their Likely Cause
Let's ground this in some real-world examples. Often, corruption stems from incomplete downloads or bad encoding, which is rampant in pirated media. In fact, videos account for over 66% of all pirated content, and these files are notorious for having damaged headers or missing indexes because a download was cut short or the initial rip was sloppy.
Between 2023 and 2024, piracy sites racked up 141 billion visits, which just goes to show the massive scale of potentially broken files floating around out there.
Pro Tip: If a video file has a ridiculously small file size for its supposed length and quality, it's almost certainly a container issue from an incomplete transfer. A 10-minute 1080p video that's only 5MB is a classic sign of a missing
moovatom or header.
Here’s how different symptoms point to one or the other:
- Error Message: "Unsupported Format" This almost always means container corruption. Your player can't even read the "wrapper" to figure out what's inside.
- Video Plays with Green Blocks and Artifacts This is a classic codec issue. The container is doing its job, but the video data itself is garbled, or the player is having a hard time decoding it.
- Audio Plays but Video is a Black Screen This one could be either, but it often leans toward a codec problem. The audio stream is readable, but the video stream is toast.
- File Won't Import into Editing Software This strongly suggests a container issue. Professional editing software is incredibly strict about file structure and will reject anything with a damaged header or index.
Pinpointing whether you have a container or codec problem isn't just a technical exercise. It directly dictates your repair strategy and helps you pick the right tool for the job, saving you a world of trial-and-error frustration.
Your Toolkit for Repairing Corrupted Videos on macOS
When a video file stubbornly refuses to play on your Mac, it's time to dig into your digital toolkit. The good news is, you've got some powerful—and often free—options right at your fingertips, capable of fixing everything from minor playback stutters to more serious file corruption.
We’ll kick things off with a tool most people already have installed, then move on to the more specialized heavy-hitters.
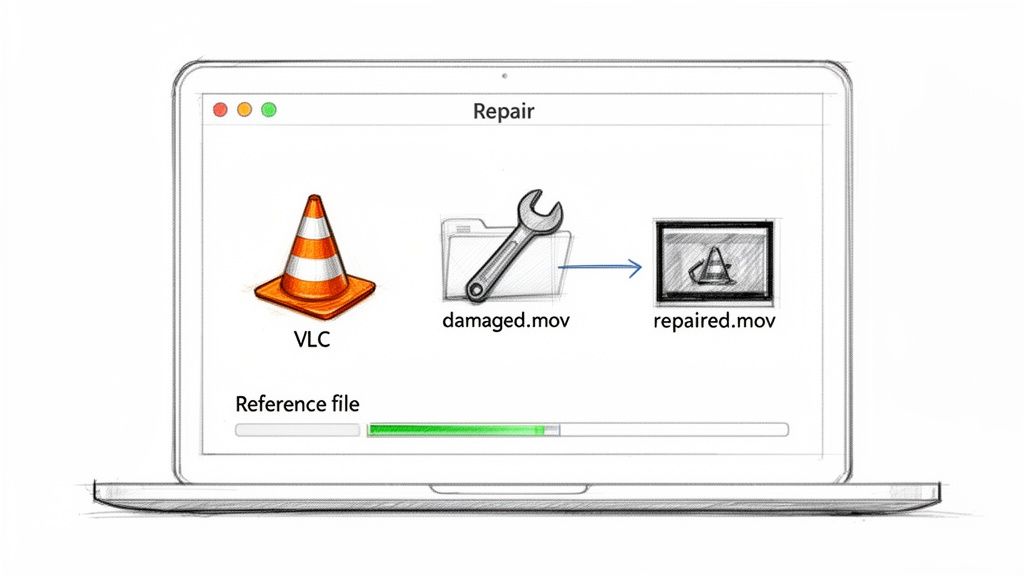
Your first line of defense is almost always VLC Media Player. It’s famous for playing nearly any file format you throw at it, but what many don't realize is that it has a surprisingly effective repair function built right in. It’s especially good at fixing container issues, like a damaged index that leaves other players clueless about how to read the file.
When you try opening a damaged video, VLC might pop up a dialog box asking if you want to "Build index then play." From my experience, simply clicking yes can be all it takes to get a broken file running smoothly again. It’s the easiest first step.
The VLC Transcoding Trick for Minor Repairs
If building a new index doesn’t cut it, VLC’s conversion feature is your next move. This process, often called transcoding, essentially forces VLC to rewrite the entire video file from the ground up. In doing so, it often cleans up the bad data and builds a fresh, healthy container.
Here's how to put this trick to work:
- Open VLC and head to File > Convert / Stream.
- Drag your corrupted video into the window or use the "Open media..." button to find it.
- In the "Choose Profile" section, pick a standard, widely-supported format like "Video - H.264 + MP3 (MP4)". Don't get fancy here; a common profile is your best bet.
- Click "Save as File," give your soon-to-be-repaired file a new name, choose where to save it, and hit Save.
This isn't just about changing the file type; it's a solid repair technique. As VLC re-encodes everything, it rebuilds the file's internal logic, often fixing the very corruption that made it unplayable in the first place.
When to Call in the Specialists: Dedicated Video Repair Software
Sometimes, VLC’s bag of tricks just isn't deep enough. That’s when you need to bring in a specialist. Dedicated video repair apps are built for one job: salvaging playable data from severely damaged files. They often succeed where general-purpose players fail, especially when you're dealing with problems like missing headers or fragmented data.
A classic scenario where these apps are a lifesaver is after recovering footage from a formatted SD card. A tool like PhotoRec might pull back the raw .mp4 data, but it often misses the crucial moov atom—the file's "table of contents." Without it, the file is completely unplayable.
This is where dedicated software shines by using a reference file.
How Reference Files Work: You give the software a healthy video file—one shot on the exact same camera with the exact same settings. The app analyzes this "good" file to learn the correct data structure, header info, and codec specifics. It then uses that blueprint to rebuild the corrupted file's missing parts.
The workflow is pretty much the same across most of these apps:
- Load Up: Add your corrupted video and the healthy reference video to the application.
- Analyze & Repair: Let the software work its magic, using the reference file to reconstruct the damaged one.
- Preview & Save: Most tools will let you preview a short clip to confirm the fix before you save the full, repaired file.
For any professional who's ever faced a camera malfunction mid-shoot or accidentally deleted crucial footage, this technique can be an absolute career-saver.
Video Repair Software Comparison for Mac Users
Deciding which tool to use often comes down to the level of damage you're dealing with and what you're willing to spend. I always start with the free options, but for really complex damage, a paid tool often delivers a much higher success rate.
Here's a quick look at some of the top video repair tools to help you pick the right one for your situation.
| Tool Name | Best For | Key Features | Price Model |
|---|---|---|---|
| VLC Media Player | Minor index or container issues, format incompatibility. | Free, cross-platform, built-in index repair and transcoding. | Free |
| Stellar Repair for Video | Moderate to severe corruption, including header damage and playback errors. | Repairs multiple files at once, uses reference files, supports all major camera brands. | Subscription / Lifetime |
| Disk Drill | Recovering and repairing files from damaged or formatted drives. | Combines data recovery with advanced camera-specific repair modules for Sony, Canon, etc. | Freemium / Pro License |
| untrunc (Command Line) | Technically savvy users with moov atom corruption. | Open-source, requires a healthy reference file, highly effective but complex to use. | Free |
Ultimately, choosing the right software depends on your needs. For most Mac users, VLC is the perfect no-risk starting point. If it can't solve the problem, investing in a user-friendly tool like Stellar Repair for Video or Disk Drill gives you a powerful way to fix corrupted video files without ever having to touch the command line.
Advanced Fixes Using Command Line Tools
Sometimes, the easy-to-use apps just can’t get the job done. When you hit that wall, it’s time to roll up your sleeves and head to the command line. For anyone comfortable in the macOS Terminal, FFmpeg is the ultimate multitool for video. It’s a free, open-source powerhouse that can manipulate, convert, and repair pretty much any video format you can throw at it.
Think of it as the surgeon’s scalpel of video repair. Where GUI apps use a sledgehammer, FFmpeg offers precision. It gives you the granular control needed to fix complex corruption that simpler apps can't even diagnose, making it an essential skill for anyone serious about video work.
Getting Started with FFmpeg on macOS
Before you can start fixing files, you need to get FFmpeg installed. The most straightforward way to do this on a Mac is with Homebrew, a package manager that makes installing command-line tools a breeze.
If you don’t have Homebrew yet, just open Terminal and paste the single installation command from their official website. Once that's set up, installing FFmpeg is just one line:
brew install ffmpeg
After the process finishes, you can check that it worked by typing ffmpeg -version. If a bunch of text pops up showing the version number and configuration details, you’re good to go. This one-time setup unlocks a massive toolkit for video repair right from your terminal.
Command One: Re-Multiplexing the Container
A lot of the time, the actual video and audio data inside your file is perfectly fine. The problem is the "container"—the .mp4 or .mov wrapper holding it all together—which has become damaged or corrupted.
FFmpeg can fix this by simply copying the video and audio streams into a brand-new, healthy container. The best part? It does this without re-encoding, so it’s incredibly fast and completely lossless.
First, navigate to the folder containing your broken video file in Terminal. Then, run this command:
ffmpeg -i corrupted_video.mp4 -c copy repaired_video.mp4
Let’s quickly break that down:
ffmpeg -i corrupted_video.mp4: This tells FFmpeg thatcorrupted_video.mp4is your input file.-c copy: This is the secret sauce. It instructs FFmpeg to "stream copy" the codecs, meaning it moves the data without altering it.repaired_video.mp4: This is the name for your new, hopefully fixed, output file.
If the corruption was just a simple container issue, this command will often fix it instantly. It should always be the first thing you try. If you want to dive deeper, you can learn more about compressing videos with FFmpeg in our other guide.
Command Two: Forcing a Specific Codec
What if a file has bad metadata? Sometimes, a file might tell a media player to use the wrong decoder, which can lead to a black screen with perfect audio, weird visual glitches, or other playback issues.
You can tell FFmpeg to ignore the faulty instructions and force the file to re-encode with a specific, known-good codec. For a standard H.264 video, the command would be:
ffmpeg -i corrupted_video.mp4 -c:v libx264 -c:a aac repaired_video.mp4
This process takes a bit longer because it’s actually re-encoding the file, but it’s a powerful way to bypass severe metadata corruption. Here, -c:v libx264 specifies the H.264 video codec and -c:a aac sets the audio to AAC, essentially rebuilding the file with clean parameters.
Pro Tip: This re-encoding method is also a lifesaver for fixing files that use old, obscure codecs that modern software has trouble playing. It effectively converts them into a universally compatible format.
Command Three: Salvaging Data from Truncated Files
Ever had a file transfer get cut short? You end up with a partial, or "truncated," video file. These are notoriously difficult to play because they’re often missing the moov atom—a kind of table of contents for the file. Without it, most players don't know where to begin.
Fortunately, FFmpeg has a command specifically for these situations:
ffmpeg -err_detect ignore_err -i corrupted_video.mp4 -c copy repaired_video.mp4
The key flag here is -err_detect ignore_err. This tells FFmpeg to plow through any errors it encounters in the file's structure and copy whatever valid data it can find into a new container. It can’t magically restore the missing parts of the video, but it can often make the portion you do have playable again. This is an indispensable trick for recovering footage from failed downloads or spotty camera transfers.
How to Prevent Video File Corruption in Your Workflow
Let’s be honest: the best way to fix corrupted video files is to avoid ever having them in the first place. Shifting your mindset from reactive repair to proactive prevention is the single most valuable investment you can make in your workflow. It's the difference between a smooth project and a stressful, time-sucking scramble to recover lost footage.
Thankfully, you don't need to be a tech wizard to build a resilient workflow. A few disciplined habits are all it takes to create a strong safety net for your valuable creative work.
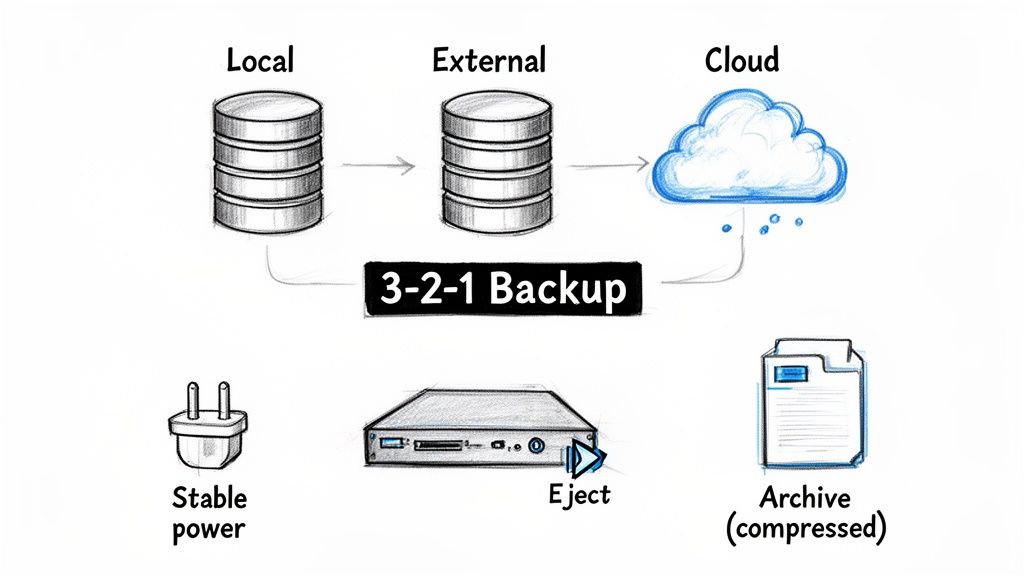
Embrace Safe Hardware Practices
The integrity of your entire workflow often starts with how you handle your physical gear. One of the most common ways people end up with corrupted files is by yanking an external drive or SD card out of their computer too soon. If the system is still writing data when you disconnect, you’re basically guaranteed to end up with a truncated, unplayable file.
Always, always use your operating system's "Eject" function before physically unplugging a drive. It’s a tiny step that ensures all write operations are complete, the file is properly closed, and its structure is intact.
Power stability is another huge factor. A sudden power outage during a file transfer or video export is a surefire way to corrupt your work. Investing in an uninterruptible power supply (UPS) for your computer and key external drives gives you a battery backup, buying you those precious few minutes needed to save everything and shut down safely.
Implement a Rock-Solid Backup Strategy
A single copy of a file isn't a backup; it’s a ticking time bomb. The undisputed gold standard for protecting your data is the 3-2-1 rule. It's a beautifully simple concept that's incredibly powerful in practice:
- Keep three total copies of your important data.
- Store these copies on two different types of media.
- Make sure one of those copies is stored off-site.
A real-world example might be keeping your current project files on your Mac's internal SSD, a second copy on a dedicated external hard drive, and a third copy synced to a cloud storage service. This kind of redundancy shields you from nearly any single point of failure, whether it’s a drive crash, a stolen laptop, or even a fire or flood at your location. If you want to dive deeper, you can explore various https://compresto.app/blog/data-backup-strategies.
This isn’t just about protecting against accidents, either. Digital threats are a growing concern. Cybercrime is projected to cost the world $10.5 trillion annually by 2025. Ransomware attacks, which often encrypt and corrupt your files, were already hitting businesses every 11 seconds back in 2021. With the sheer volume of data we all create, the risk of catastrophic loss is higher than ever.
Part of a solid prevention strategy involves adopting secure data storage practices to protect your files from both physical hardware failure and malicious software attacks.
Optimize and Verify Your Files
Before you put a project into long-term storage, take a moment to optimize it. This is where a reliable compression tool like Compresto can play a crucial role in preventing future corruption. It helps in two key ways. First, it creates smaller, more manageable files that transfer much faster and are less prone to errors during a copy, especially over a network or up to the cloud.
Second, the process of re-encoding a video into a new, optimized format can actually clean up tiny inconsistencies in the file structure—the kind of digital "bit rot" that can cause data to degrade over many years. Think of it as proofreading your file's digital DNA before locking it away in the archive.
Key Takeaway: Prevention isn't a one-time fix; it's an ongoing process. Consistently ejecting drives safely, maintaining multiple backups with the 3-2-1 rule, ensuring stable power, and compressing files before archiving are the cornerstones of a resilient workflow that safeguards your creative output.
Got Questions About Video Repair? We've Got Answers
Even with the best software, fixing a corrupted video can feel like navigating a minefield. You're bound to run into questions about codecs, containers, and repair tools. This section cuts through the noise and tackles the most common questions we hear from creators and editors, giving you straight answers to get your footage back.
We'll cover everything from the real limits of free software to knowing exactly when it's time to throw in the towel and call a pro.
Is It Always Possible to Fix a Corrupted Video File?
Unfortunately, no. Whether a file is salvageable comes down to the type and severity of the damage.
Minor issues, like a broken index or a messed-up container, are often fixable. Think of it like a book with a torn table of contents—the chapters are all there, you just need a way to access them. Tools like VLC or FFmpeg can often rebuild that index with a high success rate.
But if the core video and audio data (the mdat atom in an MP4) is gone—overwritten, fragmented from a failing drive, or just plain missing—no software can magically bring it back. You can't rebuild what isn't there.
A Pro Tip From The Trenches: Your best clue is the file size. If that 10-minute 4K clip is showing up as only a few megabytes, the actual video data is almost certainly lost for good. A full repair is a long shot at best.
Can VLC Really Fix Any Corrupted Video?
VLC Media Player is an incredible first-aid kit for video problems, but it's far from a miracle worker. Its built-in repair function is great at rebuilding a file's index, which is a very common failure point. Its transcoding feature can also rewrite a file into a fresh, stable container, which cleans up a lot of structural mess.
But VLC has its limits. It typically chokes on:
- Severely Damaged Headers: If the file's header is wiped, VLC has no idea what kind of video it's even looking at.
- Missing
moovAtoms: This is a critical piece of metadata for MP4/MOV files. Without it, VLC is usually helpless. - Codec-Level Corruption: If the actual compressed video stream is a garbled mess, VLC can't unscramble it.
Think of VLC as a fantastic general practitioner. It can handle the common cold, but for major surgery, you need a specialist.
When Should I Give Up and Seek Professional Help?
Knowing when to stop fiddling is just as important as knowing what tools to try. It's time to consider professional help when you've hit these walls:
- You've Tried Everything: You've run the file through VLC, dedicated repair software, and even command-line tools like FFmpeg, but nothing has worked.
- The Footage is Mission-Critical: This isn't just a random clip. It's for a major client, a once-in-a-lifetime event like a wedding, or has serious financial value tied to it.
- You Suspect Hardware Failure: The corruption is happening on a drive that's making clicking noises, running painfully slow, or struggling to even show up on your computer.
In these situations, continuing to run software on a failing drive can actually make things worse. If your files are irreplaceable and standard tools have failed, your best bet is to consult professional data recovery services. These experts use specialized hardware in clean-room environments to salvage data from physically failing drives, offering a last resort when all other options are off the table.
Will Repairing a Video Reduce Its Quality?
This one really depends on how you repair it.
If you're using a method that only rewrites the container or rebuilds the index without re-compressing the video and audio streams, the process is completely lossless. A perfect example is running a command like ffmpeg -c copy, which just repackages the existing data into a new, healthy container.
On the other hand, if the repair involves re-encoding (also called transcoding), there will always be some quality loss. Every time a video is compressed, a little bit of data is discarded. Modern codecs are incredibly good at minimizing this, but it’s never a perfect 1:1 process. The goal is simply to use settings that make any quality drop impossible to see while creating a stable, playable file.
The best defense is a good offense. To avoid corruption in the first place, ensuring your video files are optimized and resilient is key. Compresto helps by creating smaller, more robust files that are less likely to suffer from transfer errors. By compressing your videos before you archive or share them, you build a safer, more efficient workflow from the very beginning. Download Compresto for macOS and start protecting your work at https://compresto.app.