Compress PDF Mac Free Your Guide to Shrinking Files
Got a massive PDF that refuses to send? You don’t need to shell out for expensive software to fix it. Your Mac comes packed with some surprisingly powerful—and totally free—tools to shrink down any document, and the simplest trick is right inside the Preview app.
Your Go-To Methods for Free PDF Compression on Mac
When you need to compress a PDF on your Mac without spending a dime, you’ve got a few great choices. The real trick is knowing which tool to grab for the job at hand. Are you just trying to get a big file under the email attachment limit, or are you putting together a professional portfolio where every pixel counts? Your answer points the way.
H3: The Quick Fix: Preview App
For most of us, most of the time, the built-in Preview app is the perfect starting point. It offers a one-click solution that works wonders on documents loaded with images, like scanned receipts or long reports. This method is all about getting it done fast.
H3: For Fine-Tuned Control: Custom Quartz Filters
But sometimes, Preview’s default compression is a bit too heavy-handed and can crush the quality. For moments like those, macOS has a powerful, lesser-known feature: custom Quartz Filters. By digging into the ColorSync Utility, you can create your own compression settings to dial in the exact image quality and resolution you need. This is a game-changer for designers, photographers, or anyone who needs to balance file size with visual fidelity.
H3: For Bulk Jobs: Automator
Finally, if you’re staring down a folder with dozens—or even hundreds—of PDFs, compressing them one by one is a non-starter. This is where Automator shines. It lets you build a simple workflow to batch compress entire folders of PDFs at once, saving you a massive amount of time and repetitive clicking.
This little visual guide helps break down which tool is best for a quick fix, fine-tuned control, or tackling a bunch of files at once.
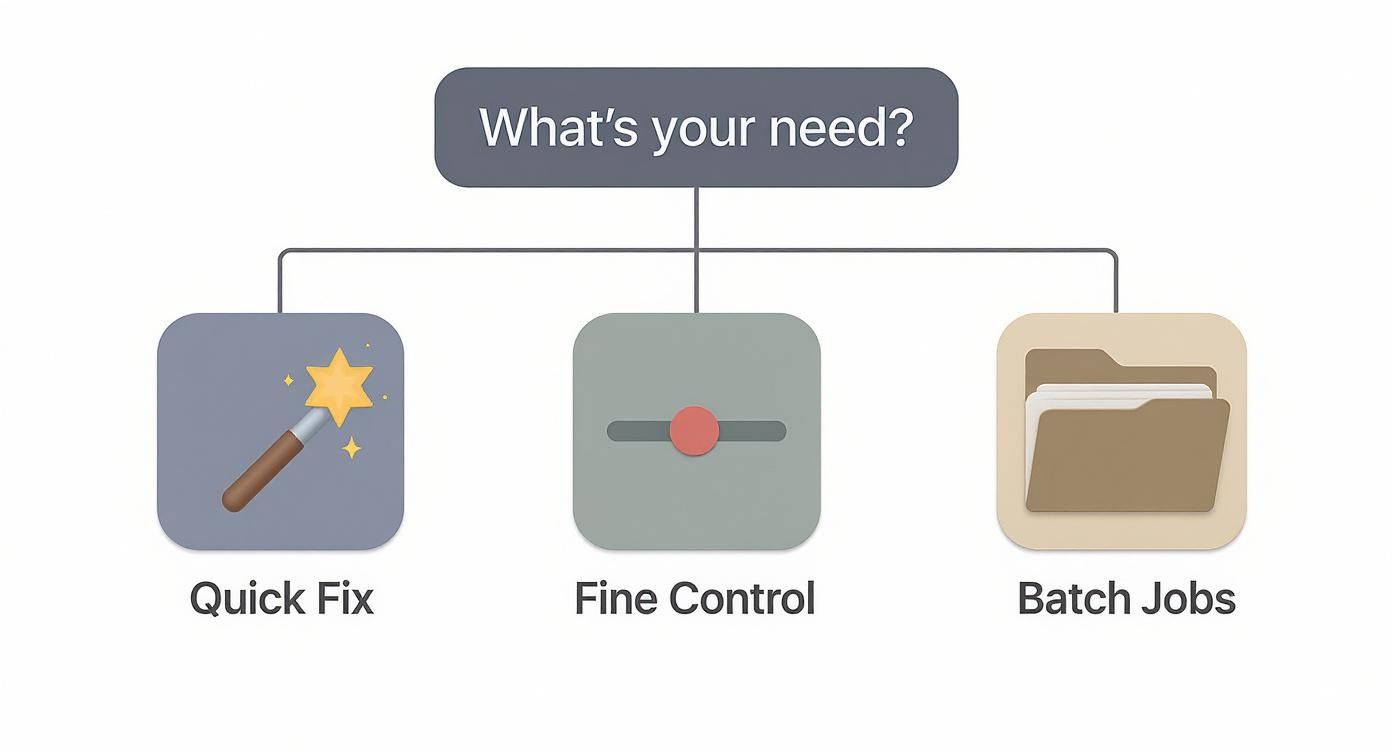
As you can see, for simple, everyday tasks, Preview is your best bet. When things get more complex, it's time to look at Quartz Filters or Automator.
H3: Comparing Free Mac PDF Compression Tools
To make the choice even clearer, it helps to see how these three native macOS tools stack up against each other. Each one has its own strengths, depending on what you need to accomplish.
Here’s a quick look at how they compare.
| Method | Best For | Ease of Use | Customization Level |
|---|---|---|---|
| Preview App | Quick, single-file compression and image-heavy documents. | Very Easy | Low |
| Quartz Filters | Balancing file size with specific image quality needs. | Medium | High |
| Automator | Compressing multiple PDFs in a single batch process. | Medium | Moderate |
Ultimately, knowing which tool to reach for is half the battle. With these three options, you're well-equipped to handle just about any PDF compression task that comes your way.
Using Preview for Quick and Easy PDF Compression
When you need to compress a PDF on your Mac for free, your first stop should be an app you already have: Preview. It’s the fastest, most direct way to shrink a file without downloading anything extra.
This built-in tool is perfect for everyday situations, like when you’ve got a massive, image-heavy user manual that you need to email without getting a bounce-back message. The process is refreshingly simple—no complex menus or technical jargon, just a couple of clicks.
The Standard Compression Process
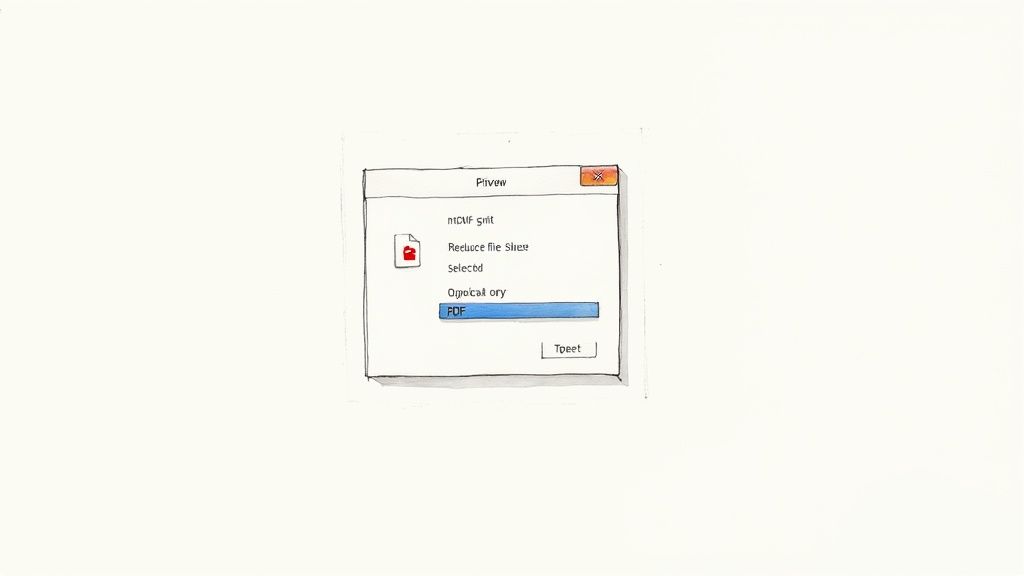
The magic here happens in the "Export" function, which hides a handy tool called a Quartz Filter. This filter is what does all the heavy lifting, analyzing your PDF and aggressively compressing the images inside it to cut down the file size.
Here's how you put it to work:
- First, open your big PDF file in the Preview app.
- Head up to the menu bar at the top of your screen, click File, and then choose Export.
- A dialog box will pop up with a few options. Look for the Quartz Filter dropdown menu.
- From that menu, just select Reduce File Size.
- It’s a good idea to give your new, smaller file a slightly different name so you don't overwrite the original.
- Click Save, and you're done.
This creates a brand-new, compressed copy of your document, leaving your original high-resolution version completely untouched. For more tips on working with PDFs, check out our guide on how to create a PDF on Mac.
Crucial Pro-Tip: Always duplicate your PDF before you start messing with it. While the "Export" method creates a new file, it’s far too easy to accidentally hit "Save" instead. A backup ensures your high-quality original is always safe.
A Real-World Scenario
Let's say you just finished scanning a 20-page product manual, and the PDF is a whopping 20 MB—way too big to attach to a standard email.
By running it through Preview’s "Reduce File Size" filter, you can often get that file down to under 5 MB, making it perfect for sharing. The text will stay sharp, and while the images might lose some of their crispness, they'll still be perfectly fine for viewing on a screen.
As you can see, the "Quartz Filter" is the key. This is the setting that tells Preview how to shrink the file.
The growing need for tools like this is pretty clear from market trends. The global PDF Compression Software market, valued around $1.2 billion, is expected to soar to $3.4 billion. It just goes to show how critical efficient document management is for everyone.
But Preview isn’t perfect. The biggest drawback here is the lack of control. The "Reduce File Size" filter is an all-or-nothing deal; it’s aggressive, and you can’t fine-tune the compression level. If your PDF is a design portfolio filled with high-quality photos, this method will probably degrade them more than you'd like.
Creating Custom Quality Settings with Quartz Filters
Preview's default "Reduce File Size" option is a great quick fix, but let's be honest—it's a sledgehammer. It crushes your PDF's size but often takes image quality down with it. For documents where clarity matters, like a design portfolio or a scanned blueprint, that one-size-fits-all approach just doesn't cut it.
This is where you can get clever and compress a PDF on your Mac for free with real precision. We're going to create a custom Quartz Filter.
The secret weapon here is a little-known app already on your Mac: the ColorSync Utility. By building your own filter, you're essentially creating a reusable preset. It will show up right inside Preview's "Export" menu, giving you a personalized, one-click solution that’s perfectly tuned to your needs.
Accessing the ColorSync Utility
First things first, you need to find this hidden gem. It's not an app you'd normally open, but for this task, it's exactly what you need.
- Open Finder and head to your Applications folder.
- From there, open the Utilities folder.
- Double-click to launch the ColorSync Utility application.
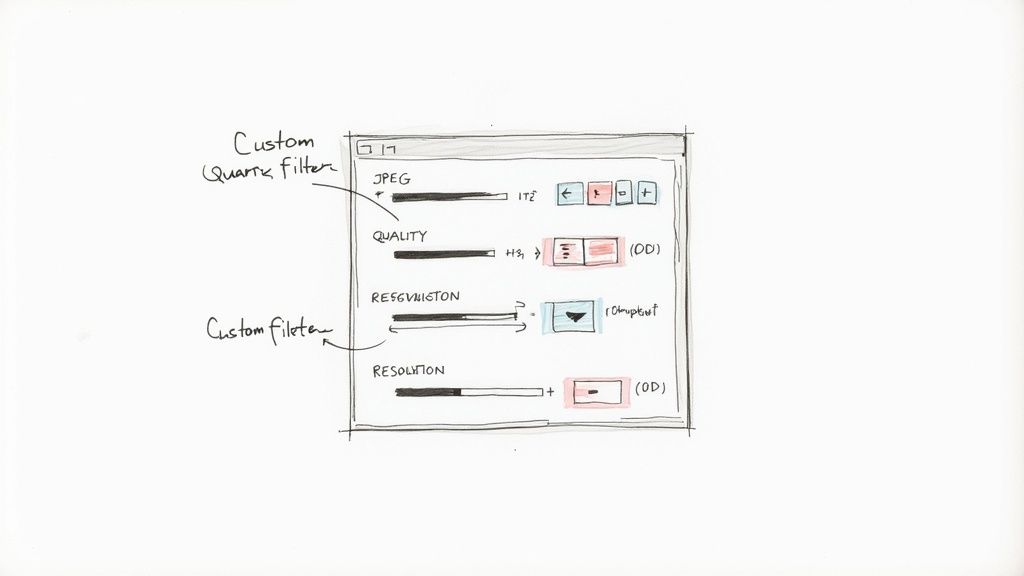
Once it’s open, click the Filters tab at the top. You'll see a list of default filters, including the familiar "Reduce File Size." To make your own, just click the small plus icon at the bottom of that list. A new, untitled filter will pop right in.
Fine-Tuning Your Compression Settings
This is where the magic happens. You now have total control over the balance between file size and image quality. After creating your new filter, you can tweak a few key components to cook up the perfect compression recipe.
Start by giving your filter a name you'll remember, like "High-Quality Web PDF" or "Portfolio Compression." Next, click the little downward arrow next to its name to see all the adjustment options. The one we care most about is Image Compression.
Here are the key settings to play with:
- Mode: Go ahead and set this to JPEG. It gives you the best bang for your buck when compressing photos and other complex images inside your PDF.
- Quality: This slider is the main event. Pull it left for smaller files and lower quality, or push it right for better quality and bigger files. A setting around 75% is a fantastic starting point that often hits the sweet spot.
- Image Sampling: This lets you cap the maximum resolution for images. For documents you know will only be viewed on a screen, setting "Scale to" 150 Pixels/Inch (DPI) works wonders.
Expert Tip: Don't just create one filter. I recommend making a couple. Start with one named "Medium Quality" at 75%. Then, duplicate it and create a "Low Quality" version at 50% for those times when getting the smallest possible file size is all that matters.
Once you’ve dialed in your settings, the filter saves automatically. No "save" button needed.
The next time you open a PDF in Preview and go to File > Export, your custom-made filter will be waiting for you in the Quartz Filter dropdown. Just like that, you’ve got a reliable, personalized way to shrink PDFs without sacrificing quality.
How to Batch Compress PDFs with Automator
When you're staring at a folder packed with huge PDFs, compressing them one by one is a soul-crushing task. I've been there. Maybe you're an accountant archiving a year's worth of scanned receipts or a researcher trying to wrangle hundreds of academic papers. This is exactly where macOS gives you a secret weapon: Automator.
Automator is one of those powerful, built-in tools most people never touch, but it's perfect for creating custom workflows. For this job, we'll build something called a "Quick Action." It adds a new option right into your right-click menu in Finder, so you can compress a whole batch of PDFs with a single click. It's a game-changer for repetitive work.
Building Your First Quick Action
Don't worry, this isn't as technical as it sounds. You’re basically just dragging and dropping puzzle pieces together to tell your Mac what to do. No coding required.
First, you need to open Automator. The quickest way is with Spotlight (Command + Spacebar), just type "Automator" and hit Enter. You can also find it tucked away in your Applications > Utilities folder.
Once it's open, create a new document and make sure you choose Quick Action as the type.
Now, we need to tell this new action what kind of files it should work on. At the very top of the workflow panel, change "Workflow receives current" to PDF files and set the location "in" to Finder. This ensures your new command only shows up when you've actually selected PDFs.
Assembling the Compression Workflow
With the basics set up, it's time for the fun part—building the actual workflow. The panel on the left has a huge library of actions your Mac can perform.
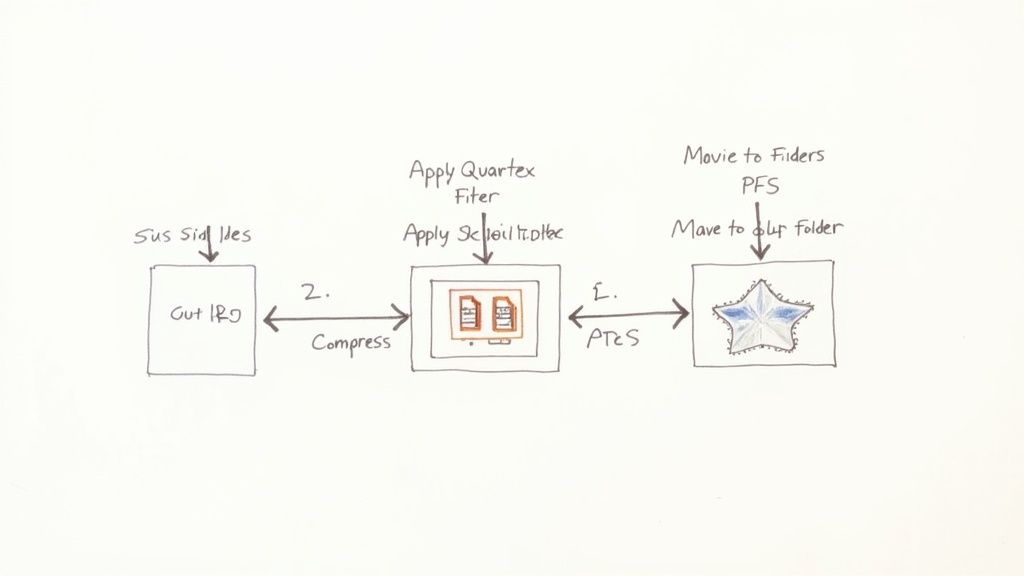
- Keep Your Originals Safe: The first thing you should always do is make a copy. Find the Copy Finder Items action and drag it into the main workflow area. This step is critical—it duplicates your files before compressing them, so your high-quality originals are never touched. I usually have it save the copies right to my Desktop for easy access.
- Add the Compression Step: Next, search for the Apply Quartz Filter to PDF Documents action. Drag it into the workflow, placing it right below the "Copy Finder Items" step. This is where the magic happens. From this action's dropdown menu, you can pick the standard "Reduce File Size" filter. Better yet, if you created a custom Quartz Filter in ColorSync Utility earlier, you can select that here for total control over the compression quality.
After saving the Quick Action with a name you'll remember (like "Compress PDF Batch"), it will instantly be available anytime you right-click a PDF file in Finder.
This kind of automation isn't just a neat trick; it's becoming a core part of modern business. The PDF software market was valued at USD 2.39 billion and is on track to hit USD 7.12 billion, largely because companies are adopting digital document workflows to save time and money. You can discover more insights about this growing market and how it’s changing efficiency.
By taking just a few minutes to set this up, you've built a permanent tool that will save you from hours of boring, repetitive clicks down the road.
While your Mac’s built-in tools are great for most quick jobs, sometimes you need a different angle. Web-based services can be incredibly convenient, and for those who like to get their hands dirty, command-line tools offer a level of precision that GUI apps just can't match.
Diving into these options can help you find the perfect way to compress a PDF on your Mac for free, especially when you're dealing with unique files or want to automate the whole process.
https://www.youtube.com/embed/JtEvCWJX5qw
Navigating Online PDF Compressors
The appeal of online tools is obvious: just drag, drop, and download. No software to install, and the whole thing is over in seconds. It's no surprise that cloud-based PDF tool usage has shot up by 200% since 2020, largely driven by small businesses and schools who need quick, accessible solutions.
But that convenience comes with a huge trade-off: privacy. The moment you upload that document, you're sending it to a server you don't control.
A Quick Word on Security: Never, ever upload sensitive documents to a free online service. For things like contracts, financial records, or anything with personal info, stick to offline methods like Preview or Automator. That way, your files never leave your machine.
For non-sensitive files, plenty of reputable services use encryption and have clear data-deletion policies. Just do a little homework before you upload.
Using the Command-Line with Ghostscript
For anyone comfortable in the Terminal, the command line offers surgical control. One of the most powerful open-source tools for this is Ghostscript, a workhorse processor for PostScript and PDF files. Once you have it installed (usually a quick job via Homebrew), you can shrink a file with a single command.
Here’s a simple one you can copy and paste to get started:
gs -sDEVICE=pdfwrite -dCompatibilityLevel=1.4 -dPDFSETTINGS=/ebook -dNOPAUSE -dQUIET -dBATCH -sOutputFile=output.pdf input.pdf
Let's quickly break that down:
gs: This is just the command to run Ghostscript.-sDEVICE=pdfwrite: Tells Ghostscript to process the file and spit out a new PDF.-dPDFSETTINGS=/ebook: This is the magic ingredient. It applies a preset that balances quality and size, targeting around 150 DPI, which is perfect for on-screen viewing. You can also try/screen(lower quality, smaller file) or/prepress(higher quality, bigger file).-sOutputFile=output.pdf: This sets the name for your new, compressed PDF.input.pdf: Just swap this with the actual name of your file.
This method is a dream for developers, sysadmins, or anyone who wants to script and automate their compression workflows. While Ghostscript is all about PDFs, some general file optimization services can also come in handy. For instance, shortgenius is a tool that can help with broader file shortening needs.
If you're looking for more ways to manage your documents, you might also want to check out our comparison of the best free PDF editors for Mac.
Common PDF Compression Questions Answered
When you're trying to compress a PDF on your Mac, free tools can feel like a lifesaver. But they often bring up a lot of questions. Let's tackle some of the most common frustrations and clear up the confusion so you can get the results you're after.
Why Did My PDF Quality Drop So Much?
This is the number one issue people run into, especially when using Preview's default "Reduce File Size" filter. That tool is built for one thing and one thing only: making the file as small as humanly possible.
It aggressively downsamples images, which is fine for a text-heavy document but absolutely destroys a visual portfolio or a high-resolution scan. The results are often blurry, pixelated, and unusable for professional work.
The best fix is to create your own custom Quartz Filter using the ColorSync Utility, like we covered earlier. This gives you direct control over the JPEG quality slider and DPI settings, letting you find a perfect middle ground instead of settling for the default, overly aggressive setting.
Is It Safe to Use Free Online PDF Compressors?
Honestly, it depends entirely on the service you choose. The reputable online tools use HTTPS encryption and have clear privacy policies stating they delete your files from their servers after a few hours.
But the risk is never zero. We strongly recommend sticking to well-known providers and never uploading confidential documents. For anything sensitive—like contracts, financial statements, or personal records—always use offline Mac tools like Preview or Automator. Your files never leave your device, so you stay in complete control.
Why Did My PDF File Size Barely Change?
It’s incredibly frustrating when you run a file through a compressor and the size barely budges. This usually happens for one simple reason: your PDF is already optimized.
If the document is mostly text and vector graphics, there just isn't much data for the compression algorithms to remove. These algorithms are designed to target large, unoptimized images, which is where the biggest savings come from.
If your file is still too big, here are a few things to try:
- Check for Hidden Layers: Some PDFs, especially those from design software, have hidden layers or metadata that add bulk.
- Downsample Images Manually: If you know large images are the culprit, use a custom Quartz Filter to manually lower their resolution (e.g., from 300 DPI to 150 DPI). This often has a much bigger impact than JPEG compression alone.
- The "Print to PDF" Trick: Re-saving your file by using the "Print to PDF" function can sometimes "flatten" it, stripping out unnecessary data in the process.
Thinking about how much space your files take up is a huge part of good digital hygiene. For a deeper dive, check out this guide to understanding your digital storage needs. And if your workflow involves marking up documents, you can learn how to add notes to a PDF without accidentally bloating its size.
Ready to reclaim your disk space without the hassle? Compresto compresses PDFs, images, and videos right on your Mac, ensuring your files never leave your device. With batch processing and a simple drag-and-drop interface, it's the fastest way to shrink files while preserving quality. Get your free trial at https://compresto.app.