How to compress pdf size mac Without Losing Quality
The fastest way to compress PDF size on a Mac is often right under your nose: the built-in Preview app. Just open your PDF, head to File > Export, and choose the "Reduce File Size" option from the Quartz Filter dropdown. It's a simple, free method that works in a pinch for basic needs like emailing documents.
Why and When You Need to Compress PDFs on Mac
Have you ever tried to email a crucial proposal only to be hit with that dreaded "file size too large" error? Or maybe you've waited an eternity for a portfolio to upload to a job application site. These are the classic digital roadblocks that make knowing how to shrink a PDF on your Mac so essential.
Large PDFs don't just create sharing headaches. They also eat up valuable storage on your hard drive and can make your cloud backups painfully slow.
The need for smaller PDFs touches nearly every profession. Designers, architects, and photographers are constantly juggling image-heavy files that can quickly balloon in size. A common scenario is creating a professional portfolio, like an interior design showcase, which is packed with high-resolution images. If you're looking for ideas, there are some great interior design portfolio template sources out there to get you started.
What Happens During PDF Compression
So, what’s actually going on when you compress a PDF? It’s not magic—it's a process of smart optimization. The software looks at what’s inside the file and makes a few strategic trims:
- Image Downsampling: High-resolution images are usually the main culprit behind a bloated PDF. Compression scales them down to a more web-friendly DPI (dots per inch), drastically cutting the file size without a noticeable loss in on-screen quality.
- Data Redundancy Removal: PDFs can carry around a lot of extra weight, like hidden duplicate data or unnecessary metadata. Compression tools find and strip out this excess baggage.
- Font Subsetting: Instead of embedding entire font families (every single character), the file might be tweaked to only include the specific characters actually used in the document.
This quick decision tree breaks down the most common reasons you'd need to compress a PDF.
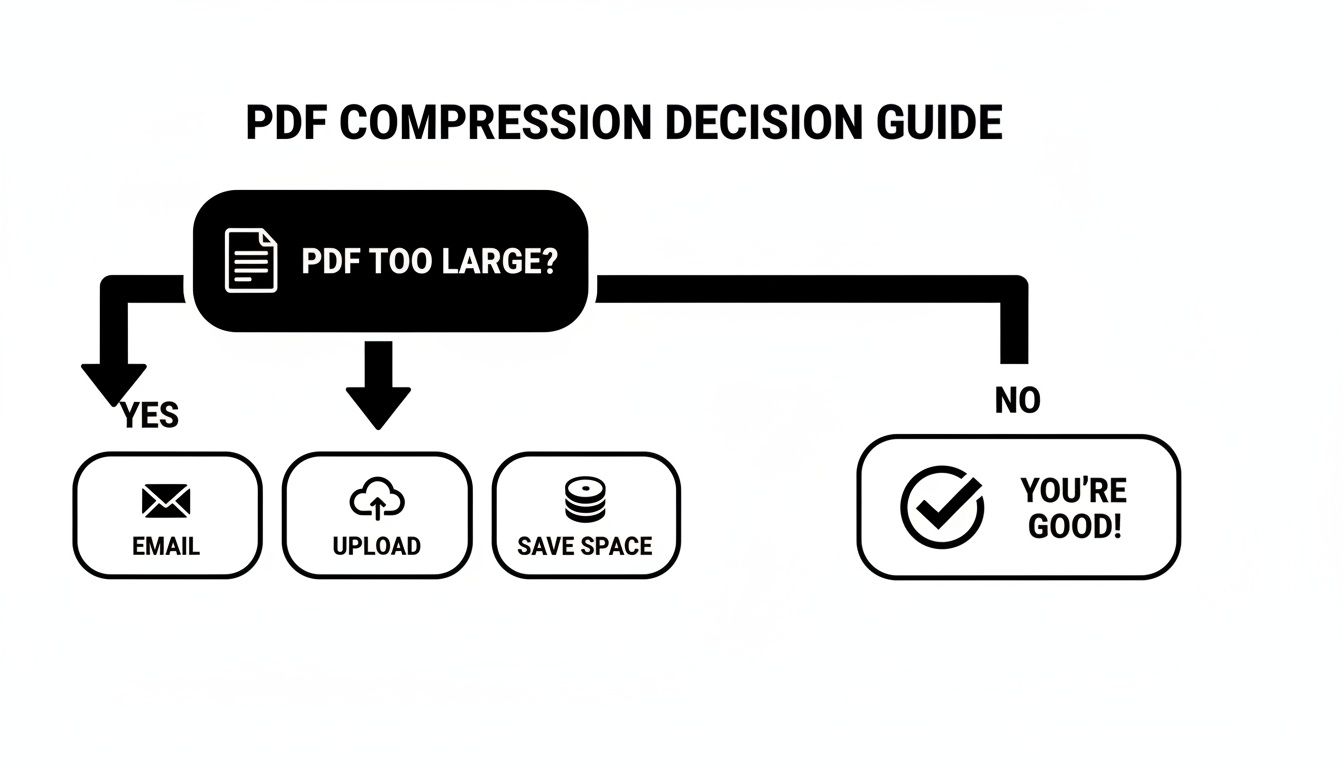
As you can see, the main drivers are practical: emailing, uploading, or simply archiving files more efficiently. And if you're starting from scratch, it helps to build your documents with optimization in mind. Our guide on how to create a PDF on a Mac can get you started on the right foot.
Your Mac PDF Compression Options at a Glance
Before diving into the step-by-step methods, it helps to get a bird's-eye view of the tools available. Each one has its strengths, whether you need a quick fix, fine-grained control over quality, or the ability to process hundreds of files at once.
| Method | Best For | Quality Control | Batch Processing |
|---|---|---|---|
| Preview App | Quick, simple, one-off compressions for non-critical files. | Low (one-size-fits-all) | No |
| Quick Actions | Creating reusable shortcuts for routine compression tasks. | Low to Medium | Yes (with setup) |
| Command Line | Power users who need scripting and precise control. | High (very granular) | Yes (scriptable) |
| Compresto | Balancing high-quality results with speed and ease of use. | High (presets & sliders) | Yes (drag & drop) |
This table should help you quickly decide which tool is the right fit for your immediate needs. For a simple email attachment, Preview is perfect. For a professional portfolio where quality is key, something like Compresto gives you the control you need.
Using Built-In macOS Tools for Quick Compression
Your Mac actually has some surprisingly decent tools for basic PDF compression, tucked away right under your nose. These methods are perfect when you just need a quick, no-fuss way to shrink a PDF without having to hunt down and install new software.
We'll start with the fastest option, the Preview app, and then move on to building a more refined, reusable tool with Automator that will save you a ton of time in the long run.
The Preview App Method: A Double-Edged Sword
The most direct route to a smaller PDF is using Preview, the default app for viewing PDFs on macOS. It’s incredibly fast for a one-off task, but it comes with a pretty big trade-off.
Getting it done is simple enough:
- Open your PDF file in the Preview app.
- Head up to the menu bar and select File > Export.
- In the export window that pops up, find the Quartz Filter dropdown.
- Choose Reduce File Size from the list.
- Give your file a new name (so you don't overwrite the original!) and hit Save.
This little trick can produce some seriously impressive size reductions, sometimes shrinking a file by over 90%. The problem? This efficiency comes at a cost. The "Reduce File Size" filter is a blunt instrument. It hammers down on image quality, often leaving visuals looking pixelated, blurry, and just plain bad.
It's a great option for documents that are mostly text, but if your PDF contains a portfolio, a presentation, or any other important visuals, the quality loss is usually a deal-breaker.
My Personal Takeaway: I use Preview's compression for things like signed contracts or text-only reports I need to email quickly. For anything where visual quality matters, I always turn to a more controlled method.
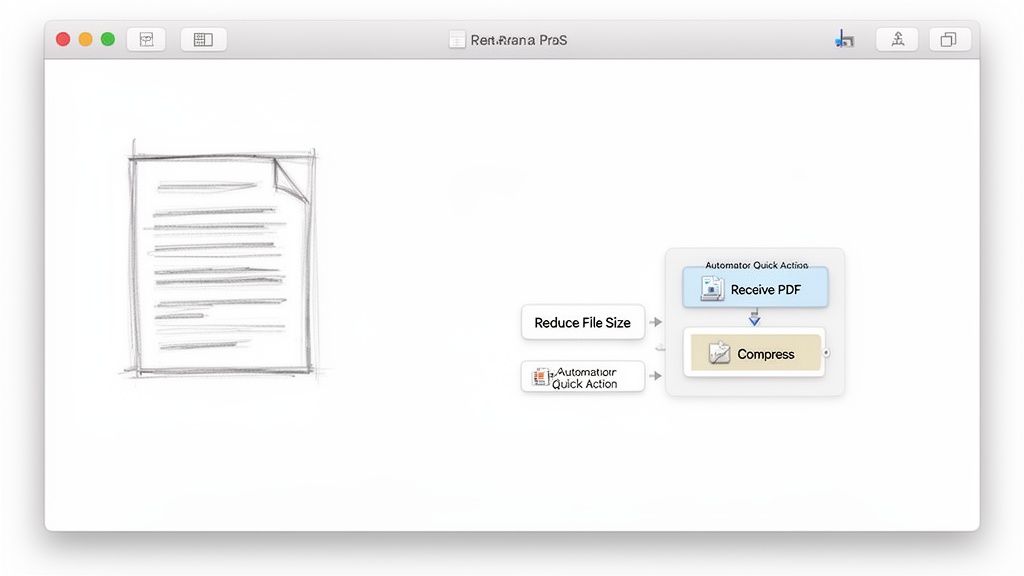
Building a Better Tool with Automator Quick Actions
So, what if you want a bit more control than Preview gives you, but you don't want to open a separate app every time? This is where Automator comes in handy. You can create a custom Quick Action that lives right in your right-click menu, giving you a repeatable, one-click shortcut for compressing PDFs.
Setting up a Quick Action is a one-time task that pays dividends down the road. It lets you apply a specific set of compression rules with just a couple of clicks, directly from the Finder.
How to Create Your Compression Shortcut
Let's walk through building a simple Quick Action that takes any PDF you throw at it and shrinks it down.
- Open the Automator app (you can find it in your Applications folder or search for it with Spotlight).
- Click New Document, then select Quick Action and click Choose.
- At the very top of the workflow window, change the settings so that "Workflow receives current" is set to PDF files in Finder. This tells your action what kind of files to expect.
- From the Actions library on the left, search for Apply Quartz Filter to PDF Documents and drag it into the main workflow area on the right.
- In this action block, you can leave the filter set to the default "Reduce File Size." If you're feeling adventurous, you can even create your own custom filters in the ColorSync Utility for more granular control over the quality.
- Finally, go to File > Save and give your Quick Action a memorable name, like "Compress PDF."
That's it! Now, you can simply right-click any PDF file in Finder, go to Quick Actions, and select your newly created "Compress PDF" action. It will instantly create a compressed version of the file in the same folder. This is a fantastic way to streamline your workflow for routine tasks.
For even more powerful free compression methods, you can check out our detailed guide on how to compress a PDF on Mac for free.
Go Pro with Compresto for Superior Compression
When you need to shrink a PDF without turning it into a blurry mess, the built-in macOS tools often don't cut it. They're fine for a quick, rough trim, but for anything that needs to look professional, you'll want a dedicated app. This is exactly where Compresto comes in. It's designed specifically to compress PDF size on a Mac without the quality headaches, bridging the gap between Preview's blunt approach and the hassle of command-line tools.
What makes specialized software better? It's all in the algorithms. Instead of just hammering down the quality on every single image, a tool like Compresto intelligently analyzes the PDF's content. It can selectively optimize different elements, preserving crisp text and sharp graphics while still slashing the overall file size.
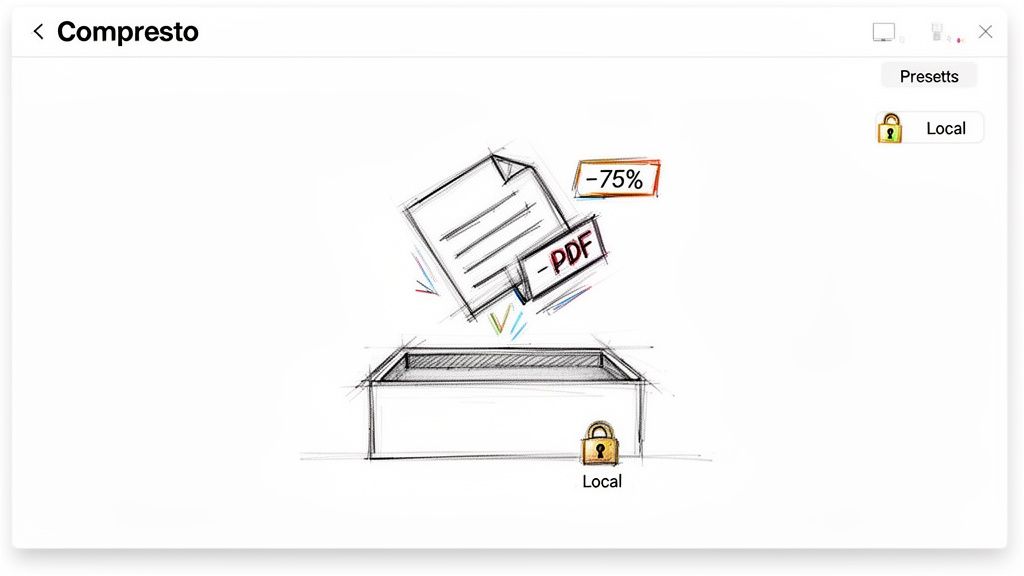
Find the Perfect Balance with Presets and Controls
Compresto’s real strength is how it combines power with simplicity. The whole workflow is built around a drag-and-drop interface, so you can get started in seconds. No digging through confusing menus or writing scripts—just drop your file in and pick your setting.
The app gives you a few presets that work great as a starting point:
- Low Quality: This is your go-to for maximum file size reduction, perfect for when visual fidelity just isn't a priority.
- Medium Quality: A solid middle-ground option. It gives you significant file savings with very little noticeable loss in quality.
- High Quality: The best choice for professional documents where every detail needs to be preserved.
If you need to fine-tune things, you can take manual control. A simple slider lets you dial in the exact balance between file size and image quality, and you can even see the estimated output size before you hit "Compress."
A Real-World Workflow for Professionals
Picture this: you're a designer ready to send a 150 MB branding proposal to a client. Trying to email it is a non-starter, and even cloud-sharing links can be a pain for clients trying to view it on their phone. With Compresto, this problem disappears.
You just drag the proposal into the app, choose the "High Quality" preset, and let it run. In a matter of seconds, the app can shrink a file like that by 70-80%. That bulky 150 MB file becomes a clean, easy-to-share 30-45 MB attachment, and the logos and mockups inside still look sharp.
A huge plus for professionals is that Compresto processes everything locally on your Mac. Your sensitive client proposals, financial reports, or legal documents never get uploaded to a server, guaranteeing total privacy and security.
Unlock Efficiency with Batch Processing
One of the biggest time-savers is the ability to process a bunch of files at once. Got a whole folder of project documents or a month's worth of invoices you need to archive? Just drag the entire folder into Compresto. The app queues them up and compresses them one by one, saving you from the mind-numbing task of doing each file individually.
This feature is a game-changer for anyone who deals with a high volume of PDFs. You can learn more about how Compresto is the right choice for compressing a wide variety of large digital files in our detailed guide.
The need for tools like this is growing. The global PDF Editor Software Market, valued at USD 4.77 billion in 2025, is projected to hit USD 10.01 billion by 2032, driven by the demand for better document management. This trend just highlights how crucial effective PDF compression has become for professionals on platforms like macOS. You can dig into more insights on this expanding market and its drivers.
Take Your Workflow to the Next Level with Batch Processing and Automation
If you’re a pro who juggles dozens of PDFs every day, compressing files one by one is a massive time-waster. That’s where a little bit of automation can completely change your workflow. By setting up a "set it and forget it" system, you can let your Mac handle the compression in the background, freeing you up for more important things.
We're going to look at two fantastic ways to do this: a super user-friendly method using automated folders in Compresto, and a more technical, scriptable approach for those who love the command line.
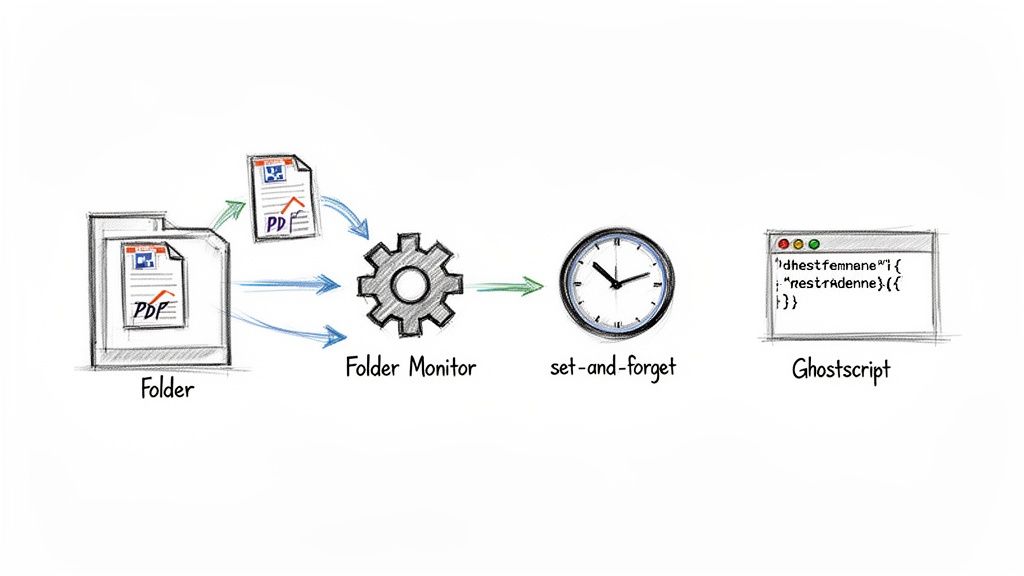
Set Up an Automated Watch Folder
Imagine having a magic folder on your Mac. Anytime you drop a PDF into it, the file instantly gets compressed and moved, all without a single click. That’s exactly what Compresto's Folder Monitoring feature delivers. It’s an incredibly slick way to manage a constant stream of documents like design proofs, client reports, or scanned invoices.
Getting it running is dead simple:
- First, open up the Folder Monitoring settings in Compresto.
- Next, pick a source folder—this is where you’ll drop your original, uncompressed PDFs.
- Then, choose a destination folder for the freshly compressed files.
- Finally, select your go-to compression preset, like "Medium Quality."
Once you flip it on, Compresto keeps an eye on that source folder. The second a new PDF lands in it, the app springs into action, compressing it and sending it straight to the destination folder. It's a lifesaver for teams sharing assets over a network; just create a shared "to-be-compressed" folder, and the optimization happens for everyone automatically.
Get Your Hands Dirty with Ghostscript on the Command Line
For developers, sysadmins, or anyone who feels at home in the Terminal, command-line tools offer the ultimate power and flexibility. Ghostscript is a seriously powerful open-source tool for handling PostScript and PDF files, and you can use it to compress PDF size on a Mac with surgical precision.
This route isn't for the faint of heart. It requires installing Ghostscript (usually through a package manager like Homebrew) and getting comfortable with commands. The payoff, though, is total control and the ability to bake PDF compression right into larger, automated scripts or back-end processes.
Why bother with the command line? While a GUI is easier for one-off tasks, command-line tools are scriptable. That means you can build them into other workflows, like a server-side process that automatically optimizes every PDF a user uploads.
Here’s what a typical Ghostscript command looks like in action:
gs -sDEVICE=pdfwrite -dCompatibilityLevel=1.4 -dPDFSETTINGS=/ebook -dNOPAUSE -dQUIET -dBATCH -sOutputFile=output.pdf input.pdf
Let's break down what that command is actually doing:
gs: This just fires up Ghostscript.-sDEVICE=pdfwrite: Tells Ghostscript that its job is to write a new PDF file.-dPDFSETTINGS=/ebook: This is the secret sauce. It applies a preset that balances quality and file size, typically targeting around 150 DPI. You can swap/ebookfor other presets like/screen(lower quality, smaller size) or/prepress(higher quality, larger size).-sOutputFile=output.pdf: This specifies the name for your new, smaller PDF.input.pdf: And this is the original file you want to shrink.
This level of control is part of a bigger picture. The entire data compression software market is on track to hit USD 7.41 billion by 2035, pushed forward by things like machine learning and a heavy focus on security. These trends shape everything from powerful command-line tools to the easy-to-use apps on your desktop. You can dig into the full analysis on data compression market trends to learn more.
Troubleshooting Common PDF Compression Problems
Even with the best tools, you'll eventually hit a snag. You run a PDF through a compressor, and the result is just… disappointing. Either the file is still massive, or the quality has completely tanked. Don't worry, this happens to everyone when learning to effectively compress PDF size on Mac.
More often than not, the problem isn't the tool itself but the unique makeup of that specific PDF. Let's walk through the most common headaches and how to fix them.
Why Is My PDF Quality So Low After Compression?
This is the classic complaint, and I see it all the time, especially from people using Preview's built-in "Reduce File Size" filter. The problem is that this one-size-fits-all approach is a blunt instrument. It uses incredibly aggressive, lossy compression that can absolutely butcher images, leaving them pixelated and blurry.
It doesn't care if your file contains high-resolution product photography or just simple text; it slams everything with the same heavy-handed settings. To fix this, you need a tool that gives you back some control.
- Use Smart Presets: A good app like Compresto will offer presets like "Medium Quality" or "High Quality." These are already fine-tuned to strike a great balance, cutting down the file size without trashing your images.
- Take the Wheel Manually: If the presets aren't quite right, a quality slider is your best friend. This lets you dial in the exact sweet spot between file size and visual clarity for your document.
My advice? Always start with a higher quality setting and work your way down. It's far easier to re-compress a high-quality original than it is to try and salvage a file that's already been over-compressed into a pixelated mess.
Key Takeaway: Poor quality almost always comes from overly aggressive, one-click compression. Regain control with tools that let you choose your quality level, ensuring your visuals stay crisp and professional.
Why Did the File Size Barely Change?
This one is incredibly frustrating. You go through the motions of compressing a PDF, only to find the file size has barely budged. There's almost always a logical reason, and it usually comes down to the content inside the PDF. Some things are just hard to shrink.
The main culprits are usually:
- Complex Vector Graphics: Unlike regular pixel-based images (like photos), vectors are made of mathematical equations. They're already incredibly efficient by nature, so there's not much data for a compressor to trim away.
- Embedded Fonts: If a PDF uses a bunch of custom or oversized fonts, they can add serious weight to the file. Standard compression algorithms often can't do much to optimize these embedded font files.
- Already-Optimized Images: This is a big one. If the images in your PDF were already compressed before being added to the document (like JPEGs saved for the web), there's little to no redundant data left for the compressor to remove.
When you run into this, you might need to go back to the source file (like the original Word or InDesign document) and downsample the images there before you even export to PDF.
The good news is that the tech behind PDF compression is always improving. New methods like Brotli compression are on the horizon, promising an average file size reduction of 10% to 25%. As this tech becomes more common, Mac apps will need updates to handle these modern formats, giving us all better results. You can read more about these new PDF compression filters and how they're set to change the game.
Common Questions About PDF Compression
When you start shrinking PDFs on your Mac, a few common questions always seem to pop up. Let's tackle them head-on so you can get back to work without any guesswork.
How Can I Check the PDF File Size on My Mac?
The quickest way is right in Finder. Just click on your PDF file and hit Command + I (the "I" is for Info). A little window will appear, showing you the exact file size right at the top.
You can also right-click the file and select "Get Info" from the menu. This is perfect for doing a quick before-and-after comparison to see just how much space you've saved.
Does Compression Make My PDF Unsearchable?
This is a great question, and the answer is almost always no. Standard PDF compression is all about optimizing images and cleaning up redundant data. It doesn't touch the actual text layer of your document.
That means you can still use the search function (Command + F) in Preview or any other PDF reader to find words and phrases just like before. The text inside your document stays fully intact and searchable.
The only exception is if your PDF was an image-only scan to begin with—one without any Optical Character Recognition (OCR) applied. In that scenario, the text was never searchable, and compression won't change that.
What About Password-Protected PDFs?
If you try to compress an encrypted or password-protected PDF, you're probably going to hit an error. The security settings are designed to prevent any tool from getting inside and modifying the file's data.
To get around this, you'll need to remove the password first. Open the PDF, type in the password to unlock it, and then save a new, unprotected version. Once you have that decrypted copy, you can compress it with your preferred method and then add the password back to the smaller file if you need to.
Ready to stop wrestling with oversized files and start compressing with confidence? Compresto offers powerful, local, and easy-to-use compression for all your needs. Download it now and see the difference for yourself.