Video Production Best Practices: Quick Tips for Results
In a landscape saturated with visual content, producing a high-quality video is no longer a luxury; it is a fundamental requirement for capturing and holding an audience's attention. The distinction between a fleeting, amateur clip and a polished, professional production often lies in a handful of core principles applied with intention and skill. For anyone from a seasoned filmmaker to a social media manager, mastering these foundational techniques is the key to creating visuals that not only look good but also achieve specific communication goals.
This comprehensive guide moves beyond generic advice to provide a structured collection of actionable video production best practices. We will dissect the entire workflow, offering specific, practical insights for every stage. You will learn how to transform a simple concept into a compelling narrative through meticulous pre-production, capture pristine visuals and audio on set, and apply professional-grade finishing touches in post-production. Each item on this list is designed to be a clear, implementable step toward elevating your work.
We will cover the essential pillars of professional video, including:
- Pre-production planning and detailed storyboarding.
- Mastering the classic three-point lighting setup.
- Ensuring crystal-clear audio and impactful sound design.
- The art of color grading and correction for mood and consistency.
- Optimizing for various platforms with the right export settings.
By integrating these proven methods, you can systematically improve your projects, ensure consistency, and produce content that not only engages viewers but also achieves a memorable, cinematic quality. Let’s explore the essential practices that will make your video projects stand out.
1. Pre-Production Planning and Storyboarding
The foundation of any successful video isn't the camera or the editing software; it's the meticulous planning that happens before the record button is ever pressed. This pre-production phase is one of the most critical video production best practices because it transforms a vague idea into a concrete, executable plan. It involves everything from scriptwriting and storyboarding to location scouting and detailed scheduling, ensuring every department is aligned and every dollar is accounted for.
Think of filmmakers like Christopher Nolan, who famously maps out complex narratives with painstaking detail, or even top YouTube creators like MrBeast, whose elaborate videos rely on months of strategic planning. This isn't just for big-budget productions; it's a scalable process that prevents costly mistakes, saves time on set, and clarifies the creative vision for the entire team. A well-defined plan is your roadmap to a smooth and efficient production.
Actionable Tips for Implementation
- Utilize Digital Planning Tools: Software like StudioBinder or Milanote centralizes scripts, shot lists, call sheets, and storyboards. This keeps your entire crew on the same page and streamlines communication.
- Scout Locations Thoroughly: Visit potential locations at the exact time of day you plan to shoot. This helps you assess natural light, identify potential sound issues (like traffic or construction), and secure necessary permissions.
- Create a Detailed Shot List: Go beyond simple descriptions. Specify the shot type (wide, medium, close-up), camera angle, lens choice, and any required camera movement. This gives your director of photography a clear guide to follow.
- Plan for Contingencies: What happens if it rains during your outdoor shoot? What if a key piece of equipment fails? Building backup plans and buffer time into your schedule prevents minor setbacks from derailing the entire project. One of the first decisions to make is the format; exploring the pros and cons of live vs. pre-recorded video will fundamentally shape your planning and resource allocation.
2. Three-Point Lighting Setup
Great lighting is the difference between an amateur recording and a professional production. The three-point lighting setup is a foundational technique and one of the most essential video production best practices for achieving a cinematic, polished look. This method uses three distinct light sources to sculpt your subject, eliminate harsh shadows, and create a sense of depth that makes the image pop off the screen. It is a time-tested formula that provides complete control over the visual mood and quality.
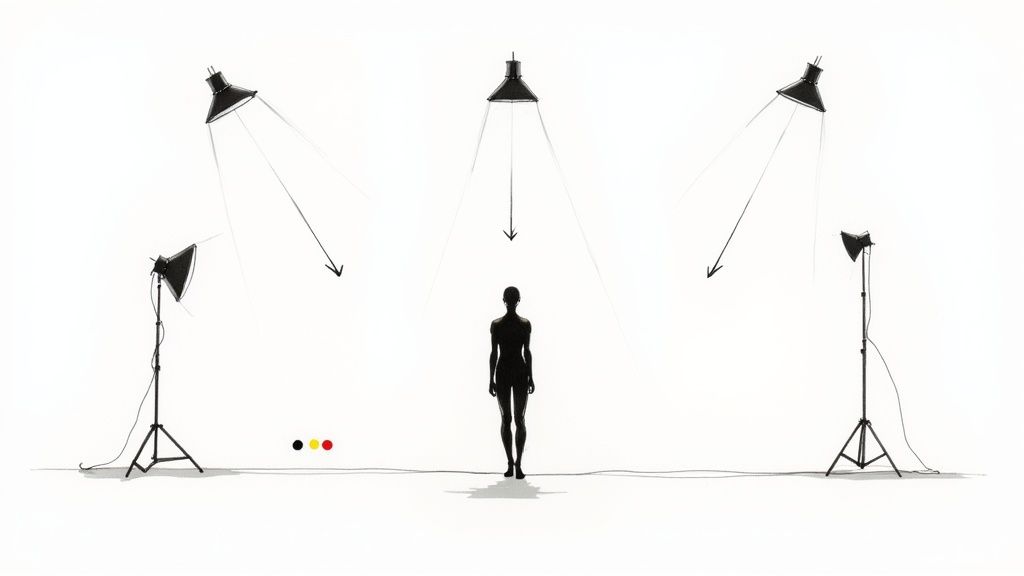
This technique is the industry standard for everything from late-night talk shows and broadcast news to corporate interviews and high-quality YouTube studio setups. The setup consists of a Key Light (the main, brightest light), a Fill Light (a softer light to fill in shadows created by the key), and a Back Light (placed behind the subject to create a subtle outline that separates them from the background). Mastering this balance gives your video a dynamic and professional appearance.
Actionable Tips for Implementation
- Position Your Key Light First: Place your main light source at a 45-degree angle to the subject. This creates a natural, flattering look with gentle shadows that define facial features.
- Balance with a Softer Fill Light: Position the fill light on the opposite side of the key light, also at a 45-degree angle. It should be less intense than the key light; a good starting point is 50% of the key’s brightness to soften, but not eliminate, shadows.
- Create Separation with a Back Light: Place the back light behind the subject, aimed at their shoulders and the back of their head. This creates a subtle rim of light, or "halo," that visually separates them from the background, adding depth and dimension.
- Use Diffusers and Flags: Raw light can be harsh. Use softboxes or diffusion panels to soften the light quality for a more pleasing look. Use flags (black cards or fabric) to block light from spilling into unwanted areas of the frame, like the camera lens or background.
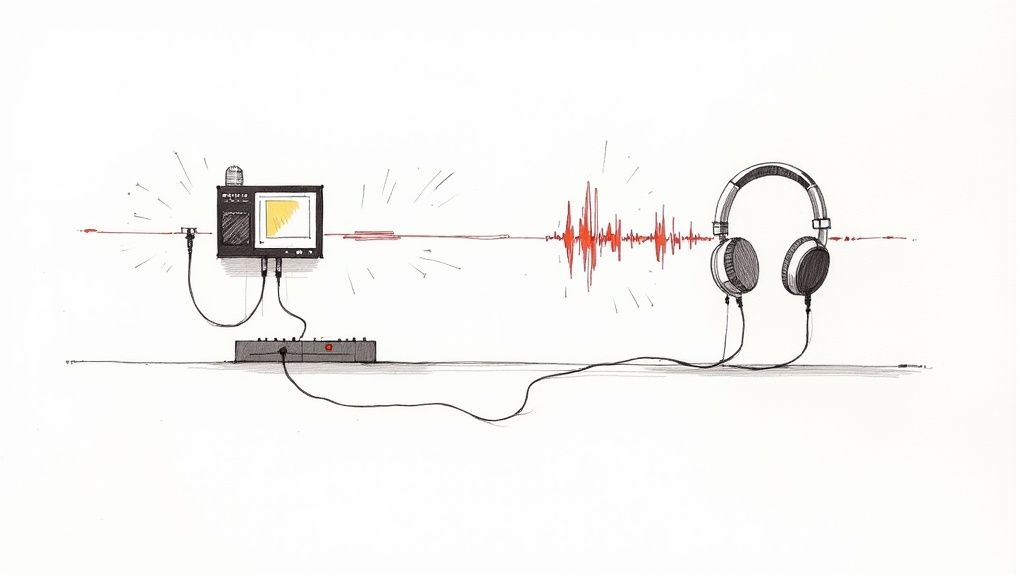
3. High-Quality Audio Recording and Sound Design
Viewers will forgive grainy visuals, but they will almost never tolerate poor audio. High-quality audio is a non-negotiable component of professional video, as it directly influences a viewer's perception of quality, credibility, and engagement. This practice involves prioritizing crystal-clear dialogue capture on set and implementing intentional sound design in post-production. It recognizes that what an audience hears is just as crucial as what they see, making it one of the most impactful video production best practices you can adopt.
This principle is evident across all forms of high-end media. Think of the immersive nature documentaries from BBC's Planet Earth, where every rustle of leaves and animal call is captured with pristine clarity, or the meticulous soundscapes in a David Fincher film that build unbearable tension. Even in the world of podcasting, creators like the team behind Serial proved that compelling audio alone can captivate millions. Bad audio immediately signals an amateur production, while great audio elevates the entire viewing experience, making the content more immersive and authoritative.
Actionable Tips for Implementation
- Use External Microphones: Never rely on your camera's built-in microphone. Use dedicated lavalier, shotgun, or condenser microphones placed as close to the sound source as possible to capture clean, direct audio and minimize background noise.
- Monitor Audio Levels Continuously: Actively monitor audio levels using quality headphones during recording, not just by watching the meters. This allows you to catch issues like clipping (distortion), wind noise, or rustling clothes in real-time.
- Record "Room Tone": Always capture at least 30 seconds of pure ambient sound of your location without any dialogue. This "room tone" is invaluable in post-production for smoothing audio edits and filling gaps to create a seamless sound floor.
- Plan Your Sound Design: Don't treat sound as an afterthought. During pre-production, plan your use of music, sound effects (SFX), and ambient textures. This ensures your final audio mix supports the narrative and emotional tone of the video. For complex projects, learning how to combine sound files effectively is a foundational skill for building a rich soundscape.
4. Color Grading and Correction
Color grading and correction is the post-production art of refining your video’s color palette to achieve a specific mood, ensure visual consistency, and create a professional, cinematic look. This two-part process involves first correcting technical issues like exposure and white balance (correction), then stylistically enhancing the colors to evoke emotion and reinforce the narrative (grading). Mastering this is a crucial video production best practice that separates amateur footage from polished, high-quality content.
Think of the distinctive orange-and-teal palette that defined shows like Dexter, or the neon-drenched, 80s aesthetic of the film Drive. These looks are not accidents; they are deliberate choices made during color grading to immerse the audience in a specific world. In the digital age, from Netflix originals with their consistent brand visuals to an Instagram influencer’s warm, signature filter, color is a powerful tool for storytelling and brand identity. It transforms raw, flat footage into a visually cohesive and emotionally resonant experience.
Actionable Tips for Implementation
- Grade on a Calibrated Monitor: Your phone, laptop, and TV all display colors differently. Grading on a professionally calibrated monitor ensures that the colors you see are accurate and will translate consistently across various viewing devices.
- Use LUTs as a Starting Point, Not a Crutch: Look-Up Tables (LUTs) are excellent for quickly applying a specific color style. However, always use them as a foundation and then manually tweak settings like contrast, saturation, and shadows to customize the look for your specific footage.
- Establish a Mood Board Reference: Before you even open your editing software, compile a mood board with visual references that capture the desired aesthetic. Keep this visible during the grading process to ensure your creative choices stay on track with the original vision.
- Leverage Professional Software: While basic editors offer color tools, dedicated software like DaVinci Resolve provides an industry-standard suite of tools for professional-grade color work. The free version alone is more powerful than most paid alternatives.
- Export and Test on Multiple Devices: Before finalizing your project, export a short clip and view it on different screens like a smartphone, a tablet, and a television. This crucial step helps you identify and fix any color or contrast issues that may only appear on certain types of displays.
5. Consistent Frame Rates and Resolutions
The technical specifications of your video, specifically its frame rate and resolution, are foundational elements that define its visual quality and viewing experience. This crucial aspect of video production best practices involves selecting the right settings before you record and maintaining them consistently through editing and final delivery. Getting this wrong can result in jarring playback, dropped frames, and a final product that looks unprofessional, regardless of how great the content is.
Think about the distinct look of a Hollywood film versus a live sports broadcast. That difference is largely due to frame rate; films almost universally use 24 frames per second (fps) for a cinematic feel, while sports often use 60fps for smooth, clear motion. Similarly, a crisp 4K Netflix special has a different resolution requirement than a 9:16 vertical video for TikTok. Matching these technical specs to your creative intent and distribution platform is a non-negotiable step for a polished final product.
Actionable Tips for Implementation
- Establish Project Standards Early: Before shooting, decide on your primary frame rate and resolution. Will it be a cinematic 24fps in 4K, or a web-friendly 30fps in 1080p? Lock this in and ensure all cameras are set to these exact specifications.
- Match Frame Rates for a Seamless Edit: If you must mix footage with different frame rates (e.g., combining 24fps interview footage with 60fps slow-motion B-roll), make sure your editing software timeline is set to your primary delivery frame rate. This allows the software to correctly interpret and conform the clips, preventing stuttering.
- Shoot for Your Final Delivery Platform: Always consider where your video will be viewed. For YouTube or a corporate website, 1080p or 4K at 30fps or 60fps is ideal. For Instagram Stories or TikTok, a vertical 1080x1920 resolution is essential. Planning for the platform prevents awkward cropping and quality loss later.
- Use High-Quality Codecs: When exporting, choose a codec that balances quality and file size, such as H.264 for web delivery or Apple ProRes for archival purposes. A poor codec choice can introduce compression artifacts and degrade the visual clarity you worked so hard to capture.
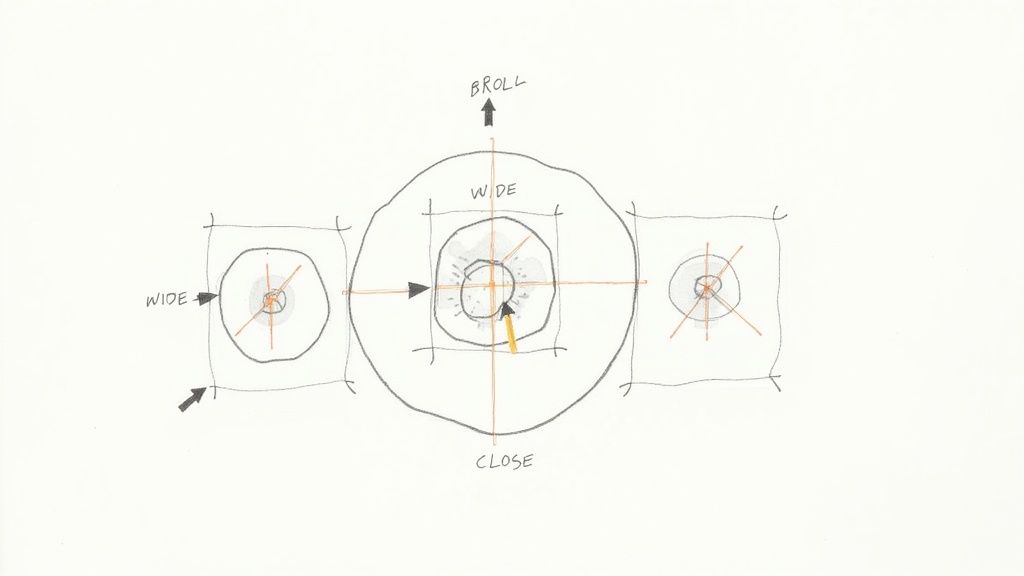
6. B-Roll and Multiple Camera Angles
Static, single-camera shots can feel monotonous and unprofessional. One of the most effective video production best practices to elevate your work is to strategically capture B-roll and utilize multiple camera angles. B-roll is supplementary footage that is cut into the primary shot (A-roll) to add context, visual interest, and smooth over edits. When combined with varied camera angles, it creates a dynamic, polished, and engaging viewing experience.
Think of a documentary like BBC's Planet Earth, where a narrator's voiceover (A-roll) is accompanied by breathtaking shots of landscapes and animal behaviors (B-roll). Similarly, a product demonstration is far more compelling when it cuts from the speaker to close-ups of the product in action. This technique isn't just for hiding mistakes; it’s a powerful storytelling tool that gives the editor immense flexibility to control pacing, emphasize key points, and maintain audience attention.
Actionable Tips for Implementation
- Plan Your Shots Methodically: During pre-production, list the specific B-roll shots you need. For an interview, this could include shots of the subject's hands, their environment, or relevant objects they mention. A shot list ensures you don't forget crucial footage.
- Cover Every Scene in Threes: For every primary action, capture a wide shot to establish the scene, a medium shot to show the action, and a close-up to highlight important details. This classic "wide, medium, tight" formula provides essential editing options.
- Shoot More Than You Need: It’s always better to have too much footage than not enough. Capture extra cutaways, establishing shots, and alternative angles. This "extra" content often becomes invaluable in post-production for covering jump cuts or adding polish.
- Systematically Organize Footage: As you film, label your clips clearly (e.g., "Interview_CamA_Wide," "Product_B-roll_CU_01"). This organizational discipline saves countless hours during the editing phase and prevents confusion. You can further enhance your B-roll with professional overlays using free motion graphics templates to add a layer of visual sophistication.
7. Proper Stabilization and Camera Movement
Unstable, shaky footage is one of the quickest ways to signal an amateur production. Proper stabilization and intentional camera movement are essential video production best practices that distinguish professional-grade content. This isn't just about avoiding jitter; it’s about using motion strategically to guide the viewer's eye, create a specific mood, and enhance the narrative. The goal is to balance a stable, clean image with dynamic, engaging visuals that serve the story.
From the smooth, sweeping tracking shots in a Spielberg film that immerse you in a scene, to the fluid gimbal work in a real estate video that creates a sense of luxury and space, controlled movement is a powerful storytelling tool. It transforms a static frame into a living, breathing environment. Whether using a tripod for a locked-down interview or a drone for an epic aerial reveal, the choice of equipment and movement directly impacts the audience's emotional and visual experience.
Actionable Tips for Implementation
- Master the Tripod: Before reaching for more complex gear, master the tripod. Use it for all static shots like interviews or product showcases. It guarantees a stable foundation and allows for clean, intentional pans and tilts that are free of human error.
- Use Gimbals for Fluid Motion: Gimbals are ideal for following subjects, creating dynamic walk-and-talk scenes, or adding a cinematic feel to B-roll. Practice operating the gimbal extensively before a shoot to master its balance and achieve buttery-smooth footage.
- Incorporate Sliders for Subtle Elegance: A slider provides a short, controlled, and perfectly linear camera move. It’s excellent for product shots, interview parallax effects, or subtle reveals. This small motion can add significant production value without being distracting.
- Plan Movements in Pre-Production: Don’t improvise camera movements on set. Just like a shot list, a movement list should be part of your storyboard or plan. Decide exactly where the camera will move, why it's moving, and what that motion is meant to communicate to the viewer.
8. Proper White Balance and Exposure Control
Beyond creative framing and smooth camera movement lies the technical core of a professional image: accurate color and brightness. Mastering white balance and exposure is a fundamental video production best practice that separates amateur footage from cinematic quality. White balance ensures that colors appear natural and consistent, while proper exposure preserves crucial detail in the brightest highlights and darkest shadows, giving you maximum flexibility in post-production.
Think of the crisp, clean look of broadcast television news or the rich, detailed visuals in a narrative film. These results aren't accidental; they are achieved by technicians who meticulously set their cameras to capture reality as accurately as possible. Neglecting these settings can lead to footage with an unnatural blue or orange tint, or scenes where faces are blown out or lost in shadow, problems that are often difficult or impossible to fully correct later.
Actionable Tips for Implementation
- Use a White Balance Reference: Don't rely on your camera's auto mode, which can shift mid-shot. Instead, use a white or gray card in your shooting environment and set a custom white balance. This gives the camera a true neutral reference point for accurate colors.
- Monitor Your Histogram and Waveform: Your eyes can be deceiving, but a histogram and waveform monitor provide objective data. Aim for a balanced distribution across the graph, ensuring you aren't "clipping" your highlights (pushed to the far right) or "crushing" your blacks (pushed to the far left).
- Utilize Zebra Stripes for Exposure: Zebra stripes are a camera feature that overlays a pattern on overexposed areas of your image. Set them to appear at 90-100 IRE to quickly identify which parts of your shot are losing detail, allowing you to adjust exposure before you hit record.
- Control Light with ND Filters: When shooting in bright, sunny conditions, you might be forced to use a narrow aperture to avoid overexposure, which sacrifices a shallow depth of field. Neutral Density (ND) filters act like sunglasses for your lens, reducing the amount of light entering the camera so you can maintain a wide aperture and cinematic motion blur.
- Check Settings Between Locations: Every time you change lighting environments, from indoors to outdoors or even from one room to another, you must re-evaluate and reset your white balance and exposure to maintain consistency.
9. Compelling Storytelling and Narrative Structure
Beyond technical quality, what truly separates a memorable video from a forgettable one is the power of its story. This creative best practice involves intentionally designing a narrative with a clear beginning, middle, and end, using elements like character development, conflict, and emotional arcs to hook the audience. A strong narrative structure transforms passive viewing into an active emotional experience, making your message resonate and stick with the viewer long after they’ve finished watching.
Look at the emotional brand storytelling in Apple commercials, which often focus on human connection rather than product features, or the gripping documentary narratives in films like The Last Dance. These productions don't just present information; they guide the audience on a journey with relatable stakes and a satisfying resolution. Applying these principles is a core component of effective video production best practices, ensuring your content captivates and persuades.
Actionable Tips for Implementation
- Start with a Compelling Hook: You have less than five seconds to capture attention. Begin with a provocative question, a surprising visual, or an intriguing moment of conflict to prevent viewers from scrolling away.
- Establish a Protagonist and Relatable Stakes: Every great story needs a hero, whether it’s a customer, a brand, or an idea. Define what they want (the goal) and what stands in their way (the conflict) to create stakes that the audience can invest in.
- Use the 'Show, Don't Tell' Principle: Instead of explaining emotions or concepts with voiceover, use visuals to convey them. Show a character’s frustration through their actions or demonstrate a product’s benefit in a real-world scenario.
- Build Toward a Climax and Payoff: Structure your narrative to build tension or curiosity, leading to a climax where the central conflict is addressed. The conclusion should provide a sense of resolution or an emotional payoff, leaving the viewer feeling satisfied.
10. Optimization for Platform Specifications and Distribution
Tailoring video content, formatting, and technical specifications to each distribution platform is a crucial video production best practice. By aligning resolution, aspect ratio, codec, length, and metadata with the unique requirements of YouTube, TikTok, Instagram, LinkedIn, and beyond, you ensure videos display correctly, stream smoothly, and engage audiences in every context.
This method works by baking platform constraints into your workflow early on. During pre-production, choose aspect ratios based on primary channels. In post-production, export a high-quality master file and then generate platform-specific versions. Embedding optimized metadata, captions, and custom thumbnails further boosts discoverability and viewer retention.
Examples of successful implementation range from long-form YouTube videos at 1080p 16:9 with compelling thumbnails, to TikTok clips in 9:16 vertical format under 10 minutes, Instagram Reels thriving at 15–90 seconds, LinkedIn posts in 1:1 square format with a professional tone, and Netflix originals in 4K HDR using HEVC codecs at high bitrates. Each format demands a unique approach to framing, color grading, and pacing to maximize reach.
Use this approach from scripting through final export. Early alignment prevents costly re-exports and ensures each upload meets platform algorithms’ expectations. The benefits include smoother distribution, higher engagement, and clearer brand presentation across channels.
Actionable Tips for Implementation
- Research official specs before production and integrate them into your shot list
- Export a high-quality master file, then create platform variants with correct resolution, codec, and bitrate
- Embed optimized metadata: titles, descriptions, tags, and custom thumbnails for YouTube
- Add closed captions for silent autoplay on social feeds using AI tools
- Adjust color contrast and audio levels for mobile viewing environments
- Leverage platform-specific resources—creators of concise clips can explore mastering short-form video production
- Monitor analytics to refine specs and formats over time
- Learn more about Optimization for Platform Specifications and Distribution on Compresto
Video Production: 10 Best Practices Comparison
| Technique | Implementation Complexity 🔄 | Resource Requirements ⚡ | Expected Outcomes ⭐ | Ideal Use Cases 💡 | Key Advantages 📊 |
|---|---|---|---|---|---|
| Pre-Production Planning and Storyboarding | High — extensive coordination and upfront time | Moderate–High — planning tools, crew time, budgeting | Very High — smoother shoots, fewer reshoots, clear vision | Feature films, commercials, complex multi-day shoots | Reduces on-set confusion; improves consistency and efficiency |
| Three-Point Lighting Setup | Medium — setup and adjustment expertise needed | Medium — three lights, stands, modifiers, power | High — polished look, controlled mood and depth | Studio interviews, portraits, corporate videos | Provides subject separation and versatile mood control |
| High-Quality Audio Recording and Sound Design | Medium–High — capture and post-production skill required | High — mics, recorders, monitoring, audio engineer | Very High — clearer dialogue, stronger emotional impact | Podcasts, documentaries, cinematic projects | Significantly raises perceived production quality and immersion |
| Color Grading and Correction | Medium–High — specialized software and artistic skill | Medium — grading workstation, calibrated monitors | High — cohesive aesthetic, increased production value | Narrative films, commercials, branded content | Ensures visual consistency and creative stylization |
| Consistent Frame Rates and Resolutions | Medium — technical planning and standardization | Low–Medium — compatible cameras, storage, codecs | High — smooth playback, platform compatibility | Cross-platform distribution, archival projects | Prevents artifacts and simplifies editing workflow |
| B-Roll and Multiple Camera Angles | Medium — coordination, logging, shot planning | Medium–High — extra cameras/operators, time | High — editorial flexibility, visual variety | Documentaries, news, music videos, social content | Enables invisible cuts and richer visual storytelling |
| Proper Stabilization and Camera Movement | Medium–High — practice and movement planning | Medium–High — tripods, gimbals, sliders, drones | High — smooth, immersive and professional visuals | Travel, real estate, action sequences, cinematic scenes | Eliminates shake and enables dynamic, intentional shots |
| Proper White Balance and Exposure Control | Medium — technical camera knowledge needed | Low — manual controls, white/gray card, monitoring | High — technically usable footage, easier grading | Any professional shoot, multi-camera setups | Preserves highlight/shadow detail; speeds post work |
| Compelling Storytelling and Narrative Structure | High — writing, structure and creative development | Low–Medium — writers, time for drafts and tests | Very High — stronger retention, emotional resonance | Brand films, documentaries, narrative and long-form | Increases engagement and memorability |
| Optimization for Platform Specifications and Distribution | Medium — multiple exports and platform rules to follow | Low–Medium — encoding tools, captions, thumbnails | High — improved reach, engagement, playback reliability | Social media campaigns, multi-platform releases | Maximizes discovery and ensures correct presentation |
| Proper Stabilization and Camera Movement | Medium–High — requires practiced technique | Medium–High — gimbals, sliders, maintenance | High — professional, stable motion | Cinematic shots, sports coverage, travel vlogs | Smooth movements enhance immersion and production polish |
Bringing It All Together: Your Path to Polished Video
The journey from a raw concept to a polished final video is a complex process built on a foundation of deliberate choices and technical skill. The ten video production best practices we've explored in this guide are not just isolated tips; they are interconnected pillars that support the entire structure of your creative work. From the meticulous blueprint of pre-production planning to the final platform-specific export, each stage is a critical link in the chain.
Think of these practices as a system. Meticulous storyboarding and a clear narrative structure give purpose to your camera movements and B-roll. A perfectly executed three-point lighting setup is only as effective as the proper white balance and exposure settings that capture it. Crystal-clear audio, often the unsung hero of professional video, elevates compelling storytelling from good to unforgettable. Each element reinforces the others, creating a cumulative effect that separates amateur content from professional-grade productions.
The Synthesis of Art and Science
Mastering video production is a continuous act of balancing the artistic with the technical. It’s about understanding the science behind frame rates, resolutions, and color spaces, and then applying that knowledge to serve a creative vision. You can have the most advanced camera equipment on the market, but without a firm grasp of stabilization techniques or the principles of compelling narrative, your final product will fall short of its potential.
The true impact of adopting these best practices goes beyond just creating a visually appealing video. It's about achieving consistency, efficiency, and predictability in your workflow.
- Consistency: When you follow a structured process for lighting, audio, and color, your body of work develops a signature professional quality that audiences can trust.
- Efficiency: Rigorous planning in pre-production saves invaluable time and resources during shooting and editing. Knowing your platform's specifications beforehand eliminates the need for frustrating re-exports.
- Impact: A well-produced video, where every technical element serves the story, is far more likely to engage, persuade, and resonate with your audience, achieving your communication goals.
Adopting these video production best practices transforms your workflow from a series of disjointed tasks into a cohesive, repeatable system for creating high-impact content.
Your Actionable Path Forward
The path to improvement is paved with intentional practice. Don't feel pressured to master all ten areas at once. Instead, identify the weakest link in your current production chain and focus your energy there.
Perhaps your audio quality has been a persistent issue; dedicate your next project to experimenting with different microphones and sound design techniques. If your storytelling feels flat, spend more time developing your narrative structure and storyboarding key sequences. Or maybe your final videos look compressed and artifacted online; learn the optimal export settings for your primary distribution platforms.
By systematically strengthening each of these core competencies, you build a versatile and robust skill set. This dedication is what ultimately elevates your work, ensuring that every project you undertake is a step forward in your journey as a creator. The pursuit of excellence in video production is an ongoing endeavor, but by integrating these foundational principles into your daily creative habits, you are well on your way to consistently producing work that not only meets but exceeds expectations.
Ready to ensure the final step of your production workflow is as professional as the rest? Compresto helps you compress your high-quality video files for web, social media, and documentation without sacrificing the visual fidelity you worked so hard to achieve. Optimize your polished videos for fast, efficient delivery on any platform by trying Compresto today.