How to Make a PDF Read Only on Your Mac A Practical Guide
Making a PDF read-only is about more than just flipping a switch; it’s about applying the right level of restriction to prevent viewers from editing, copying, or printing your hard work. The quickest ways on a Mac usually involve either setting a permissions password right within the Preview app or simply “printing” the file to a new PDF, which effectively flattens it.
Why You Need to Make Your PDFs Read-Only
Locking down a PDF is a critical step in protecting the integrity of your work. For designers, developers, and marketers, this isn't just a "nice-to-have"—it's an essential part of the workflow.
Imagine sending a client a carefully crafted design proof, only for them to make small, unauthorized tweaks that completely misrepresent your vision. Or think about sharing technical documentation that gets accidentally altered by a team member, leading to widespread confusion and costly errors down the line. It happens.
The need for secure, reliable document sharing has exploded. The global PDF software market is on track to hit USD 5.72 billion by 2033, a surge driven by the fact that 98% of businesses now rely on PDFs for their external communications. This massive adoption is exactly why so many professionals are focused on locking their files down.
Understanding Your Protection Options
The term "read-only" can mean different things. It might be a simple, lightweight deterrent or a robust, encrypted security measure. Your choice of method really depends on your goal. Are you just trying to prevent accidental edits within your team, or do you need to safeguard sensitive client data from being copied and pasted?
This quick decision tree breaks down the two main paths for protecting a PDF on a Mac—from fast, simple methods to more advanced permission controls.
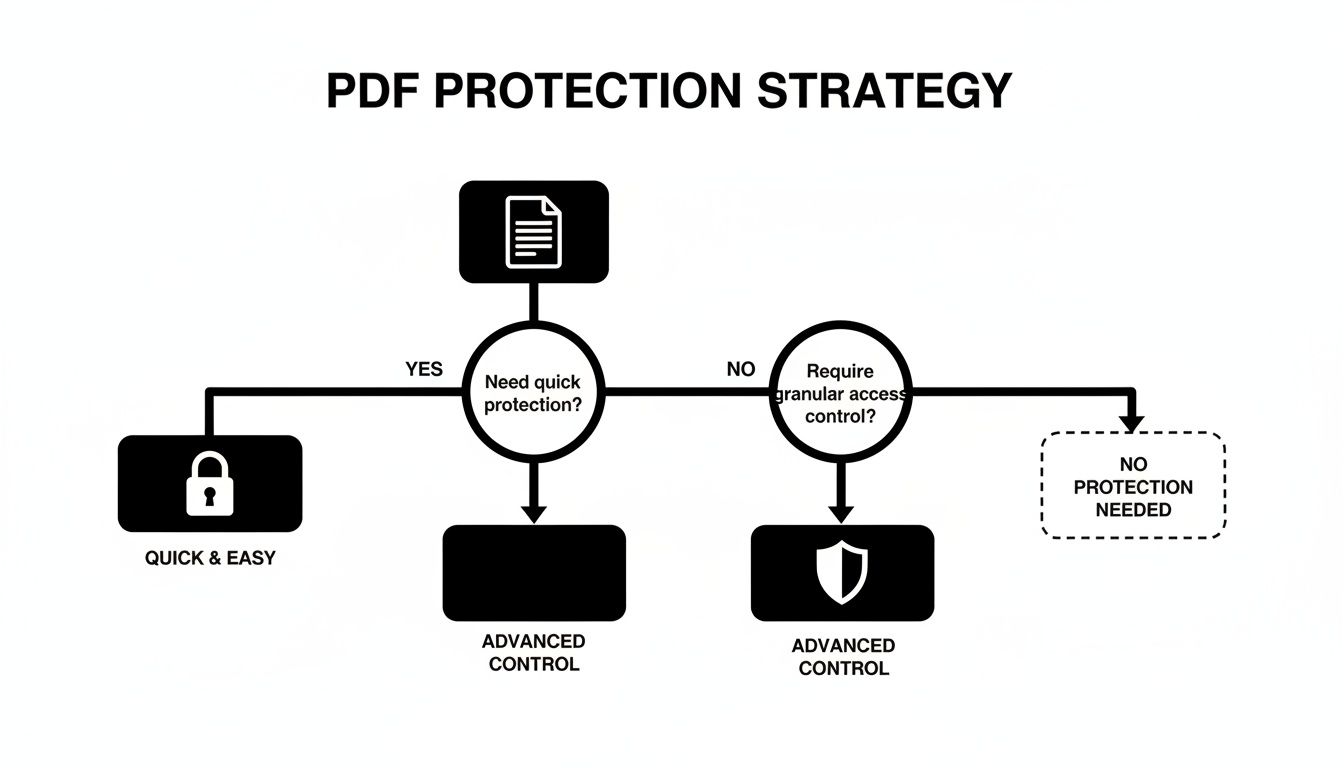
As the flowchart shows, the first step is figuring out the level of security you need. This will point you toward either the simple, built-in Mac tools or more powerful, permission-based solutions.
Before we dive into the step-by-step methods, here’s a quick comparison table to help you decide which approach is the best fit for your situation.
Comparing PDF Protection Methods on a Mac
| Protection Method | Best For | Ease of Use | Security Strength |
|---|---|---|---|
| Preview Permissions | Quickly restricting printing and copying. | Very Easy | Low to Medium |
| Adobe Acrobat Pro | Granular control over all permissions. | Easy | High |
| File System Permissions | Preventing local edits on shared machines. | Easy | Low |
| Flattening (Print to PDF) | Preventing edits to form fields and annotations. | Very Easy | Low |
| CLI/Automator | Batch processing for multiple files. | Advanced | Varies |
This table gives you a snapshot of your options, but remember that the "best" method truly depends on what you're trying to accomplish.
Protecting Your Content and Brand
Ultimately, making a PDF read-only is a direct way to maintain control over your brand and intellectual property. When you lock a document, you ensure that your work is seen and shared exactly as you intended.
This is especially critical for:
- Designers: Locking brand guidelines, logos, and mockups to prevent misuse.
- Writers: Protecting manuscripts or reports from unauthorized duplication.
- Businesses: Securing contracts and financial reports from being altered.
A read-only PDF acts as a digital seal. It tells the recipient that the document is final and its content should be respected as presented, preserving the author's original intent and authority.
Beyond basic document security, think about how making PDFs read-only fits into your broader intellectual property protection strategies. And for an extra layer of visible protection that discourages screenshots and unauthorized sharing, check out our guide on how to add a watermark: https://compresto.app/blog/adding-watermark-to-pdf.
Using macOS Preview for Quick Protection
You don't always need heavyweight software to lock down a PDF. For many day-to-day needs, your Mac comes equipped with a surprisingly capable tool right out of the box: Preview. It's perfect for adding a quick layer of protection without any extra cost.
One of the simplest tricks in the book is often called "Print to PDF." This process essentially flattens your document, merging any interactive elements—like form fields, annotations, or separate image layers—into a single, static background.
Think of it as taking a high-resolution screenshot of your document. All the content is still there and looks perfect, but the individual pieces are no longer editable. This is a great move for a marketer sharing a social media graphic with the team for feedback; it prevents anyone from accidentally moving an element while still letting them see the design.
The Flattening Method: Print to PDF
This technique isn't about true encryption; it's more about making edits a real pain for anyone who tries. To do it, just open your PDF in Preview, head up to the File menu, and choose Print.
In the print dialog box, ignore your physical printer. Instead, look for the little PDF dropdown button in the bottom-left corner. Click it and select Save as PDF. Give the new file a name, and you're done. You now have a flattened version that's much harder to mess with.
This approach has some solid advantages:
- It's completely free and built into every Mac.
- The process is incredibly fast, taking just a few clicks.
- It locks down content while preserving the visual quality.
The main drawback? It's low security. Someone with advanced PDF software could still potentially copy text or try to edit the flattened image, so don't use this for truly sensitive documents.
Using Password Protection in Preview
For a more robust way to make your PDF read-only, Preview also offers password-based permissions. This method goes beyond flattening by applying actual encryption to restrict what people can do with your file.
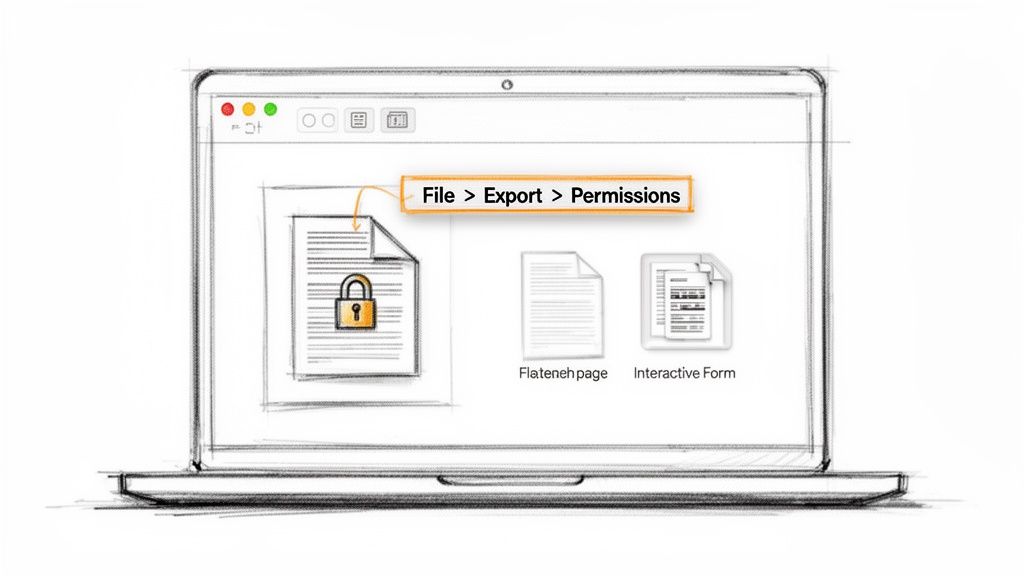
Open your document in Preview and navigate to File > Export. In the window that pops up, make sure the format is set to PDF. Before saving, you'll spot a Permissions button—click it to open the security options.
This is where you can set a password that's required to change the permissions, effectively locking the file down.
Pro Tip: Always set a Permissions password, not just an "Open" password. A password to open locks the whole file from view. A permissions password lets people see the document but stops them from printing, copying text, or making any changes.
From there, just check the boxes to prevent printing or copying content. Once you've set your restrictions and your password, click Apply and save the file. Now, anyone can view the PDF, but they’ll be blocked from doing anything you've restricted. It’s a much stronger method than simply flattening the file.
If you want to learn more about creating PDFs from the ground up on your Mac, check out our detailed guide on how to create a PDF on a Mac.
Advanced Security with Adobe Acrobat
When the basic read-only toggle just won't cut it, you need to bring in the big guns. That’s where Adobe Acrobat comes in. While Preview on a Mac is great for a quick lock, Acrobat is the industry standard for a reason—it gives you precise, granular control over your PDFs.
Think about sensitive documents like legal contracts, unreleased product roadmaps, or confidential financial reports. For these, "oops, I accidentally edited it" isn't an option. You need to define exactly what someone can and can't do with the file once it leaves your hands.
Acrobat’s power lies in its Protect tool. Instead of a simple on/off switch, it lets you set specific, password-protected permissions. You can let a client view a proposal but block them from printing it. Or you can allow a stakeholder to read a report but prevent them from copying a single line of text.
This level of detail is a major reason why Acrobat holds 64% of the market share. For industries that live and breathe compliance and confidentiality, this isn't just a nice feature; it's a necessity. In fact, security tweaks like setting read-only permissions are among the most common PDF actions, accounting for 19% of all top tasks on major platforms.
Setting Up Permissions with a Password
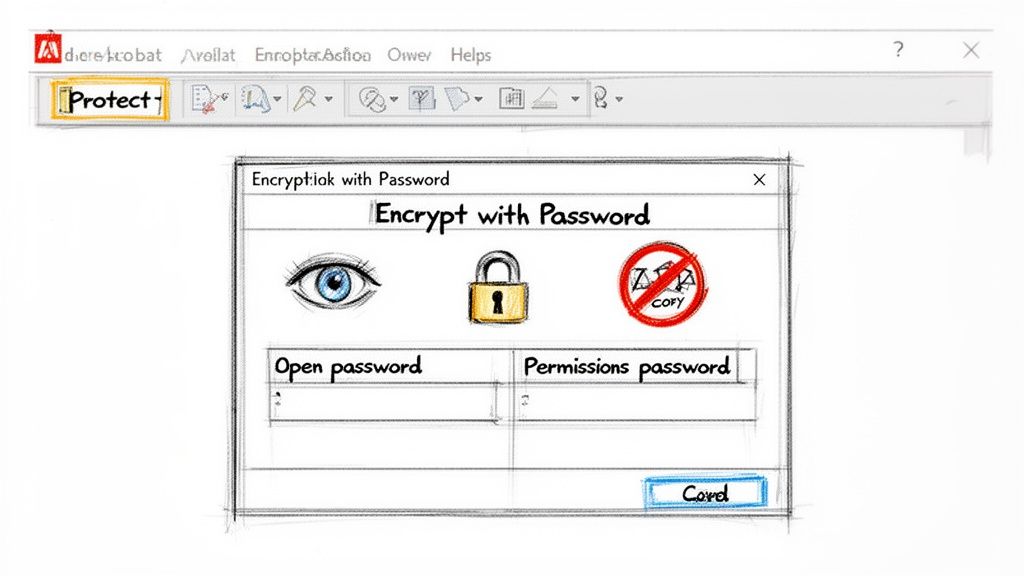
Fire up Adobe Acrobat, open your PDF, and find the Protect tool—it's usually in the right-hand panel. From there, you'll want to select Encrypt with Password. This is your command center for locking down the document.
Acrobat gives you two different password options, and it's crucial to know which one to use for making a file truly read-only:
- Document Open Password: This is a hard lock. No password, no entry. Anyone who wants to even see the contents needs this password first.
- Permissions Password: This is the key to read-only control. It lets anyone open and view the PDF, but it puts a wall around specific actions like editing, printing, or copying text.
For our purposes, we're focusing on the Permissions Password. Once you select it, a whole new menu of security settings will pop up, ready for you to customize.
Fine-Tuning Your Document Restrictions
After you've set a Permissions Password, you get to play gatekeeper and decide precisely what you want to restrict. This is perfect for real-world scenarios, like a product team sharing a sensitive roadmap—they can allow stakeholders to view it but stop anyone from making unauthorized tweaks.
Here are the most common restrictions you’ll want to set:
- Printing Allowed: To prevent physical copies from being made, set this to “None.”
- Changes Allowed: Setting this to “None” is the most important step. It blocks all editing, commenting, and form filling.
- Enable copying of text, images, and other content: Simply uncheck this box. It stops users from highlighting your content and pasting it elsewhere.
By setting a strong Permissions Password and locking down changes and copying, you create a genuinely secure, view-only document. The file is still perfectly accessible for review, but its integrity is protected from accidental edits or unauthorized sharing.
This method creates a powerful barrier against unwanted modifications. While no digital lock is 100% unbreakable, Acrobat’s encryption makes it incredibly difficult for the average person to bypass your settings.
Of course, Acrobat is a premium tool. If its features or pricing don't fit your needs, it's always a good idea to explore a quality Adobe PDF alternative that might offer a different workflow.
Smart System-Level PDF Security Tricks
Sometimes you don't need a dedicated, heavy-duty application. macOS itself has some clever, built-in ways to make a PDF read-only. These system-level tricks are perfect when you need a quick solution on the fly or want to protect files being shared among different users on the same machine.
We'll look at two practical methods that tap directly into the operating system: changing file permissions and flattening documents. Both are simple yet surprisingly effective in the right situations.
Changing Permissions with Get Info
One of the most direct ways to control who can do what with a file on a Mac is by adjusting its permissions. This is an ideal solution for internal teams or developers sharing files on a local server or a multi-user Mac. It's less about airtight encryption and more about setting ground rules.
By tweaking these permissions, you can prevent specific users or groups from making any changes, effectively creating a local, user-specific read-only state.
Here's how you do it:
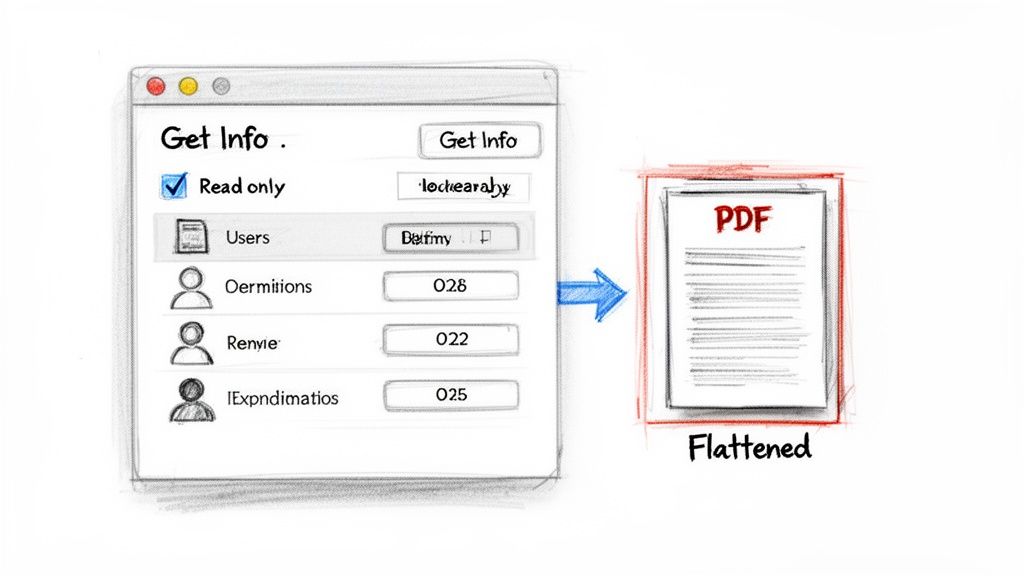
- Find your PDF in Finder and right-click on it.
- Select Get Info from the menu (or just hit Command + I).
- Down at the bottom of the window, expand the Sharing & Permissions section.
- From there, you can change the privilege for different users from "Read & Write" to "Read only."
This method is fast and straightforward, but it comes with a big catch: the permissions are tied to that specific file on that specific system. If someone copies the PDF to their own computer or a different drive, those permissions won't follow.
This approach is a deterrent, not a fortress. It works best to prevent accidental edits in a trusted, shared environment, like a project folder on a local network.
The Power of Flattening a PDF
Another powerful system-level trick is flattening. We touched on this with the "Print to PDF" method, but it’s worth understanding why it works so well as a read-only technique. A typical, complex PDF isn't a single image; it's a stack of different layers.
These layers can include things like:
- Editable form fields
- Clickable hyperlinks
- Annotations and comments
- Vector graphics and text boxes
Flattening merges all these individual layers into one static background image. Think of it like gluing all the pieces of a collage onto a single sheet of paper—you can no longer pick up and move the individual parts. This permanently locks in your content, making it much harder for someone to alter.
This is especially useful for finalizing documents. For example, once a client has filled out a form, you can flatten it to make sure their responses can't be changed later. Similarly, if you’ve added feedback and annotations, flattening the PDF "bakes" them into the document so they can't be deleted. It’s a simple but incredibly robust way to finalize and secure your file’s content.
Fine-Tuning Your Secure PDF Workflow
Making a PDF read-only is just the first half of the job. To truly nail your workflow, you need to think about how you'll share that secure document. A great process combines robust protection with total efficiency, making sure your file is both safe and easy to send.
Think about a social media manager who just finished a dozen campaign briefs. First, they lock down each PDF with a password to stop any unwanted edits. But the files are still a bit chunky. So, they run the locked documents through a compression tool like Compresto to shrink them down for quick sharing over Slack or email.
This two-step dance—secure, then compress—is fast becoming standard practice. For 34% of people using PDF editors, compression is a must-have feature, often used right after applying read-only permissions. It's a workflow trusted by professionals who need to move secure files quickly across different platforms. You can dig into more of these trends with these PDF usage statistics.
Automating Repetitive Security Tasks
Let's be honest: manually applying the same security settings to file after file is a total drag. This is where automation and presets come in, saving you from repetitive clicks and freeing up hours in your week.
Most professional-grade tools let you save your go-to security settings as a reusable profile. In a tool like Adobe Acrobat, for instance, you can build a security policy that automatically includes:
- A permissions password to block editing and copying.
- Specific restrictions, like disabling the print function.
- Compatibility settings to make sure the file opens correctly in older PDF viewers.
Once that preset is saved, you can apply the entire configuration to any new PDF in a single click. This is a game-changer for keeping document security consistent across a team. For example, every financial report could get the "High-Security Finance" preset, guaranteeing uniform protection every single time.
Creating presets for your most common security needs doesn't just speed things up—it also cuts out the risk of human error. When it comes to keeping documents safe, consistency is everything.
If you're on a Mac and want to take things a step further, the built-in Automator app is your best friend. You can create a custom workflow that prompts you for a password, applies it to a PDF, and then neatly moves the secured file into a "Ready to Send" folder.
For teams handling a high volume of sensitive documents, looking into the best document management software for law firms can unlock even more advanced security and workflow tools. By combining presets with automation, you can transform a tedious chore into a seamless, fire-and-forget part of your daily routine.
Common Questions About Making PDFs Read-Only
Once you get the hang of locking down a PDF, a few practical questions almost always come up. Let's run through the most common ones I hear so you can share your documents with total confidence.
Can a Read-Only PDF Still Be Edited?
The honest answer? It really depends on how you made it read-only. Think of "read-only" not as a single switch but as a spectrum of protection.
At the weakest end of the spectrum is the simple file-system flag you can set using the "Get Info" window on a Mac. This is more of a polite suggestion than a lock. Anyone can bypass it just by copying the file, which instantly removes the restriction. It's really only useful for preventing accidental edits on a shared local drive.
Password-based restrictions, like those you can apply in Preview or Adobe Acrobat, offer a much bigger hurdle. But even these aren't completely foolproof. A determined person with the right software could potentially crack or strip these permissions.
For the strongest practical protection, my go-to method is flattening the PDF by printing it to a new file. This trick essentially turns everything—text, images, form fields—into a single, static image layer. For the vast majority of people, it's fundamentally un-editable.
Does Making a PDF Read-Only Change the File Size?
In most cases, no. Simply adding a password or flipping the file permissions in Finder doesn't add any meaningful data, so the file size stays the same. You can lock down a sensitive document without worrying it'll become too bulky to email.
The one interesting exception is the flattening method. When you use the "Print to PDF" feature, you might actually see the file size change. If your original PDF was complex, with lots of layers or high-res vector graphics, flattening can simplify its structure and sometimes result in a slightly smaller file.
But if you really want to shrink a file, don't rely on the security method. The best practice is to lock it down first, then run it through a dedicated compression tool. This two-step process gives you a file that's both secure and perfectly optimized for sharing.
What Is the Best Method for Legal Documents?
This is a big one. When you're dealing with legal contracts, financial reports, or other highly sensitive information, a casual trick like "Print to PDF" or a basic file permission just won't cut it.
The industry standard is to use a tool like Adobe Acrobat to set a strong permissions password. This doesn't just lock the file; it lets you get granular by specifically restricting editing, printing, and even copying text.
Using this method creates a clear digital trail of your intent to protect the document's integrity. For the highest level of security and authenticity, you can combine that permissions password with a digital signature. This proves the document's origin and confirms it hasn't been tampered with since you signed it.
Once your PDF is locked down, make it easy to share. Compresto compresses your secure files right on your Mac, ensuring they’re both protected and perfectly sized for any platform. Reclaim your storage and speed up your workflow at https://compresto.app.