Convert AVI to MOV on Mac A Practical Guide
Ever tried to play an AVI file on your Mac, only to be greeted by a stubborn error message? The best way to convert AVI to MOV is by using a video conversion tool that can repackage the file into a format your Mac understands, ensuring it works perfectly with apps like Final Cut Pro and QuickTime Player. This one step bridges the gap between the old-school AVI container and Apple's modern ecosystem.
Why Your Mac Struggles with AVI Files
If you've ever dragged an AVI file into Final Cut Pro or QuickTime and watched it fail, you've run into a classic compatibility headache. The problem isn't your Mac, but what's hiding inside that AVI file. Think of AVI (Audio Video Interleave) as a box. The video and audio inside are compressed using specific methods called codecs.
The real issue is that many AVI files use older, Windows-native codecs that modern versions of macOS simply don't support out of the box. It’s like trying to play a Blu-ray in a DVD player—even though they’re both discs, the player just doesn't recognize the format.
Common Scenarios Where This Pops Up
This isn't just a technical quirk; it’s a real-world problem that can grind creative workflows to a halt. You'll likely need to convert a file when:
- A client sends over legacy footage from an old digital camera for a new video project.
- You’re trying to edit archival family videos that were originally saved as AVIs.
- You download a video that plays just fine on a PC but refuses to open on your Mac.
In any of these cases, the goal isn't just to make the file playable. It's about getting it into your workflow without any friction. That’s exactly why you need to convert AVI to MOV.
The MOV format, built by Apple around its QuickTime framework, is the native video container for macOS. Converting your files guarantees they’ll work flawlessly across the entire Apple ecosystem, from editing in Final Cut Pro to watching on an iPhone.
The advantages go beyond just making the file work. While AVI was introduced by Microsoft back in 1992 for a world of local playback, the files can be massive. Modern containers like MOV often deliver identical visual quality in files that are 30–50% smaller when using efficient codecs like H.264 or HEVC. This not only makes your files compatible but also frees up a ton of storage space. You can find out more about the differences between these legacy and modern formats.
Choosing the Right AVI to MOV Conversion Tool
So you’ve got an AVI file that your Mac is refusing to play nicely with. Before you can jump into converting it to a friendly MOV format, you need to pick your weapon of choice. The best tool for the job really boils down to your specific situation—what’s your technical comfort level? Are you trying to convert a single clip or an entire library of old home movies?
Your options range from quick and dirty built-in solutions to seriously powerful software built for pros.
We’re going to walk through four main paths. You can stick with what’s already on your Mac and use QuickTime Player for simple, one-off tasks. If that doesn't cut it, free apps like VLC Media Player offer a bit more muscle. For those who love tinkering under the hood, the command line with FFmpeg provides ultimate control. And if you're dealing with a mountain of files, dedicated converters like Compresto are built for speed and batch processing.
This decision tree gives you a simple way to think about how to handle AVI files on your Mac.
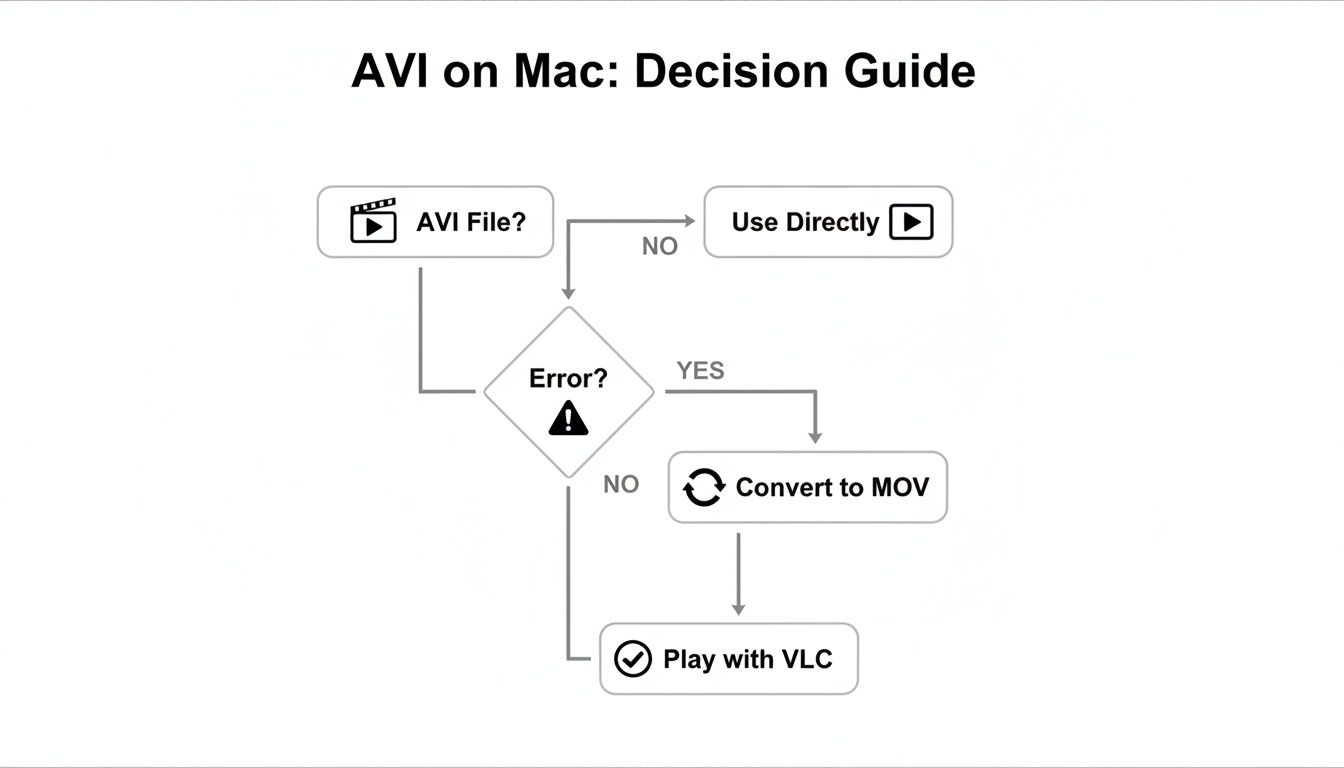
As you can see, the moment a compatibility error pops up, converting the file to MOV is almost always the most straightforward way to get back to a smooth workflow.
Finding Your Ideal Conversion Method
Picking a tool isn’t just a matter of preference; it’s a strategic choice that can save you a ton of time and preserve the quality of your video. A casual user just trying to open an old video will have very different needs than a video editor juggling client footage.
Here’s a quick rundown to help you figure out where you land:
- QuickTime Player: Perfect for the occasional, simple conversion. If macOS can at least partially recognize the file, QuickTime can often finish the job. It's already on your Mac, so there's zero setup.
- VLC Media Player: The go-to free option when QuickTime throws an error. It has much broader format support and gives you some basic controls over the final output.
- FFmpeg: This is the power user's choice. It’s a command-line tool that offers complete, granular control over every single aspect of the conversion. It’s unbeatable for automation and custom scripts.
- Dedicated Converters (e.g., Compresto): Built for professionals who need to process heaps of files at once. These apps are all about batch processing, folder monitoring, and optimized presets that deliver speed and reliability.
Your choice isn't just about getting the file to open. The right tool fits seamlessly into your workflow, saves you from tedious manual work, and ensures your final video looks just as good as the original. It removes the friction.
And the need for these tools is only getting bigger. The global video converter market is projected to more than double, growing from USD 1.2 billion in 2023 to USD 2.8 billion by 2032. This boom shows just how critical it is for creators and professionals to standardize their media, especially when moving video between different editing systems and platforms. If you're curious about the numbers, you can explore the full video converter market report.
Before we dive into the step-by-step guides, let's put these methods side-by-side to make your decision even easier.
A Quick Comparison of Mac Conversion Methods
This table breaks down the key differences between the tools we'll cover. Think about what matters most to you—speed, control, cost, or simplicity—and find the method that aligns with your needs.
| Method | Best For | Ease of Use | Batch Processing | Cost |
|---|---|---|---|---|
| QuickTime Player | Quick, one-off conversions of compatible AVIs | Very Easy | No | Free |
| VLC Media Player | Basic conversions when QuickTime fails | Easy | No | Free |
| FFmpeg | Power users needing full control and automation | Difficult | Yes | Free |
| Compresto | Professionals needing speed and bulk processing | Easy | Yes | Paid |
Ultimately, choosing how to convert AVI to MOV is all about matching the tool's capabilities to your project's demands. Now, let’s get into the specifics of how to use each one.
Converting Files for Free with VLC and HandBrake
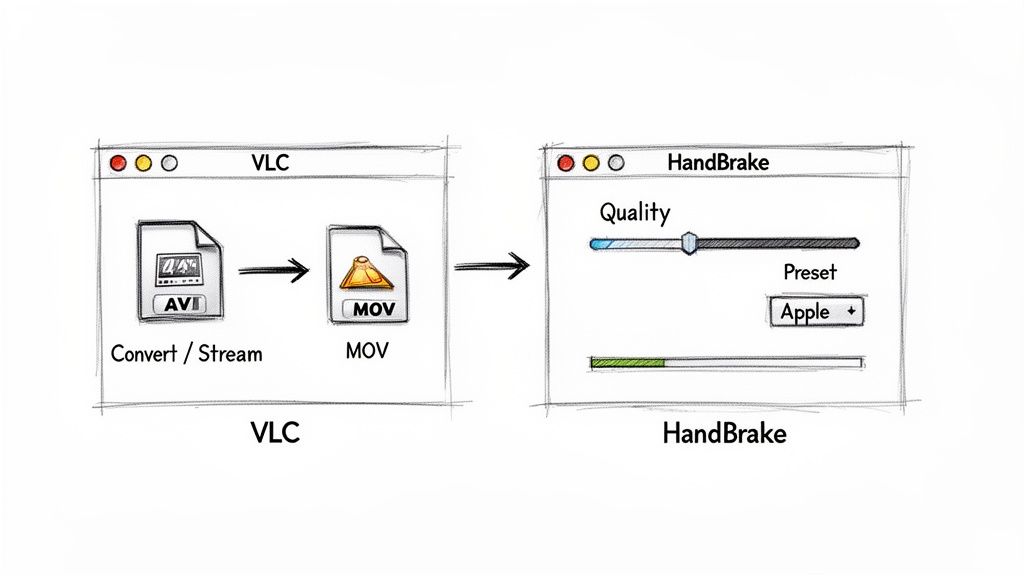
You absolutely don't need to shell out for expensive software just to convert AVI to MOV. In fact, a couple of the most reliable and powerful tools for the job are completely free and probably already on your radar: VLC Media Player and HandBrake.
Most people know VLC as the media player that can play absolutely anything you throw at it. But tucked away inside is a surprisingly capable conversion tool, making it the perfect first stop for a quick and dirty conversion.
Using VLC Media Player for a Quick Conversion
Think of VLC's conversion feature as the no-fuss, get-it-done option. It’s perfect when you have a single AVI file and just need it to work on your Mac, without getting bogged down in the technical weeds of codecs and bitrates.
Here’s how to do a basic conversion in a snap:
- Open up VLC and head to File > Convert / Stream in the menu bar.
- Drag your AVI file right into the window, or use the "Open media..." button to find it.
- Look for the "Choose Profile" section and pick a preset that works with MOV, like Video - H.264 + MP3 (MP4). Don't worry about the MP4 label; VLC is smart enough to handle the container change.
- Click "Save as File," pick where you want to save it, and—this is important—make sure you name the file with a
.movextension. - Hit "Save," and you're off to the races.
This method is all about speed and simplicity. But what if you need more say in the final output? If you want to fine-tune the quality or optimize the video for a specific device, it's time to bring in the specialist: HandBrake.
Gaining More Control with HandBrake
HandBrake is a dedicated video transcoder, and it’s what you grab when you want to dial in the perfect balance between file size and visual quality. It's especially handy for batch processing multiple files, though you'll set them up one by one in the main interface.
One of HandBrake's greatest strengths is its massive library of presets. Instead of playing a guessing game with settings, you can just pick a preset tailored for your target, like "Apple 1080p30 Surround," and trust that it's good to go.
After opening your AVI file in HandBrake, check the "Summary" tab and make sure the format is set to MP4. HandBrake mostly outputs to MP4 or MKV containers, which might sound wrong, but the resulting MP4 file uses modern codecs that are universally compatible with the entire Apple ecosystem. It achieves the same goal as a MOV, just with a different file extension.
The real magic happens in the "Video" tab. Here, you can choose the H.264 or H.265 video encoder and use the Constant Quality slider to adjust the output. A lower RF (Rate Factor) number means higher quality and a larger file, while a higher number shrinks the file at the cost of some quality.
For anyone looking to really become a pro, we've got a complete guide on how to use HandBrake that dives into all the advanced settings and workflows. It's an incredibly powerful tool that, with a bit of practice, delivers professional-grade results for free.
When you're just converting a file here and there, the free tools get the job done. No question. But for anyone who works with video for a living, the rules are completely different. Your time is your most valuable asset, and workflow efficiency isn't a luxury—it's essential.
This is where professional, dedicated software earns its keep, transforming what would be a mind-numbing manual chore into an automated, background process.
Built for Bulk Processing and Speed
The game changes entirely when you need to convert AVI to MOV in bulk. Picture this: a client drops off a hard drive packed with 50 old AVI clips for a new project you're cutting in Final Cut Pro. Trying to convert those one-by-one with a free tool would be a logistical nightmare, burning through hours of billable editing time before you even start.
Professional converters, like Compresto, are built from the ground up for exactly this kind of high-volume work. Instead of the tedious single-file dance, you just drag an entire folder into the app, pick a high-quality MOV preset, and walk away. It’s a true set-it-and-forget-it approach.
This batch processing feature is an absolute lifesaver. A task that could easily take an hour of manual clicking and waiting with a free tool is finished automatically in just a few minutes. That frees you up to focus on the creative work that actually drives your business forward.
The interface is also designed for pure function—no confusing menus, just the essentials right where you need them.
A clean layout like this lets you add files, choose your settings, and see what's happening at a glance, without having to navigate a maze of options.
For any serious creator, the ROI on professional software isn't just about speed. It's about reliability. Knowing your conversions will be high-quality and consistent, without you having to babysit the process, brings incredible peace of mind.
Advanced Automation with Folder Monitoring
Beyond just batching files you already have, some of the more advanced tools offer powerful automation that can completely reshape your workflow. One of the most impactful features is Folder Monitoring.
Here’s how it works: you tell the software to "watch" a specific folder on your Mac.
Anytime a new AVI file lands in that folder—whether it's from a network drive, a client upload, or a camera dump—the software automatically kicks off the conversion using your preset rules. This creates a fully automated pipeline that runs 24/7 without any input from you.
Let's put this into a real-world scenario:
- The Setup: You set up a shared folder called "AVI_IN" as your watch folder.
- The Action: Your client uploads 20 new AVI files directly into it.
- The Result: The software instantly detects them, converts each one to your preferred MOV format, and drops the finished videos into an "MOV_OUT" folder, ready for you to pull into your editor.
This level of automation is a game-changer for busy freelancers and production teams. It takes the human element out of a repetitive, error-prone task, guaranteeing consistency and freeing up your mental bandwidth. If you regularly need to convert AVI to MOV, this feature alone can justify the investment, streamlining your entire media pipeline from ingest to edit.
The result is simple: more time creating, less time managing files.
Using FFmpeg for Ultimate Control
If you're comfortable working in the terminal and want absolute, granular control over your video files, FFmpeg is the ultimate power tool. Think of it as the Swiss Army knife for video conversion. It’s a completely free, open-source command-line utility that can handle pretty much any media task you throw at it, including a flawless way to convert AVI to MOV.
Sure, it doesn't have a fancy graphical interface, but its real strength is in its precision and how easily it can be automated. Getting a basic conversion done is surprisingly simple. Once you have FFmpeg installed (most Mac users grab it via Homebrew), you can convert a file with a single line of code.
This command is your starting point. It tells FFmpeg to take a source file named input.avi and create a new file, output.mov, using its default settings. This process re-encodes both the video and audio streams into formats that play nicely inside a MOV container.
Advanced FFmpeg Techniques
The real magic of FFmpeg happens when you move beyond the basics. You can specify exact codecs, tweak quality settings, and even write scripts to handle repetitive conversions automatically. This is where you can truly dial in your workflow.
For instance, what if the video and audio inside your AVI file are already compatible with MOV, and all you need to do is change the "wrapper"? You can do that almost instantly with zero quality loss.
By using the
-c copycommand, you're telling FFmpeg to simply "remux" the file. It swaps the container from AVI to MOV without touching the media streams inside. This is incredibly fast—often taking just a few seconds—and preserves 100% of the original quality.
This is the command for that lossless remux: ffmpeg -i input.avi -c copy output.mov
This single command is a game-changer, especially for anyone trying to preserve archival footage.
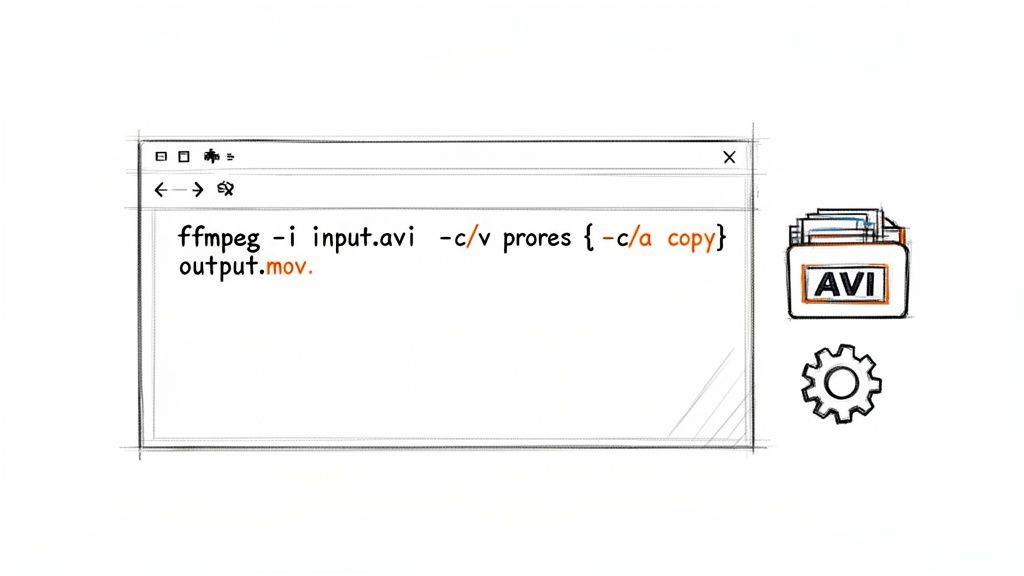
You can also get way more specific, which is essential for professional editing workflows where a particular codec is required. Let's say you need to prep a file for Final Cut Pro; you'll likely want to convert it to the high-quality ProRes codec.
- Specify a Video Codec: Use
-c:v prores_ksto select the Apple ProRes codec. - Set Audio to Uncompressed: Use
-c:a pcm_s16lefor high-fidelity, uncompressed audio. - Combine for a Pro Workflow:
ffmpeg -i input.avi -c:v prores_ks -c:a pcm_s16le output.mov
This level of control is exactly why FFmpeg is an indispensable tool for so many video professionals. While it definitely has a steeper learning curve, understanding just a few key commands can unlock some seriously powerful automation. If you're looking to dive deeper, our guide on how to compress videos using FFmpeg is a great next step, with more advanced examples and workflows.
Balancing MOV Quality and File Size
Getting your AVI file into a MOV container is a solid first step, but the real magic happens inside. When you convert from AVI to MOV, you’re making a critical choice about how the video is compressed. This decision is the ultimate balancing act between crisp visual quality and a manageable file size.
Think of it like packing for a trip. You can bring a giant suitcase with everything you own (that’s your high-quality, massive file), but it’s a pain to haul around. Or, you can pack light and smart (a smaller, optimized file), making the journey much smoother. Your goal is to find that perfect balance for wherever your video is headed next.
Understanding Your Codec Options
The two codecs you’ll run into most often are H.264 and H.265 (HEVC). These are the workhorses of modern video, and choosing between them depends entirely on your needs.
- H.264 (AVC): This is the undisputed champion of compatibility. If your video needs to play on just about any website, social media platform, or device without a single hiccup, H.264 is your safest bet. It has been the standard for years for a reason, offering a fantastic blend of quality and compression.
- H.265 (HEVC): This is the newer, more efficient kid on the block. An H.265 video can deliver the same visual quality as H.264 in a file that’s up to 50% smaller. This is a game-changer for 4K video or if you’re just trying to save on storage space. The only catch? It might not play nice with older devices.
For professional editors, there’s another major player: Apple ProRes. This isn’t a codec for your final YouTube upload; it’s designed for the editing bay. ProRes creates massive files but preserves an incredible amount of detail, which is perfect for heavy-duty color grading and effects work, especially in apps like Final Cut Pro.
The push to convert older, bulky formats like AVI into more streamlined containers like MOV is driven by the real-world economics of video. The global mobile video optimization market is set to grow from USD 720.5 million in 2024 to USD 1.44 billion by 2034. This trend shows just how much businesses rely on smart compression to cut bandwidth costs while delivering high-quality playback on any device. Learn more about these mobile video optimization trends.
Practical Tips for Perfect Results
No matter what software you’re using, a few key settings give you precise control over the final output. You don't have to be a video engineer to get great results; you just need to know which levers to pull.
One of the most powerful tools at your disposal is the Constant Rate Factor (CRF), a setting you'll find in software like FFmpeg or HandBrake. Instead of telling the encoder to aim for a specific file size (bitrate), CRF tells it to maintain a consistent level of visual quality. A lower CRF value (like 18) produces a higher-quality video with a larger file size. A higher value (like 23) shrinks the file down but might introduce some minor visual artifacts. It’s a fantastic way to dial in the exact quality you want.
If that sounds too technical, many professional tools like Compresto take the guesswork out of it with presets. You can simply choose a target like "Web," "Social Media," or "Archival," and the software automatically applies the best settings for that specific use case. It ensures your final MOV is perfectly optimized without you needing to touch a single slider. For a deeper dive, check out our guide on how to compress a MOV file for more advanced tips.
Ready to take control of your video files? With Compresto, you can compress and convert videos, images, and more with a simple drag-and-drop interface, all while keeping everything private on your Mac. Try Compresto today and see how much time and space you can save.