How to Compress a MOV File Without Losing Quality
Before we get into the nuts and bolts of compressing a MOV file, let's talk about why you’d even need to. Large MOV files are a classic bottleneck. They eat up precious storage, make uploads painfully slow, and kill any chance of sharing clips through email or messaging apps. This guide will walk you through how to shrink those files down, freeing up your digital space and making your workflow a whole lot smoother.

Why Are MOV Files So Huge Anyway?
If you’ve ever watched an upload progress bar barely budge, you’ve experienced the pain of an oversized MOV file firsthand. The format itself, developed by Apple, is fantastic for keeping video and audio quality crisp, which is why it’s a go-to in professional editing suites like Final Cut Pro. But that high fidelity comes at a steep cost: massive file sizes.
The reason MOV files get so big is because they're designed as flexible containers. They often hold video data compressed with codecs like Apple ProRes, which are built to prioritize quality over size. That makes them perfect for the editing room but a real headache for sharing, archiving, or putting on the web.
The Real-World Headaches of Bulky Videos
The consequences of these large files ripple through every stage of a project. A simple two-minute 4K video can easily balloon to several gigabytes, creating logistical nightmares you just don’t have time for.
- Storage Clogs: Your hard drive fills up way too fast, forcing you into a constant battle for space or making you shell out for expensive external drives.
- Upload Timeouts: Trying to get a multi-gigabyte MOV onto a platform like YouTube or Vimeo can take hours and is notorious for failing if your internet connection hiccups.
- Sharing Barriers: Most email clients tap out at attachment limits around 25 MB, making it impossible to send even a short, high-quality MOV clip directly.
- Collaboration Delays: Sending files to teammates or clients through cloud services becomes a slow, clunky process that brings feedback loops to a grinding halt.
The problem isn't the MOV format itself. It's that the file is in an unoptimized state for delivery. The goal of compression is to transform it from a high-quality "master" copy into a lightweight, portable version that’s ready for its final destination.
Understanding the many benefits of file compression is the first step toward getting these assets under control without wrecking the quality you worked so hard to create. Check out our deep dive for more on that: https://compresto.app/blog/benefits-of-file-compression.
Just to put it in perspective, a raw 1080p video at 30 fps can have a bitrate over 1.5 Gbps. That means a two-hour file would be a staggering 1.3 TB. Even with a professional codec like ProRes, that same file could still be 200-300 GB. This is exactly why knowing how to compress a MOV file is a non-negotiable skill for any modern creator.
Your First Compression: A Guided Walkthrough
Alright, let's jump in and get our hands dirty. The best way to learn how to compress a MOV file is by doing it, so let's walk through your first compression with Compresto. When you pop the app open, you’ll notice the interface is clean and uncluttered—that’s by design. The goal is to get you from a massive source file to a perfectly compressed video without any headaches.
First thing's first: you need to get your MOV file into the app. You can either click the big "Import" button or just drag and drop your file right onto the main window. I almost always use drag-and-drop; it’s just faster and gets the ball rolling in seconds without clicking through menus.
Once your video is loaded, you’ll see the three main areas you'll be working with: the file queue, the settings panel, and the preview window. Getting a feel for these three parts is key to a smooth workflow.
Navigating The Main Interface
The file queue is where your imported MOV file lands. If you’re compressing a bunch of clips at once, they’ll all line up here, ready to be processed as a batch. This is a lifesaver when you're dealing with a whole folder of footage from a shoot.
Over on the right is the settings panel. Think of this as your command center. It’s where you’ll mess with codecs, tweak bitrates, and change resolutions. We’ll get into the nitty-gritty of these options later, but for your first go, the default presets are your best friend. They’re already optimized for common uses like sharing online or posting to social media.
And finally, you have the preview window. It’s more than just a playback screen; it’s your chance to double-check that you’ve loaded the right clip before you hit the compress button.
Pro Tip: Don't get overwhelmed trying to master every single setting right away. Just start with an "Automatic" or "Web Optimized" preset. These give you a fantastic balance of file size and quality, letting you see the results fast and build some confidence.
For many creators, the journey into video optimization starts long before the final compression. While Compresto is great for that final squeeze, what you do in your editor matters, too. If you're looking for tools to prep your files, you might want to check out some of the cheapest video editing software to get your project ready. And if you're curious about other popular tools, our guide on how to use Handbrake can give you another perspective on compression workflows.
Balancing Quality and File Size Like a Pro
Alright, you've loaded your MOV file into Compresto. Now for the fun part—diving into the settings panel. This is where you get to play director, transforming a bulky master file into something lean, mean, and ready to share. Getting these settings right is the secret to learning how to compress a MOV file without sacrificing the quality you worked so hard to capture.
The whole process is pretty straightforward, really. You import your video, tweak a few key settings, and then preview the result before hitting export.
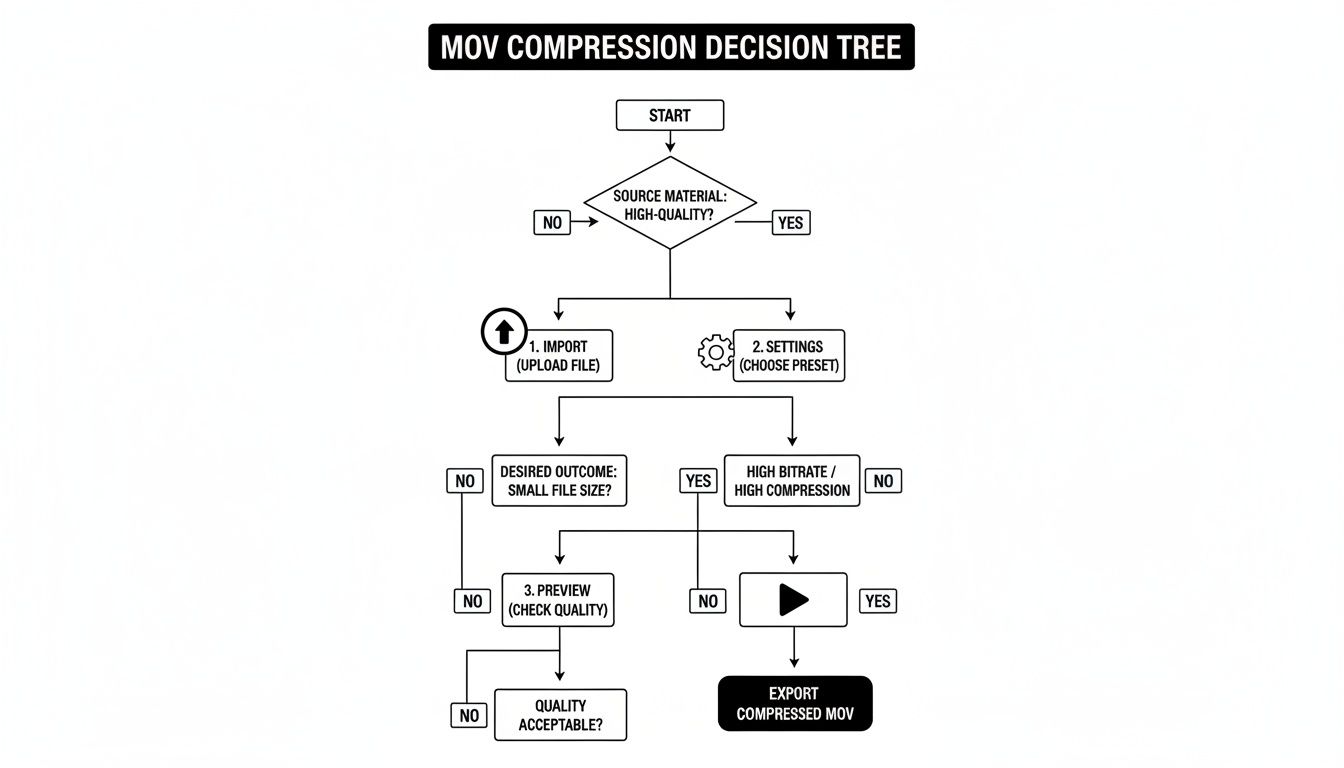
As you can see, the compression workflow boils down to the choices you make in the settings phase. Let’s break down what actually matters.
Decoding Codecs: H.264 vs. H.265
The codec is the engine driving your compression. Think of it as the set of rules the software uses to intelligently shrink your file. For MOV files, you'll mainly be choosing between two heavyweights: H.264 (AVC) and H.265 (HEVC).
- H.264 (AVC): This is the old reliable. It’s been the industry standard for ages, which means it plays nice with just about every device, browser, and platform out there. You can’t go wrong with H.264 for universal compatibility.
- H.265 (HEVC): This is the newer, more efficient kid on the block. H.265 can deliver the same visual quality as H.264 but at a significantly smaller file size—often 40-50% smaller. The only catch is that it demands more processing power and might not work on very old devices.
Just how much smaller are we talking? I’ve seen 5-minute 1080p MOV files go from 2 GB (with H.264) down to just 800 MB with H.265. That's a 60% reduction without a visible drop in quality. This incredible efficiency is why platforms are leaning on HEVC to power nearly 40% of their 4K streams already. If you want to dive deeper into the technical side, there’s a great detailed format analysis on coconut.co worth reading.
Mastering Bitrate: The Real Key to Quality
Bitrate is probably the most critical setting you'll adjust. It determines how much data is used to encode each second of your video, and it's measured in megabits per second (Mbps). It's a direct trade-off: higher bitrate means better quality and a larger file, while a lower bitrate shrinks the file but can introduce nasty artifacts like pixelation.
Think of bitrate as the "detail budget" for your video. A fast-paced action scene needs a larger budget (higher bitrate) to look sharp, while a static shot of a talking head can get by with less.
You’ll generally have two options for how this budget is spent:
- Variable Bitrate (VBR): This is the smart choice for almost every scenario. VBR is clever—it allocates more data to complex, high-motion scenes and less to simple, static ones. The result is a much more efficient compression that maintains consistent visual quality throughout.
- Constant Bitrate (CBR): This method locks in a single bitrate for the entire video, regardless of what's happening on screen. It’s less efficient but can be useful for specific streaming applications that require a predictable data stream. For everyday file compression, stick with VBR.
Resolution and Frame Rate: The Final Touches
Finally, let's talk about resolution and frame rate. Lowering the resolution is one of the quickest and most effective ways to slash your file size.
For instance, do you really need a 4K (3840x2160) video for an Instagram Story? Probably not. Downscaling it to 1080p (1920x1080) will make the file dramatically smaller and it will still look fantastic on a phone screen.
Frame rate (frames per second, or fps) also plays a part. Most video is shot at 24, 30, or 60 fps. If you have a 60 fps clip, you can often drop it to 30 fps to cut the file size nearly in half without anyone noticing. Just be careful not to overdo it, as aggressive frame rate reduction can make fast motion look choppy.
Practical Scenarios: Putting It All Together
Okay, theory is great, but how does this look in the real world? It all comes down to what you need the video for. The right settings for a YouTube upload are completely different from what you'd use to email a preview to a client.
Here's a quick cheat sheet to get you started.
Codec and Bitrate Recommendations
| Use Case | Recommended Codec | Target Bitrate (1080p) | Expected Outcome |
|---|---|---|---|
| Instagram Story | H.264 | 3-5 Mbps | A small file optimized for fast mobile uploads and smooth playback. |
| YouTube Upload | H.264 or H.265 | 8-12 Mbps | A high-quality stream that looks great and meets platform specs. |
| Archiving a Project | H.265 | 15-20 Mbps | Visually lossless quality perfect for long-term storage. |
| Emailing a Client | H.264 | 1-2 Mbps | An extremely small file that easily fits within attachment size limits. |
Ultimately, the best way to learn is by experimenting. Compress a short clip with a few different settings and see what works best for your specific needs. You'll be a compression pro in no time.
Unlocking Advanced Compression Techniques
Once you’ve got a handle on adjusting codecs and bitrates, you can really start to speed up your workflow with some of Compresto's more powerful features. This is where you go from a casual user to a true pro, processing videos with way more efficiency and precision.
Think beyond compressing one file at a time. In the real world, you're often dealing with dozens of clips from a single project. This is where batch processing becomes your new best friend.
Instead of tackling each MOV file individually, you can just drag an entire folder straight into Compresto. The app queues them all up, letting you apply the exact same compression settings across the entire batch. This is a massive time-saver for anyone who works with b-roll, a series of social media clips, or a big batch of client deliverables.
Fine-Tuning Your Compression Workflow
Speed is great, but consistency is just as important. If you find yourself using the same settings over and over for a specific task—like prepping videos for Instagram Reels—you should be using custom presets.
A preset saves your complete configuration—codec, bitrate, resolution, even your audio settings. The next time you have a similar job, just apply your preset with a single click. No more trying to remember which bitrate you used last time.
Beyond presets, don't sleep on the power of trimming your footage before you compress. Compresto has a built-in trimmer that lets you slice off clunky intros, outros, or mistakes right inside the app.
Trimming even a few seconds from your MOV file before compression can lead to a surprisingly significant reduction in the final file size. It's a simple, two-for-one optimization that cleans up your content while making it smaller.
This handy feature means you don't have to jump back into a full-blown video editor for minor tweaks, keeping your entire compression process in one place.
Optimizing Audio to Reduce File Size
While video data makes up most of a MOV file, audio tracks can add more to the file size than you might think. For a lot of projects, the default audio settings are just overkill. Dialing them back is another great way to shrink your files.
Here are a few ways to manage audio for better compression:
- Lower the Audio Bitrate: Just like with video, a lower audio bitrate means a smaller file. Dropping from a high-quality 320 kbps to a more standard 128 kbps is often completely unnoticeable for web content, but it shaves off precious megabytes.
- Convert to Mono: If your audio is mostly a single voiceover or dialogue track, converting from stereo to mono can cut the audio's size in half with practically zero loss in clarity for that use case.
- Remove the Audio Track: For purely visual content like b-roll or silent montages, you can remove the audio track entirely. This is one of the quickest ways to make a major dent in the final file size.
For those who enjoy the maximum control of command-line tools, you can learn more about how to compress videos using FFmpeg in our detailed guide, which also covers some easier alternatives.
Solving Common Compression Problems
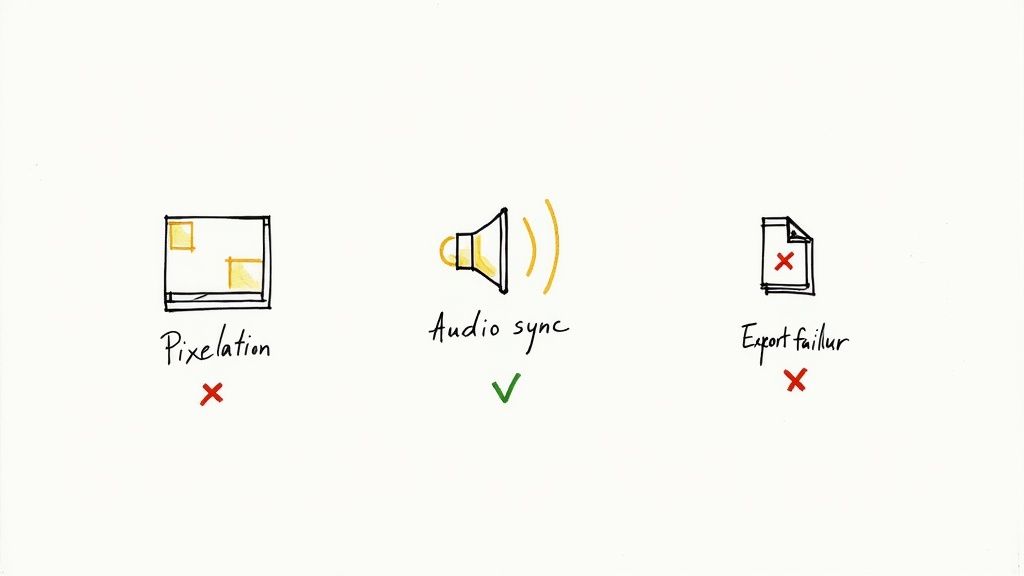
Even with the best tools, video compression can sometimes feel like more of an art than a science. You might hit export and notice some weird visual glitches or, even worse, the whole thing just fails.
Don't sweat it—this happens to everyone. The good news is that most of these issues have simple fixes. With a few tweaks, you can get things looking perfect without having to start over from scratch. Let's walk through the most common headaches.
Fixing Noticeable Quality Loss
The classic compression problem: your video looks pixelated, blocky, or just plain blurry. I’ve seen this countless times, and it almost always comes down to one thing: the bitrate.
If your footage has a lot of fast action, fine details, or complex textures, a low bitrate simply can't keep up. The compressor is forced to throw away too much visual information, and you end up with those ugly artifacts.
- The Solution: This one’s a pretty easy fix. Just head back into your settings and bump up the video bitrate by about 20-30%. For instance, if you exported at 4 Mbps and saw pixelation, try it again at 5 or 6 Mbps. This gives the encoder a bigger "data budget" to play with, which usually clears things right up.
The goal is to find that perfect balance between file size and quality. It might take a couple of quick re-exports, but dialing in the bitrate is the key to a sharp-looking video.
What to Do About Audio Sync Errors
There’s nothing more distracting than audio that’s out of sync with the picture. You see someone's lips move, but the sound lags a split-second behind. This is a tell-tale sign of issues with variable frame rates (VFR), which are super common in footage from phones and screen recordings.
Compression software can sometimes get confused by the fluctuating timing in VFR files, causing the audio and video tracks to drift apart.
- The Solution: Dive back into your export settings and look for an option called "Constant Frame Rate." Forcing the export to a standard rate like 30 fps usually locks the audio and video back together perfectly. If that doesn't do the trick, another option is to re-encode the audio separately to a standard like AAC, which can stabilize the final file.
Overcoming Export Failures
Sometimes, the compression process just…stops. You click "Export," the progress bar inches forward, and then it either freezes or spits out a cryptic error message. This can be caused by anything from a corrupted source file to not having enough disk space.
First, check the simple stuff. Make sure you have plenty of free space on your hard drive for the new file. A quick computer restart can also work wonders by clearing out any temporary system glitches that might be getting in the way.
If you’re still stuck, the source file itself might be the problem. A particularly complex MOV file—maybe one with multiple audio tracks or weird embedded data—can sometimes trip up the encoder. A great workaround is to try exporting to a different format, like MP4, which can often sidestep those compatibility issues and give you a successful export.
Common Questions About Compressing MOV Files
When you're new to compressing MOV files, a few questions always pop up. It’s totally normal. Getting some straight answers can make the whole process feel less intimidating and help you get better results, faster. Let's dig into some of the things people ask most.
Will Compressing a MOV File Ruin the Quality?
This is easily the number one concern. Will shrinking my video make it look like a pixelated mess? It’s a fair question, but the short answer is no—not if you do it right.
Pretty much all video compression is technically "lossy," which just means some data gets thrown out to make the file smaller. The magic of modern codecs like H.264 and HEVC is that they’re smart enough to discard data the human eye is unlikely to miss. You can often cut a file's size in half (or more) with very little noticeable difference, especially for videos you’re putting online.
The real trick is finding that sweet spot between file size and visual quality. For most things you'd share on social media or a website, a well-compressed video will look practically identical to the original.
What’s the Best Format to Compress a MOV File To?
For the best all-around compatibility, MP4 is the clear winner. While MOV is a fantastic format created by Apple, MP4 is the universal language of the web.
Think of it this way: converting your MOV to an MP4 ensures it will play on just about anything—a Windows PC, an Android phone, a smart TV, you name it. It's the safest bet for making sure everyone can watch your video without a headache.
How Long Does It Take to Compress a 1GB MOV File?
This one’s a classic "it depends" situation. There's no single answer because a few things can speed it up or slow it down:
- Video Specs: A long 4K video will take more time to process than a short 1080p clip. It's just more data to work through.
- Your Settings: Pushing for the absolute highest quality with a complex codec like HEVC requires more number-crunching than a standard H.264 compression.
- Your Mac's Muscle: A brand new MacBook Pro with a powerful chip is going to blaze through the task much faster than an older machine.
But for a rough idea, compressing a 1GB MOV file on a modern Mac usually takes somewhere between 5 and 15 minutes.
Can I Compress a 4K MOV File to 1080p?
Yes, you absolutely can! In fact, this is one of the quickest and most effective ways to make a massive dent in file size.
Downscaling from 4K (3840x2160) to 1080p (1920x1080) is a simple setting change in most compression tools. The final video will be significantly smaller but still look incredibly sharp and clear on the vast majority of screens. It’s the perfect move when you need to share high-res footage without the giant file attached.
Ready to take control of your large MOV files? Compresto makes it easy to compress your videos, images, and documents right on your Mac without sacrificing quality. Download it and see how much space you can save.