Top 5: Best Video Compression Software for Mac in 2024
If you’re on the hunt for the best video compression software for Mac, the answer really depends on what you need. For those who love tweaking every possible setting, HandBrake is the undisputed king of free tools, offering incredible control. But if your priority is a clean interface and getting things done quickly, a premium tool like Compresto is probably a better fit.
Why Finding the Right Mac Video Compressor Is Crucial

Diving into the world of video compression can feel like a maze. You're hit with dozens of apps, all promising the smallest files with the best quality. But here’s the thing: the best tool is the one that fits your workflow.
Are you a pro videographer who needs granular control over every single pixel? Or are you a content creator who just needs to shrink a file fast without a headache? Your answer changes everything.
This guide is here to cut through that noise. We’ll lay out a clear, practical comparison of the top players, breaking down what they do, what they cost, and who they’re really for. Think of it as your roadmap to making a smart choice without drowning in tech jargon.
Top Mac Video Compression Software at a Glance
To get started, here's a quick look at the leading tools. This table gives you an immediate feel for where each app shines, helping you spot the right one for your goals before we dig deeper.
| Software | Best For | Key Features | Price |
|---|---|---|---|
| HandBrake | Technical users and those needing maximum control over compression settings. | Open-source, extensive format support, advanced manual controls. | Free |
| Compresto | Creators and professionals who value speed, simplicity, and batch processing. | Drag-and-drop interface, high-speed compression, local processing. | Premium |
| VLC | Users who already have VLC installed and need occasional, basic compression. | Doubles as a media player, basic conversion options. | Free |
| iMovie | Casual users who need simple trimming and resolution changes without new software. | Pre-installed on macOS, easy-to-use interface, good for basic edits. | Free |
This snapshot helps frame the conversation. HandBrake, for instance, is an absolute powerhouse. As an open-source tool, it has earned a massive 16% share of the video compressor market, mostly because pros love its ability to handle nearly any codec or format you throw at it.
Beyond video, mastering your Mac’s built-in features can be a huge time-saver. If you ever need to capture what’s on your screen, for example, it’s worth learning how to screenshot a window on your Mac. And for a more detailed performance breakdown, don't miss our guide on the fastest video compression software for Mac.
Why Compressing Video on Your Mac Matters
Before we jump into the tools, let's get one thing straight: video compression isn't some niche task for tech wizards anymore. It's a daily necessity for pretty much any Mac user who deals with video.
Think of an uncompressed 4K video file like a giant, overstuffed suitcase. It has everything you own inside, which is great, but it's also ridiculously heavy, expensive to ship, and you definitely can't bring it on a plane. Compression is the art of repacking that suitcase into a neat little carry-on with just the essentials. It's lighter, way more portable, and ready for any digital journey you have in mind.
That's what lets you send a crisp video to a client, upload a reel to Instagram without it looking like a potato, or just keep your MacBook’s SSD from screaming for mercy.
Reclaim Your Precious SSD Space
Modern Macs are speed demons, but their super-fast SSD storage isn't infinite. A single minute of 4K video shot on an iPhone can chow down on hundreds of megabytes. For video editors, content creators, or even just parents filming their kids' soccer games, those files add up fast, turning a spacious 1TB drive into a storage nightmare.
Good compression can shrink video files by up to 90% with almost no noticeable drop in quality. This isn't just about archiving old projects; it's about keeping your workflow smooth and responsive without constantly getting that dreaded "Your startup disk is almost full" notification.
For creators, storage isn't just capacity—it's creative runway. The less space you waste on bloated files, the more room you have to create, experiment, and store your next great idea without compromise.
This concept map breaks down how compression turns into real, tangible benefits like smaller files, more storage, and faster sharing.
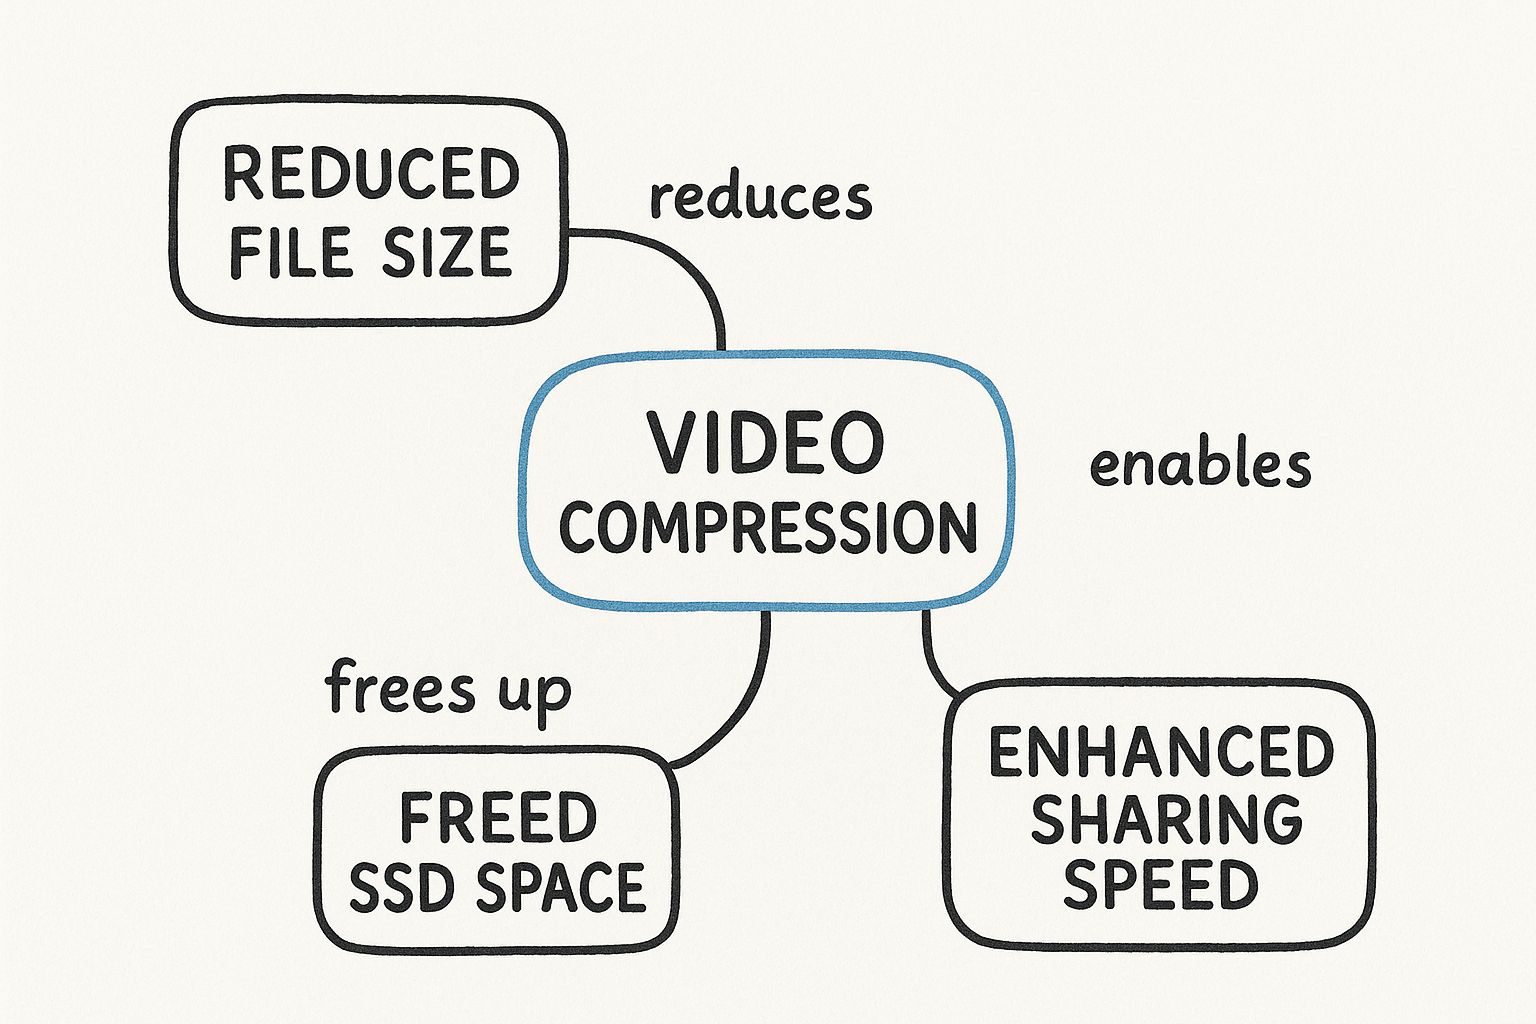
As you can see, the simple act of shrinking a file has a ripple effect, making everything from local storage to global content delivery better. This growing need is fueling a massive market.
The global video compressor market, which includes the best video compression software for mac, was valued at a cool USD 2.5 billion in 2023 and is expected to hit USD 6.8 billion by 2033. This surge is all thanks to the demand for HD content and the rise of AI-powered encoding to make streaming and sharing more efficient.
Streamline Your Sharing and Uploads
Ever tried to upload a beautiful, high-quality video to a social platform, only to watch it get turned into a pixelated mess? That’s usually because the platform slams your large file with its own harsh compression, and it doesn't care about preserving quality. Compressing your video beforehand puts you back in the driver's seat.
- Meet Platform Requirements: You can dial in the exact file size and format needed for platforms like Instagram, TikTok, or Twitter.
- Faster Uploads: Smaller files mean quicker uploads. We're talking minutes saved, sometimes even hours.
- Preserve Visual Quality: When you compress with a good tool, you ensure your video looks its best, sidestepping the platform's clumsy, automated algorithms.
A super common reason to compress is to get videos ready for social media. If you're trying to figure out the specifics, learning how to post videos from YouTube to Instagram can be a good starting point. Understanding the broader benefits of file compression really clarifies why this step is so vital today. At the end of the day, compression is the bridge between your amazing high-res source file and a world that demands speed.
How Video Compression Actually Works
Before you can find the best video compression software for Mac, you need a peek under the hood to see how the magic actually happens. It might sound complex, but the basic ideas are surprisingly easy to grasp. Just think of it like a special language and the box it gets shipped in.
First, you have the codec, which is short for coder-decoder. A codec is the "language" used to shrink down all that video data. Some of the most common codecs you'll run into are H.264, which works almost everywhere, and H.265 (also called HEVC), a newer, more efficient option that's perfect for 4K video.
Then there's the container. This is the file type you actually see, like .MP4 or .MOV. The container is really just the box that holds the compressed video, audio, and other data together. It isn't the compression itself, but it does decide where your video can be played.
Lossy vs. Lossless: The Two Main Approaches
At its core, video compression boils down to two different methods for cutting down file size. The right choice depends entirely on what you're trying to do—whether you need a perfect, untouched original or a file that’s easy to share.
Lossless Compression is like perfectly vacuum-sealing your clothes for a trip. You suck all the air out to make the bag smaller, but when you open it up, every single shirt and sock is there, exactly as you packed it. No data is permanently thrown away.
This method cleverly finds repetitive data and creates a shorthand for it. It's fantastic for archiving footage where every pixel matters, but it usually only shrinks a file by about 20-30%.
Lossy Compression, on the other hand, is the real workhorse of the internet.
Think of lossy compression as a skilled artist painting a replica of a photograph. They capture the essence—the colors, the subject, the mood—so well that it looks identical from a distance. But they leave out microscopic details that the camera captured, like the tiny texture of a leaf. To the human eye, the painting and the photo are the same, but the painting is a much smaller file.
This is exactly how services like YouTube and Netflix can stream high-definition video to millions of people without bringing the internet to a screeching halt. Lossy compression intelligently gets rid of data our eyes are unlikely to notice anyway, achieving massive file size reductions of up to 90% while keeping the video looking great.
The Levers of Compression: Quality and Size
Beyond just picking a method, the best video compression software for Mac gives you control over a few key settings. Think of these as levers you can pull to strike the perfect balance between file size and visual quality for any situation.
-
Resolution: This is simply the number of pixels in the image (like 1920x1080 for HD or 3840x2160 for 4K). Dropping the resolution is one of the quickest ways to shrink a file. For instance, exporting a 4K video at 1080p will make it dramatically smaller because you're telling the computer to use far fewer pixels.
-
Bitrate: This measures how much data is used to describe one second of video, usually in megabits per second (Mbps). A higher bitrate packs in more detail, leading to better quality but a bigger file. A lower bitrate creates a smaller file but can introduce blocky-looking artifacts if you push it too far.
-
Frame Rate (FPS): This is the number of still images, or frames, shown every second. Standard video is usually around 24, 30, or 60 FPS. If you have a video shot at 60 FPS, dropping it to 30 FPS will literally cut the number of frames in half, leading to a much smaller file.
Understanding these pieces gives you the power to make smart choices. For example, knowing that the H.265 codec is more advanced than H.264 means you can use a lower bitrate with H.265 and get the same visual quality. To see just how different they are, check out our detailed comparison of H.264 vs H.265 codecs. Getting a handle on these concepts is the first step to getting professional results every single time.
Core Features Every Mac Video Compressor Needs
Now that we've covered the basics of how compression actually works, it's time to find the right tool for the job. Picking the best video compression software for Mac isn't about chasing the longest feature list; it's about finding an app that fits your workflow like a glove.
Think of it like buying a car. Sure, you can get distracted by the paint color or the sound system, but what really matters? A solid engine, reliable brakes, and good steering. This section is your guide to those non-negotiable features, making sure you don't end up with a tool that looks great but stalls out when you need it most.
Broad Codec and Format Support
First up: versatility. Your software needs to speak multiple digital "languages" (codecs) and handle different "packages" (containers). A tool that only works with one format is like a translator who only knows a single dialect—not very helpful when you're dealing with files from all over the place.
You'll want a compressor that confidently handles the big ones:
- H.264 (AVC): This is the universal standard. It’s your guarantee that compressed videos will play on almost any device imaginable, from a ten-year-old PC to the latest iPhone.
- H.265 (HEVC): The modern, high-efficiency successor. It gives you the same visual quality as H.264 but in a much smaller file, which is absolutely essential for anyone working with 4K or 8K footage.
- MP4 and MOV Containers: These are the bread and butter of the Apple ecosystem and beyond, offering the perfect blend of quality and compatibility.
With broad support, you can take any file a client sends you and export it in the exact format needed for YouTube, Instagram, or your archives without ever hitting a compatibility wall.
Batch Processing Capabilities
Compressing one video is easy enough. But what about a folder with a hundred clips from yesterday's shoot? This is where batch processing becomes a total game-changer. It’s the difference between washing one dish by hand and loading up the dishwasher after a dinner party.
Batch processing lets you line up a whole queue of videos, apply the same settings to all of them, and just let the software run. This one feature is a massive time-saver for anyone who deals with media in bulk. Instead of babysitting each export, you can set it and forget it, freeing you up to work on something more creative.
For content creators and video editors, workflow efficiency is everything. A tool without batch processing traps you in a repetitive, manual loop, turning a simple task into a major time-sink. The ability to process entire folders at once is a hallmark of professional-grade software.
Hardware Acceleration for Speed
Modern Macs, especially those running on Apple Silicon (M1, M2, M3), have specialized hardware built specifically to chew through video encoding and decoding tasks at blistering speeds. The best video compressors for Mac tap directly into this power through hardware acceleration.
This feature essentially offloads the heavy lifting from your Mac’s main processor (CPU) to its dedicated media engine. The result? Insanely fast export times—often several times quicker than software-only encoding. It also keeps your CPU free, so your Mac stays snappy and responsive for other tasks while it compresses in the background. If you're working with 4K files or tight deadlines, hardware acceleration isn't just nice to have; it's a necessity.
A Balance of Presets and Manual Controls
Finally, a great tool meets you where you are. It should offer a simple path for quick jobs and a deep set of options for when you need to get granular.
- Presets: These are pre-configured settings optimized for platforms like YouTube, Vimeo, or even for sending a video in an email. They take the guesswork out of the equation, giving you a reliable, high-quality result with a single click.
- Manual Controls: For those times when you need total precision, the ability to tweak the bitrate, resolution, frame rate, and other encoder settings is crucial. This gives you the power to fine-tune that delicate balance between file size and visual quality.
The ideal tool gives you a library of useful presets for 80% of your work but keeps the advanced controls easily within reach for the other 20%. This dual approach makes the software both powerful for experts and approachable for beginners.
To help you evaluate your options, here’s a quick checklist of what to look for.
Feature Checklist for Mac Video Compressors
Use this checklist to evaluate software based on features that matter most for performance, quality, and workflow efficiency on macOS.
| Feature | Why It Matters | Look For |
|---|---|---|
| Codec Support | Ensures your videos are compatible with various devices and platforms. | H.264 (AVC), H.265 (HEVC), ProRes, and other common codecs. |
| Format Support | Lets you work with the most common file types in the video world. | MP4, MOV, MKV, and AVI container support. |
| Batch Processing | Saves a massive amount of time by automating the compression of multiple files. | The ability to drag-and-drop entire folders and apply settings to all. |
| Hardware Acceleration | Drastically speeds up export times by using your Mac's dedicated media hardware. | Support for Apple Silicon (M1/M2/M3) and Intel Quick Sync Video. |
| Presets | Provides one-click settings for common destinations like YouTube, Vimeo, and social media. | A library of up-to-date, platform-specific presets. |
| Manual Controls | Gives you fine-grained control over bitrate, resolution, and quality for precise results. | Sliders and input fields for bitrate, frame rate, resolution, and audio settings. |
| Preview Window | Lets you see a preview of the compressed video before committing to a full export. | A real-time, side-by-side comparison of the original and compressed video. |
| User Interface (UI) | An intuitive and clean interface makes the entire process faster and more enjoyable. | A simple, uncluttered design that’s easy to navigate. |
By keeping these core features in mind, you'll be able to cut through the noise and find a video compressor that not only works but actively makes your workflow faster and more efficient.
Alright, we've covered the basics of how video compression works. Now for the fun part: let's see how the best tools out there actually stack up in the real world. This is where the rubber meets the road.
I've put the top Mac video compressors through their paces to give you an honest look at the user experience, raw performance, and the killer features that make each one unique. We’ll look at everything from the tinkerer’s dream tool to the sleek, simple option for busy creators who just need to get the job done fast.
For each one, I’ll give you a straight-up verdict with the good and the bad, so you can pick the software that truly fits your projects, your workflow, and how much you enjoy digging into the settings. Let's dive in.
HandBrake: The Power User’s Open-Source Choice
HandBrake has been a legend in the video world for years, and for good reason. It’s completely free, open-source, and gives you an almost overwhelming level of control over every tiny detail of the compression process. If you're the kind of person who loves to tweak settings to find that perfect balance between quality and file size, HandBrake is your playground.
The interface can look a bit intimidating at first glance, packed with tabs for dimensions, filters, video codecs, and audio tracks. But that complexity is exactly where its power lies. You can fine-tune everything from the video encoder and frame rate to niche options like subtitles and chapter markers. It also comes loaded with a huge library of presets, which are a fantastic starting point for common destinations like YouTube, Vimeo, and specific devices.
Here's a look at the HandBrake interface after loading a video. You can immediately see all the knobs and dials available.
The screenshot really tells the story: this is a tool built for technical control, with options for presets, formats (like MP4), and deep-dive tabs for dimensions and video settings.
Pros of HandBrake
- Completely Free: It’s an open-source project, so it costs absolutely nothing. No ads, no subscriptions.
- Unmatched Control: You get some of the most granular manual controls available in any compressor, period.
- Excellent Presets: The built-in presets are smartly configured and cover a massive range of devices and platforms.
- Cross-Platform: It runs perfectly on macOS, Windows, and Linux, making it a go-to tool no matter what system you're on.
Cons of HandBrake
- Steep Learning Curve: All those options can be a lot for a beginner to take in.
- Dated Interface: The UI is all about function over form. It lacks the modern, intuitive feel of paid apps.
- Slower on Some Tasks: Without finely-tuned hardware acceleration for every codec, it can sometimes lag behind paid competitors.
Verdict: HandBrake is the undisputed champion for technical users, hobbyists, and anyone who wants to get their hands dirty with video settings without spending a dime. If you’re willing to spend a little time learning your way around, it delivers professional-grade power for free.
Compresto: The Premium Choice for Speed and Simplicity
While HandBrake is for the tweaker, Compresto is built from the ground up for Mac users who value a quick, frictionless workflow above all else. It elegantly sidesteps the complexity, focusing instead on a clean, drag-and-drop interface that gets the job done fast. It's the perfect fit for content creators, marketers, and professionals who compress files all day and can't afford to get stuck in a sea of technical settings.
Its magic is in its simplicity and raw speed. Compresto is optimized to use Apple Silicon's hardware acceleration, delivering blazing-fast compression times, especially with big 4K files. The app also nails batch processing—just drag a whole folder of videos onto it and compress them all with one click. Best of all, everything happens locally on your Mac, so your files stay completely private.
Pros of Compresto
- Incredibly Fast: It’s optimized for modern Macs and chews through files at high speed.
- Intuitive Interface: The user experience is clean, simple, and feels right at home on macOS.
- Powerful Batch Processing: Handles hundreds of files in a queue without breaking a sweat, saving a ton of time.
- Privacy-Focused: All compression happens on your machine. Nothing ever gets uploaded to the cloud.
Cons of Compresto
- Premium Software: Unlike HandBrake, Compresto is a paid app.
- Fewer Manual Controls: It puts ease of use first, which might not be enough for advanced users who need total control.
Verdict: Compresto is the best video compressor for Mac users who value their time. It’s perfect for professionals and creators who need a reliable, fast, and dead-simple tool that just works. The investment pays for itself in pure workflow efficiency.
Adobe Media Encoder: The Professional-Grade Powerhouse
For any video professional already living in the Adobe Creative Cloud world, Adobe Media Encoder is the obvious and most powerful choice. It’s not just a compressor; it’s a full-blown media management engine designed to integrate perfectly with Premiere Pro, After Effects, and other Adobe apps.
Media Encoder shines when dealing with professional codecs like ProRes and offers an exhaustive list of format options. Its "watch folder" feature is a game-changer for automated workflows—any file you drop into a designated folder gets automatically encoded based on your presets. This degree of automation and deep integration is unmatched, making it an absolute necessity for production houses and serious video editors.
Pros of Adobe Media Encoder
- Seamless Adobe Integration: It talks flawlessly with Premiere Pro and After Effects for a silky-smooth post-production workflow.
- Extensive Codec Support: It handles professional-grade formats that other tools can't touch.
- Powerful Automation: Features like watch folders can put your entire encoding pipeline on autopilot.
Cons of Adobe Media Encoder
- Subscription-Based: It’s only available as part of a Creative Cloud subscription, making it the priciest option by far.
- Overkill for Simple Tasks: Its pro-level features are way more than you need if you just want to shrink a few files here and there.
Verdict: For professionals working inside the Adobe ecosystem, Media Encoder is non-negotiable. Its integration and automation muscle are industry-leading, but the subscription cost makes it impractical for anyone outside of that professional sphere.
A Practical Guide to Compressing Your First Video
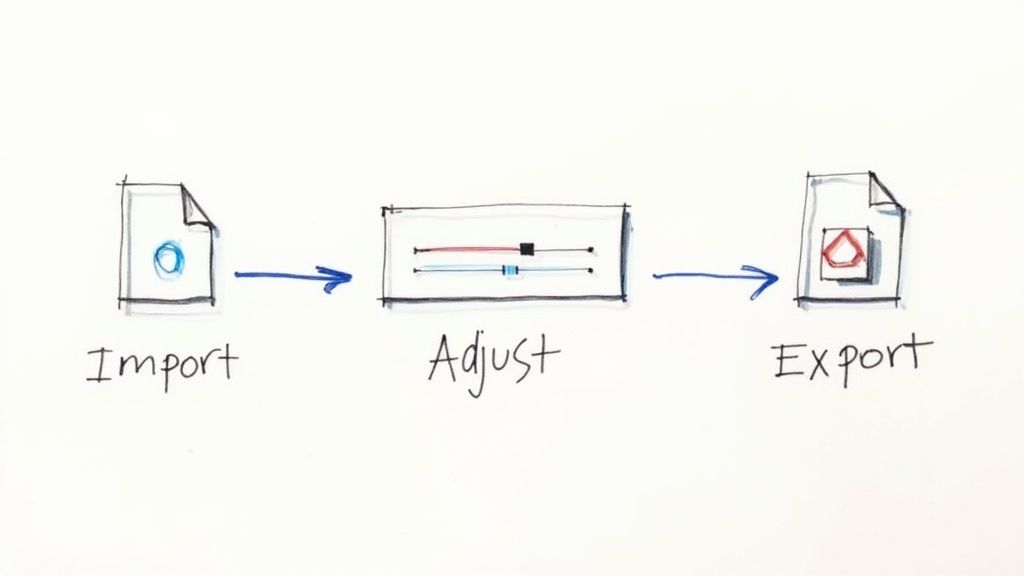
Knowing the theory behind codecs and bitrates is one thing, but nothing beats rolling up your sleeves and actually doing it. Let's walk through a real-world scenario that shows just how simple and powerful video compression can be for any Mac user.
We're going to take a big, clunky 4K video file and shrink it down to a much more manageable size. The best part? We'll do it without wrecking the crisp quality you worked so hard to capture. This guide shows exactly how the best video compression software for Mac turns a storage hog into a sleek, shareable file.
Step 1: Importing Your Source Video
This first step is always the easiest. Fire up your compression software—for this walkthrough, we'll use a tool with a simple drag-and-drop interface like Compresto. Now, find your large video file in Finder. A typical one-minute 4K clip shot on an iPhone can easily top 500 MB.
Just drag that file from its folder and drop it right into the app window. The software will instantly analyze the video, showing you its current size, resolution, and format. This gives you a clear starting point before you touch a single setting.
Step 2: Choosing a Smart Preset
Here's where the magic happens—and where you can save a ton of time. Instead of getting lost in a sea of technical settings, look for the presets menu. Think of these as pre-made recipes designed for specific uses.
Our goal is to make this 4K clip perfect for sharing online without losing too much detail. A preset like "Fast 1080p30" is an ideal choice, and here's why it's so effective:
- Resolution: It smartly downscales the video from 4K to 1080p, a resolution that looks fantastic on most screens but uses a fraction of the data.
- Frame Rate: It locks the frame rate to 30 frames per second (fps), which is the standard for smooth, reliable playback online.
- Codec: It automatically picks a universally compatible codec like H.264, guaranteeing your video will play on almost any device.
By selecting this single preset, you've instantly applied all the right settings for a high-quality, web-ready video. No guesswork required.
Presets are your workflow superpower. They apply expert-level configurations in a single click, taking the complexity out of compression and guaranteeing consistent, reliable results every time you export.
Step 3: Making Final Adjustments
While presets do most of the heavy lifting, the best tools still give you a bit of control for fine-tuning. Before you export, you might see a quality slider, usually labeled from "Lowest" to "Highest." If the preset defaults to the middle, you can nudge it a little higher for extra visual pop or a bit lower if you need an even smaller file.
For this example, we’ll stick with the preset’s default quality, since it’s already calibrated for the best balance. Now, all that’s left is to hit the "Compress" or "Export" button. The software will tap into your Mac’s hardware acceleration to get the job done fast.
The results are often staggering. That original 500 MB 4K file is now a crisp 1080p video that’s only 50 MB—a 90% reduction in file size. It’s now small enough to email, upload to social media in seconds, and won’t devour your precious SSD space, all while looking nearly identical to the original on most screens.
Common Questions About Video Compression on Mac
Even with a good guide, a few questions always seem to pop up when you start getting into video compression. Let's tackle the most common ones Mac users run into so you can feel confident handling any video file that comes your way.
Will Compressing a Video Ruin Its Quality?
Not if you do it right. While most compression is lossy—meaning some data gets selectively removed—the best video compression software for Mac uses smart codecs like H.265/HEVC. These codecs are brilliant at shrinking file sizes with a minimal, often unnoticeable, loss in visual quality.
For anything you're sharing online or on social media, the difference is usually invisible to the naked eye. You get the huge upside of a smaller file without a perceptible hit to quality.
What Is the Best Video Format for Mac?
MP4 is the undisputed champion when it comes to compatibility. An MP4 file packed with an H.264 or H.265 codec will play perfectly across the entire Apple ecosystem and just about every other device out there.
- H.264 gives you maximum compatibility, which is great for older devices.
- H.265 (HEVC) is the winner for superior compression, making it the go-to for 4K video.
Can I Just Use QuickTime Player to Compress Video?
You can, but its capabilities are pretty basic. QuickTime’s "Export As" feature lets you save videos at lower resolutions like 1080p, which does make the file smaller. The problem is, you have almost zero control over the process.
Dedicated software is like a professional toolkit compared to QuickTime’s basic screwdriver. It gives you precise control over codecs, bitrates, and quality settings, allowing you to achieve much smaller file sizes with far better results.
Ready to experience fast, simple, and private compression? Compresto offers a powerful drag-and-drop solution optimized for your Mac. Download Compresto today and see how much space you can save.