How to Make a Video Small: Easy Tips & Best Tools
The simplest way to shrink a video file is to use a good compression tool. The goal is to lower its bitrate and convert it to a modern, more efficient codec like H.265 (HEVC). This process cuts down the amount of data used every second, drastically reducing the file size while fighting to keep the visual quality high.
Understanding Why Your Video Files Are So Large
Ever shot a quick, beautiful 4K video on your phone, only to be shocked that it's eating up gigabytes of storage? It's a common headache, and it comes down to a few key technical details that work together to create massive files. Getting a handle on these is the first step toward making smarter choices when you compress.

At its heart, a huge video file is just a product of high data density. Think of it like a high-resolution photo compared to a simple line drawing—the photo has infinitely more detail, and all that detail requires more data to store.
The Main Culprits Behind Bloated Files
So, what are these factors? It really boils down to three things: resolution, bitrate, and the codec. Each one plays a unique role in determining just how big that final file will be.
Here's a quick rundown of the key factors that contribute to your video's file size. Understanding these will help you make better decisions when it's time to compress.
Key Factors Affecting Video File Size
| Factor | What It Is | Impact on File Size | Recommendation for Smaller Files |
|---|---|---|---|
| Resolution | The number of pixels in each frame (e.g., 1080p, 4K). | High. More pixels mean more data. | Lower it. Dropping from 4K to 1080p can save a ton of space. |
| Bitrate | The amount of data used to encode one second of video. | Very High. This is the biggest factor. | Lower it significantly. Find a balance that looks good to you. |
| Codec | The algorithm used to compress the video data. | High. Modern codecs are far more efficient. | Use a modern codec like H.265 (HEVC) instead of the older H.264. |
Let's dig a little deeper into what each of these means for you.
- Resolution: This is just the number of pixels that make up each frame. A 4K video (3840x2160 pixels) has four times the pixel data of a 1080p video (1920x1080). It's no wonder the file is substantially larger.
- Bitrate: Think of this as the data "budget" for each second of video, usually measured in megabits per second (Mbps). A higher bitrate allows for more detail and better quality, but it balloons the file size.
- Codec: A codec (short for coder-decoder) is the technology that compresses and decompresses the video. Newer codecs like H.265 (HEVC) are way more efficient than older ones like H.264 (AVC), giving you the same quality at a much lower bitrate.
The real magic of smart compression isn't just about making a file smaller—it's about strategically removing the data your eyes are least likely to notice. This is how you can preserve the perceived quality while dramatically cutting down the file size.
The Role of Codecs and Compression
When you hit record, your camera or phone uses a codec to package all that visual information. Some codecs are built to preserve every last bit of detail, which is great for professional editing but results in gigantic files. Others are designed for pure efficiency, making them perfect for optimizing videos for sharing and export.
Getting a grip on the difference between H.264 and the newer H.265 can be a game-changer. For a deeper dive, check out our guide on H.264 vs H.265: https://compresto.app/blog/h264-vs-h265.
The need for better video management is huge. The video compression market was valued at around USD 4.175 billion in 2025 and is on track to hit USD 7.189 billion by 2033. This growth shows just how critical it is to have tools that can make our video files more manageable.
Once you understand these core ideas, you can stop blindly clicking "compress" and start making informed decisions that give you the perfect balance of size and quality.
Easiest Way to Compress Videos on a Mac: Use a Dedicated App
When you need to shrink a video file without getting a headache from all the technical jargon, a dedicated compression app is your best friend. Tools built specifically for this, like Compresto, cut right to the chase. They give you a simple, drag-and-drop experience on your Mac that just works.
Instead of throwing a confusing dashboard of sliders and acronyms at you, these apps are designed around what you actually want to do with the file. You don't have to be a video engineer; you just need a goal.
Get Quick Results with Preset Workflows
Let's walk through a real-world scenario. You just finished editing a gorgeous 4K wedding video, but it’s a whopping 10 GB. That’s way too big to email to family or even upload to a shared cloud folder without a long wait.
This is exactly where presets shine. A good compression tool will give you options built for common situations.
- Email Preset: This setting is aggressive. It prioritizes getting the file size as small as possible, usually aiming for under the 25 MB attachment limit. It will drop the resolution and bitrate hard, making it perfect for a quick preview.
- Web Optimized Preset: This is the happy medium. It cuts the file size down for faster loading on websites or social media while keeping the video looking crisp. Your 10 GB file might shrink down to around 500 MB—still sharp, but way more manageable.
- High Quality Preset: Think of this as gentle compression, perfect for archiving. It might use a more efficient codec like H.265 to slash the file size by 50-70% with almost no visible loss in quality.
Using presets means you get predictable, reliable results every time. You just pick your destination, and the app takes care of the complicated settings behind the curtain.
The whole point of a dedicated tool is efficiency. It swaps endless customization for pure speed and simplicity, letting you compress a file in a few clicks instead of spending minutes tweaking settings.
A Practical Example: Shrinking a Screen Recording
Now, let's try a different task. You’ve recorded a two-minute screen capture showing a colleague how to use some new software. The original file is 150 MB—still too beefy for a quick Slack message or an email attachment.
In this case, you’d just drag the file into an app like Compresto and hit the "Email" or a custom "Low Quality" preset. The app would crunch the numbers, and in less than a minute, you’d have a file under 20 MB. The text on the screen would still be perfectly readable, but the file would be small enough to share instantly.
This preset-first approach removes all the friction. You aren't left guessing what bitrate to use or which codec is best; you're just telling the software what you need. For those who want to get into the weeds, you can find a more extensive review in our ultimate guide to video compression software for Mac.
At the end of the day, dedicated tools are built for speed and ease. They answer the question of "how do I make this video smaller?" by focusing on your goal, turning a potentially technical chore into a simple, everyday action.
Fine-Tuning Compression Settings for Optimal Results
While presets are fantastic for getting things done quickly, there are times you need more control to strike that perfect balance between file size and visual quality. Don't worry, diving into manual settings isn't nearly as intimidating as it sounds. In fact, it’s where you truly learn how to shrink a video file without sacrificing the quality that matters for your specific project.
Taking the wheel empowers you to tailor the output for any scenario, whether you're creating a high-quality portfolio piece or just a quick clip for social media. Two of the most powerful settings you can tweak are the video codec and the quality control method.
Choosing Between H.264 and H.265 Codecs
Think of the codec as the engine driving your video compression. The two most common options you’ll run into are H.264 (also called AVC) and H.265 (also known as HEVC).
- H.264 (AVC): This is the undisputed champion of compatibility. It plays flawlessly on pretty much every device, browser, and platform out there, making it a safe, reliable pick for videos meant for a wide audience.
- H.265 (HEVC): This is the newer, more efficient powerhouse. It can deliver the same visual quality as H.264 but at a much smaller file size—often 40-50% smaller. This makes it a no-brainer for 4K video or for archiving files where every gigabyte counts.
The main trade-off is that H.265 isn't as universally supported by older devices. So, if maximum compatibility is your goal, stick with H.264. For everything else, especially high-resolution content, H.265 is the smarter choice for cutting down file size.
Mastering Quality with CRF and Bitrate
Next, you need to decide how the compression tool manages quality. You’ll usually see two main methods: Constant Rate Factor (CRF) and Average Bitrate (ABR).
Constant Rate Factor (CRF) is what most pros prefer. Instead of aiming for a specific file size, you tell the encoder what level of visual quality you want to maintain. The software then uses whatever bitrate is necessary—moment to moment—to hit that quality target.
A lower CRF number means higher quality and a larger file. A higher CRF number means lower quality and a smaller file. For H.264, a value of CRF 23 is widely considered the sweet spot, offering an excellent balance of quality and size.
For instance, when you're dialing in your settings, it’s super helpful to know the requirements of your target platform. Knowing the ideal Instagram Reel dimensions helps you export a file that’s already optimized for both display and size.
This infographic really shows how adjusting the CRF value directly impacts the final file size of a video.
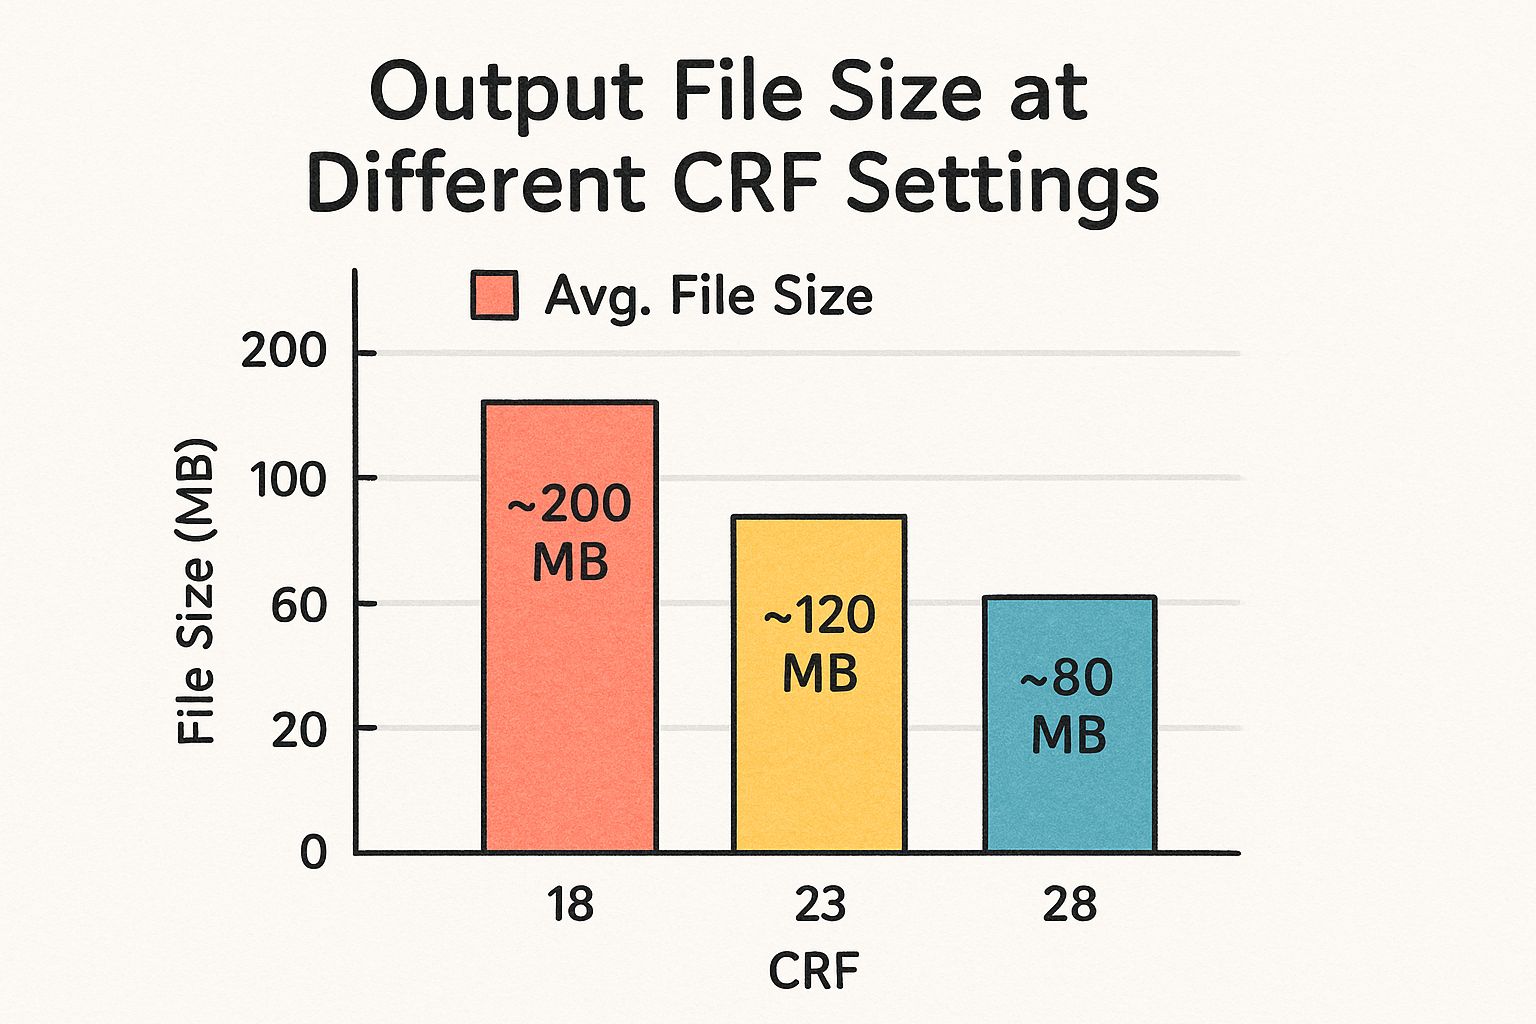
As you can see, even a small tweak to the CRF setting can make a huge difference in how big the final file is.
On the other hand, Average Bitrate (ABR) lets you set a target file size from the start. You tell the software you need the video's data rate to average 5,000 kbps, for example, and it will adjust the quality up and down to stay near that average. This is useful when you have strict file size limits, like for a video ad platform, but CRF often delivers better, more consistent visual quality for the same amount of data.
So you need to shrink a video file on your Mac but don't want to shell out for professional software? You're in luck. Your Mac is already packed with some seriously capable free tools that can get the job done, especially for quick tasks and basic compression.
The two main players in the free Mac compression game are HandBrake and the built-in QuickTime Player. While both can make your video files smaller, they're built for very different jobs. HandBrake is the go-to for creators who crave total control, while QuickTime is a hidden gem for fast, no-fuss exports.
HandBrake: The Power User's Free Choice
There's a reason HandBrake is a legend in the open-source community. It gives you access to the kind of nitty-gritty settings—like tweaking codecs, CRF values, and audio tracks—that you’d normally only find in paid software. This makes it an incredibly powerful tool for anyone who's serious about optimizing their videos without spending a cent.
Imagine you just got back from a trip with a folder of thirty 4K video clips. Trying to upload all of them would be a nightmare. This is where HandBrake shines. Its batch processing feature lets you apply the exact same compression settings to the entire folder at once. You can tell it to convert everything to a web-friendly 1080p H.264 file and just let it work its magic in the background.
This level of control is perfect for bigger projects where you need consistency and the best possible quality. It's also a fantastic way to really learn the ropes of manual video compression.
HandBrake’s real strength is its customizability. It’s the perfect free tool when you need to do more than a simple export—it lets you standardize an entire library of videos with absolute precision.
QuickTime Player: The Hidden Gem
Most Mac users just see QuickTime Player as a simple video viewer, but it has a surprisingly good compression feature tucked away inside. You won't find a dashboard full of sliders and settings, but for a quick size reduction, it's often all you need.
Let's say you just recorded a tutorial, and the screen recording is a hefty 200 MB—way too big to email. You don't need a bunch of fancy options, you just need it smaller. Just open the file in QuickTime, head to File > Export As, and pick a lower resolution like 1080p or 720p. QuickTime handles all the complex stuff automatically, often spitting out a file that’s a fraction of the original size in just a few seconds. It’s the fastest way to shrink a video that’s already on your Mac.
Choosing the Right Free Tool
So, which one should you reach for? It really boils down to what you're trying to accomplish. Neither is "better" than the other; they just excel in different situations.
To help you decide, here’s a quick head-to-head comparison.
Comparing Free Mac Video Compression Tools
Choosing between HandBrake and QuickTime Player depends entirely on your needs. For advanced users who need to process multiple files with specific settings, HandBrake is the clear winner. For anyone who just needs to quickly shrink a single file for sharing, QuickTime is faster and more convenient.
| Feature | HandBrake | QuickTime Player |
|---|---|---|
| Best For | Batch processing, advanced control, custom presets | Quick exports, trimming, basic size reduction |
| Ease of Use | Moderate learning curve | Extremely simple, no extra downloads |
| Key Strength | Fine-tuning codecs (H.265) and quality (CRF) | Speed and convenience for single files |
| Ideal Scenario | Compressing a whole folder of wedding videos | Shrinking a single screen recording for email |
While these two tools are fantastic free options, sometimes your workflow might demand something different. Exploring a wider range of software can help you find the perfect fit. For a deeper dive, check out our list of the 10 best free video compression tools available for different needs and platforms.
At the end of the day, having both HandBrake and QuickTime in your toolkit means you’re ready for just about any compression challenge that comes your way—all without opening your wallet.
Common Mistakes to Avoid When Shrinking Video Files
Figuring out how to shrink a video is a balancing act. It’s all too easy to push the settings a little too far and end up with a pixelated mess. Knowing the common pitfalls is the best way to get a final file that’s both small and sharp.
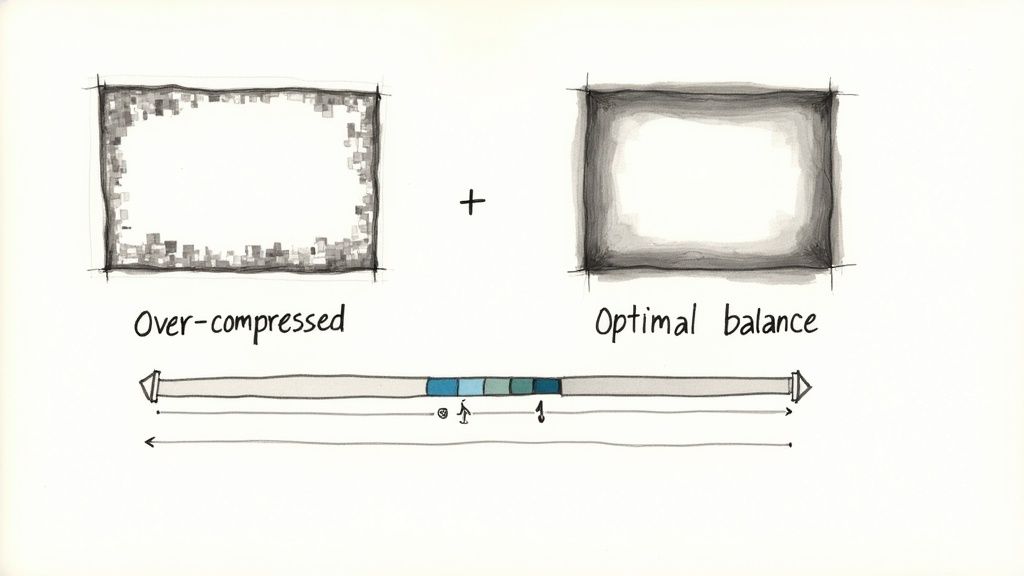
The biggest and most frequent mistake I see is just plain over-compression. This happens when you get a bit too aggressive with the settings—maybe cranking the bitrate down to rock bottom or choosing a ridiculously high CRF number. The result? A video riddled with blocky artifacts and blurry motion, especially in scenes with a lot of action.
Re-Compressing an Already Compressed File
Another classic mistake is running an already compressed video through the process a second time. Every time you compress a "lossy" video format like MP4, you're literally throwing data away. Doing this over and over creates a snowball effect of quality loss.
Think of it like making a photocopy of a photocopy. The first one looks pretty good, but by the third or fourth copy, the image is a blurry, distorted version of the original. You should always, always try to work from the highest-quality source file you have.
The golden rule of video compression is to start with the best source possible. You can always go from high quality to low, but you can never add quality back into a file that has already been stripped of its data.
Mismatching the Resolution and Use Case
Choosing the wrong output resolution is another easy way to get poor results. For instance, exporting a beautiful 4K video at 480p just to save space is total overkill. Sure, the file will be tiny, but the quality will be far too low for most modern screens.
On the flip side, keeping a 4K resolution but absolutely crushing the bitrate will look even worse. A much better approach is to downscale the resolution to 1080p. It still looks fantastic on most devices and lets you use a healthier bitrate without creating a massive file.
Here are a few quick guidelines I follow:
- For social media: 1080p is almost always the sweet spot.
- For email attachments: 720p or even 480p can work for short clips or previews.
- For archiving: Keep the original resolution but use an efficient codec like H.265 to save space.
The need for good file reduction tools is only getting bigger. The global data compression software market was valued at USD 1.11 billion in 2024 and is projected to hit USD 1.61 billion by 2029, all thanks to the explosion of data we create every day. You can dig into these trends in industry research on the global data compression market.
Your Top Video Compression Questions, Answered
Jumping into video compression for the first time? It's totally normal to have a bunch of questions. Getting the right answers helps you solve problems fast and figure out how to shrink a video without just guessing and hoping for the best. Let's dig into some of the most common things people ask.

What Is the Best Format to Make a Video Small?
For just about any use case you can think of, MP4 is the winner. It nails that perfect balance of high quality, small file size, and works on pretty much every device and platform out there.
But the format is just the container; what's inside—the codec—is where the real magic happens.
- H.264 (AVC): This is your old reliable. If you need a video that will play absolutely anywhere without a single hiccup, H.264 is the safest bet you can make. It's the universal standard for a reason.
- H.265 (HEVC): This is the newer, much more efficient kid on the block. It can deliver the same visual quality as H.264 in a file that's significantly smaller. It’s a game-changer for 4K video, but keep in mind that older devices might struggle to play it.
Bottom line: for sharing online, sending in an email, or just general use, an MP4 file using the H.264 codec is almost always the right call.
How Much Can I Compress a Video Without Losing Quality?
Let's be real—technically, all compression is "lossy," which just means some data gets thrown away for good. The trick is to toss out the data that your eyes won't miss.
As a general rule, you can often shrink a file down to 20-50% of its original size with very little noticeable drop in quality. The key is to get the bitrate or CRF settings just right. For a standard 1080p video, a bitrate between 5,000 to 8,000 kbps usually looks fantastic. Once you dip below 2,000 kbps, you'll probably start seeing that blocky, artifact-filled look nobody wants.
Pro Tip: Never compress a long video without testing your settings first. Grab a short, 10-second clip and run it through your compression settings. This gives you a quick preview of the final quality, saving you from wasting an hour on a full export that ends up looking terrible.
Does Changing the Resolution Make a Video File Smaller?
Yes, and it makes a huge difference. Resolution is just the number of pixels in each frame (like 1920 pixels wide by 1080 pixels tall for 1080p). When you downsize a video from 4K (3840x2160) to 1080p, you're actually cutting out a massive 75% of the total pixels. The result is a dramatically smaller file.
This is one of the most powerful levers you can pull to shrink a video's size.
Always think about where the video will be watched. If it's destined for a phone screen, you might even find that 720p looks perfectly fine and gives you an even smaller, easier-to-share file. Matching the resolution to how it will be viewed is the secret to smart, efficient compression.
Ready to stop wrestling with huge video files? Compresto offers a dead-simple way to shrink videos, images, and PDFs right on your Mac with a simple drag and drop. Reclaim your storage and share files faster without sacrificing quality. Get started at https://compresto.app.