Batch Convert Images on Mac A Practical Guide
If you’re still converting images one by one, you’re losing a massive amount of time. Batch converting means you process entire folders of photos at once, and it’s a skill every creative and technical professional needs. This guide will walk you through mastering this on macOS, whether you prefer simple apps, built-in tools, or the command line.
Why Batch Conversion Is a Modern Workflow Essential
In today’s fast-paced world, handling digital images individually just isn’t practical. For anyone in a creative or technical role, the ability to batch convert images has gone from a nice-to-have trick to a core part of an efficient workflow.
Think about a photographer getting a gallery of 500 RAW photos ready for a client. Or a web developer who needs to optimize hundreds of PNGs into the much lighter WebP format. Or even a marketing team resizing dozens of visuals for a social media campaign. In all these cases, converting files one by one isn't just slow—it's a genuine bottleneck that grinds productivity to a halt.
But the real magic of batch processing isn't just about saving a few clicks. It’s about building consistency and predictability into your work.
The Core Benefits of Batch Processing
When you batch convert images, you're applying the exact same rules—like format, dimensions, and compression level—to every single file. This guarantees a uniform look and feel, which is absolutely critical for maintaining brand consistency and a professional presentation. Instead of trying to remember the same settings 100 times, you define them once and let your tools do the heavy lifting.
This approach delivers three huge wins:
- Massive Productivity Gains: You get back hours that would otherwise be lost to tedious, mind-numbing tasks.
- Guaranteed Consistency: Every image is processed identically, which eliminates human error and ensures uniform quality across the entire set.
- Streamlined Asset Management: Your files are instantly organized and ready for whatever platform they’re destined for, whether it’s a website, an email campaign, or a long-term archive.
The Growing Demand for Automation
This shift toward efficiency is more than just a trend; it's a massive market movement. The global batch image converter market was valued at around $540 million in 2024 and is projected to more than double, hitting $1.13 billion by 2033. This surge is fueled by the ever-growing need for tools that can manage huge volumes of digital content for e-commerce, media, and marketing.
By mastering batch conversion, you're not just learning a technical skill; you're adopting a workflow that prioritizes speed, accuracy, and scalability. It’s about working smarter, not harder.
Understanding why this process is so crucial is the first step. It’s less about the specific software you use and more about reclaiming your time to focus on the creative and strategic work that actually matters. For more deep dives, advanced tips, and the latest news in image optimization, the Soreel App's Blog for Image Conversion Insights is an excellent resource to keep bookmarked.
A Hands-On Guide to Batch Converting with Compresto
Theory is great, but putting a tool into practice is where you really see what it can do. For anyone on a Mac looking to batch convert images, Compresto has several smart workflows that fit different needs—from a quick one-off job to a fully automated setup. Let's walk through three real-world scenarios to see how you can get your image processing done in a fraction of the time.
This infographic breaks down the core wins of adopting a batch conversion workflow, highlighting productivity, consistency, and organization.
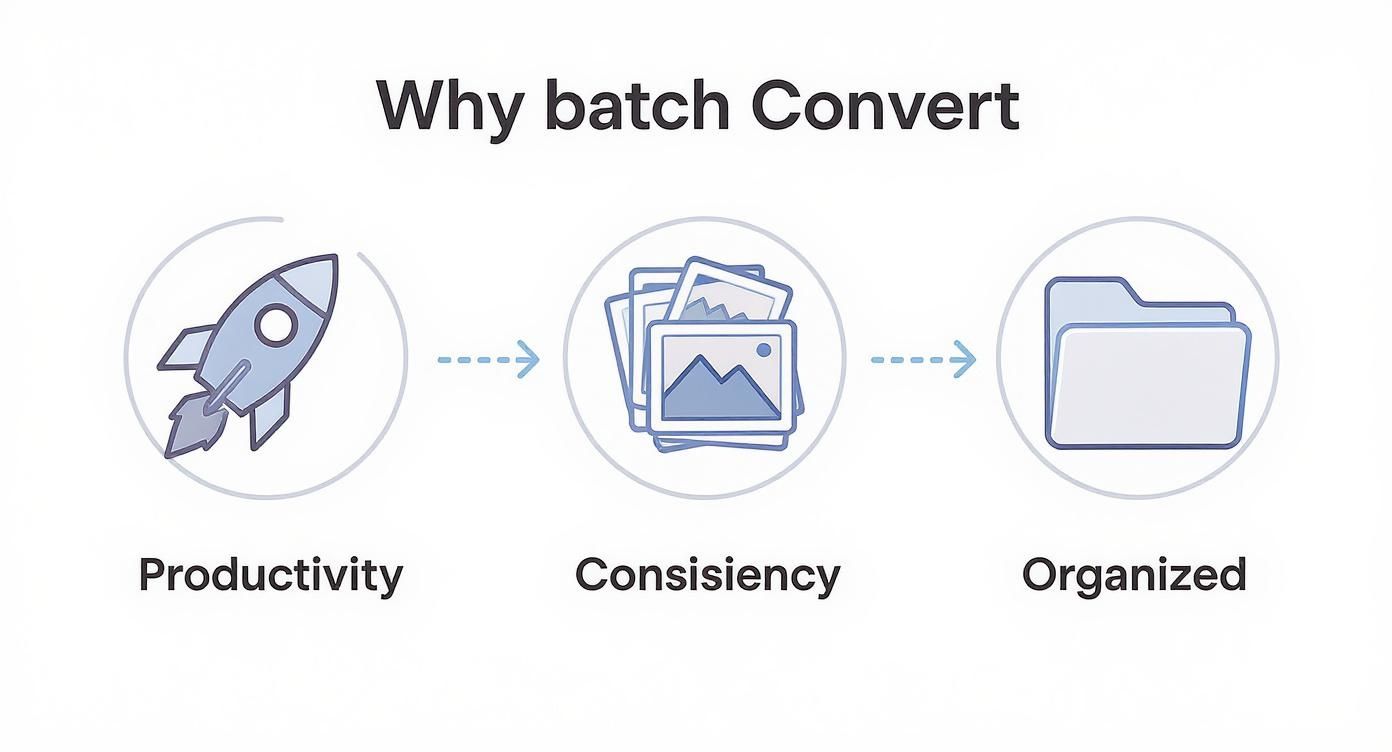
As you can see, shifting from manual, one-by-one edits to an automated batch process directly translates into a more efficient and reliable system for managing your digital assets.
The Simple Drag-and-Drop Workflow
The most straightforward method is perfect for those immediate, everyday tasks. Imagine you've just finished editing a set of 25 product photos. They’re currently saved as high-resolution PNGs, but you need smaller, web-friendly JPEGs for your e-commerce site.
With Compresto, you just open the app, drag the entire folder of PNGs right onto the main window, and watch them instantly populate the list. From there, you pick your output format (JPEG) and tweak the quality slider to find that sweet spot between file size and visual clarity. I find that somewhere around 80-85% is a great starting point for the web.
Hit "Process," and the app converts all 25 files in seconds, saving the new JPEGs wherever you choose. It’s a clean, no-fuss approach for when you just need to get the job done.
Managing Multiple Jobs with the Queue
Now, let's tackle something a bit more complex. Maybe you're a designer working on a new website launch. You have three separate folders of assets, and each one needs a different treatment:
- A folder of RAW photos from a recent shoot that need to become high-quality JPEGs for a gallery.
- A collection of PNG logos and icons that have to be optimized but must stay as PNGs to keep their transparency.
- A batch of hero images you want to convert to the modern WebP format for the best possible performance.
Instead of running these jobs one by one, you can use the queue. First, drag in the RAW photos and set their conversion to JPEG. Next, add the PNG icons and apply your optimization settings. Finally, drop in the hero images and configure their output to WebP.
Compresto lines up all three jobs, processing them one after the other without you having to do anything else. This is a huge win for multitasking—you can set up several different conversion tasks and let the app handle them while you get back to other work.
A key to efficient batch processing is leveraging presets. If you regularly convert images for your blog, create a "Blog JPEG" preset with your preferred dimensions and quality settings. This turns a multi-step configuration into a single click.
Automating with Folder Monitoring
For the ultimate "set it and forget it" workflow, Folder Monitoring is a total game-changer. Let’s say you’re a social media manager who constantly downloads images from various sources into a "Downloads" folder. Every day, you have to manually sort, resize, and convert them for Instagram. It’s tedious.
With Folder Monitoring, you can designate a specific folder—let’s call it "Incoming Social"—as a hot folder. You then assign a preset to it, for example, "Instagram Post," which automatically converts any image dropped into that folder to a 1080x1080 JPEG.
Now, your workflow is completely transformed. Any time you save an image to the "Incoming Social" folder, Compresto detects it, automatically applies your preset, and saves the ready-to-post version in an output folder. This removes the manual conversion step from your daily routine entirely, ensuring every image is perfectly formatted without you even thinking about it.
Using Built-In Mac Tools for Batch Conversions
While dedicated apps offer a polished workflow, you don't always need to download something new to batch convert images. Your Mac already comes packed with some surprisingly powerful tools that can get the job done for free. They might be a little hidden, but they're perfect if you prefer sticking with Apple's ecosystem or feel comfortable on the command line.
From the familiar Preview app to the deeper magic of Automator and the Terminal, you have options for everything from simple format changes to complex, scripted operations. The key is just knowing where to look and which tool is right for the task at hand. Let's dig into these built-in alternatives.
The Surprisingly Capable Preview App
Most of us think of Preview as just a simple image and PDF viewer, but it has a handy batch conversion feature baked right in. It’s easily the fastest native method for straightforward format changes when you don't need any complex setup.
Imagine you have a folder of 50 screenshots saved as PNGs, but you need them as JPEGs for a presentation. Instead of opening and exporting each one manually, just select them all in Finder, right-click, and choose to open them all with Preview.
Once they appear in Preview’s sidebar, select them all again (Cmd + A), then go to File > Export Selected Images. A dialog will pop up where you can pick your new format, tweak the quality, and save the whole batch in one go. It’s a simple but effective time-saver I use all the time.
Build Your Own Quick Action with Automator
For a more integrated and reusable solution, Automator is your best friend. It lets you build your own custom "Quick Actions" that live right in Finder's right-click menu. This means you can create a one-click workflow to convert images without ever opening an app.
Let's say you're constantly needing to convert those HEIC photos from your iPhone into universally compatible JPEGs. Here’s how you’d build a shortcut for that:
- Open Automator and start a new Quick Action.
- At the top, set "Workflow receives current" to image files in Finder.
- Find the Change Type of Images action and drag it into the workflow window. When it prompts you, I always recommend choosing Add—this creates copies and leaves your original files untouched.
- In the action's settings, set the "To Type" dropdown to JPEG.
- Save your Quick Action with a clear name, like "Convert to JPEG."
Now, whenever you select a group of HEIC files in Finder, you can just right-click, find your "Convert to JPEG" option under Quick Actions, and let it run instantly.
The rise of tools for batch conversion is closely tied to the expansion of the entire digital image processing market. This market was valued at $3.17 billion in 2021 and is forecasted to hit $6.5 billion by 2025, driven by demand across media, healthcare, and industrial sectors. You can explore more about these market trends in this digital image processing report.
Command-Line Power with Sips and ImageMagick
If you’re comfortable working in the Terminal, macOS provides a seriously powerful command-line tool called sips (scriptable image processing system). It can perform a huge range of operations—resizing, rotating, and of course, converting formats on entire folders of images with just a single command.
For example, to convert every PNG file in your current directory to a JPEG, you'd run this simple command:
for i in *.png; do sips -s format jpeg "$i" --out "${i%.*}.jpg"; done
This little script loops through every PNG, converts it to a JPEG, and gives it the correct new extension, all while leaving your original files alone.
If you need more advanced features, ImageMagick is a hugely popular open-source tool you can install via Homebrew. It offers even more granular control over formats, quality, and metadata. Whether you stick with sips or step up to ImageMagick, the command line provides unmatched speed and scriptability for repetitive tasks.
For more detailed instructions on resizing images with these methods, check out our guide on how to batch resize images on a Mac.
Optimizing Images for Web, Social Media, and Email
Simply converting a file from one format to another isn't where the job ends. Real optimization is about prepping your images for their final destination. When you batch convert images, you have the perfect opportunity to fine-tune the settings for the web, social media, or email.
Getting this right can be the difference between a lightning-fast page and a visitor who gives up and leaves. Each platform plays by its own set of rules, so tailoring your output is a non-negotiable step.
For anything web-related, the name of the game is balancing visual quality with file size. We’ve all seen it: huge, unoptimized images are one of the biggest culprits behind slow websites, which is a killer for both user experience and your SEO rankings.
This is where modern formats like WebP are a game-changer. They deliver fantastic compression that often beats traditional JPEGs and can handle transparency like a PNG, all while keeping file sizes tiny. If you’re setting up a batch conversion for your website, making WebP your go-to format is a smart first move.
Tailoring for Social Media Platforms
Social media channels are notoriously picky. If you upload an image that doesn't fit their preferred specs, you'll likely end up with awkward crops, blurry visuals, or weird compression artifacts. Each platform has its own sweet spot for dimensions and aspect ratios.
- Instagram: For a classic square post, aim for 1080x1080 pixels. For a portrait post that takes up more screen real estate, 1080x1350 is your best bet. Hitting these dimensions stops the app from messing with your image quality.
- LinkedIn: An image shared in a post looks sharpest at 1200x627 pixels. This ensures it displays cleanly in the feed on both desktop and mobile.
- X (formerly Twitter): In-stream photos look best with a 16:9 aspect ratio. The recommended size to upload is 1600x900 pixels.
The most efficient way to handle this is by creating presets for each platform you use. If you need to do a quick, one-off check before running a big batch job, you can use an online Image Resizer tool to experiment with different dimensions and see what works.
The key takeaway is that one size never fits all. A high-resolution image perfect for a portfolio might cripple an email campaign. Always convert with the end-user’s experience in mind.
Optimizing for Email Marketing
When it comes to email, file size is everything. Large images can make emails load at a snail's pace, get clipped by clients like Gmail, or even get flagged by spam filters. As a rule of thumb, you want to keep the total size of your email—including all images—under 100KB if at all possible.
To hit that target, you’ll need to use aggressive but smart compression. For JPEGs, I’ve found that a quality setting between 60-70% is usually the sweet spot for email. It's also critical to make sure all your images are converted to a web-safe color profile like sRGB, since other profiles can make colors look strange in different email clients.
For a deeper dive, our guide on using a https://compresto.app/blog/batch-image-compression-tool has even more tips for slimming down file sizes without making your images look terrible.
Solving Common Batch Conversion Problems
Even the slickest workflow can hit a snag. When you’re batch converting images, running into an error or getting a disappointing result is frustrating, but don't worry—the fixes are usually straightforward once you know what to look for.
From pixelated outputs to cryptic error messages, most issues boil down to just a few common culprits. Instead of giving up and going back to manual processing one by one, a little troubleshooting can get your automated system running smoothly again.
Diagnosing Significant Quality Loss
One of the most frequent complaints I hear is that images look noticeably worse after conversion. They might come out blurry, pixelated, or with strange color artifacts. This is almost always a result of overly aggressive compression, especially when you're converting to a lossy format like JPEG.
Remember that every time you save a JPEG, some data is permanently discarded. Re-saving an already compressed JPEG will degrade its quality even further. Always work from the highest-quality original file you have.
If your images are suffering, try these adjustments:
- Increase the Quality Setting: When exporting to JPEG, bump the quality slider up. I find that a setting between 85-95% usually provides an excellent balance of file size and visual fidelity.
- Check the Source File: Make sure you aren't accidentally converting low-resolution source files to begin with. You can't add quality that isn't there in the first place.
- Choose the Right Format: For graphics with sharp lines, text, or transparency, converting to JPEG will create ugly artifacts around the edges. Stick with PNG or WebP in those cases.
Fixing Color Profile Mismatches
Ever convert a folder of vibrant photos only to find they look dull and washed out afterward? This is a classic sign of a color profile mismatch. Many professional cameras and editing tools use profiles like Adobe RGB, but most web browsers and devices expect the standard sRGB profile.
When the profile isn't converted correctly during the batch process, colors can shift dramatically. The solution is simple: ensure your batch conversion workflow includes a step to convert the color profile to sRGB. This will keep your colors looking consistent and accurate everywhere.
For photographers dealing with RAW files, our guide on how to convert DNG to JPG offers more detailed steps for preserving color integrity.
The tools we use are always evolving, often following broader tech trends. For instance, the AI image generator market is set to grow by $2.39 billion by 2029. This trend suggests that future batch converters will likely incorporate AI to solve problems like these automatically. You can find more insights on AI's impact on image technology and see how it’s shaping the tools we'll be using tomorrow.
Common Questions Answered
When you're first getting started with batch converting images on a Mac, a few common questions always pop up. Let's clear up some key points to help you round out your knowledge.
What's the Best Image Format to Use?
Honestly, the "best" format really depends on what you need to do with the images.
For anything web-related, WebP is a fantastic modern choice. It gives you a great mix of quality and impressively small file sizes. If you're a photographer prepping images for print or creating a long-term archive, you'll want to stick with a high-quality JPEG or even a lossless format like TIFF.
And for graphics that need a transparent background—like logos, icons, or overlays—PNG is still the king. Before you kick off a big batch job, just ask yourself one simple question: is this for the web, for print, or for archiving? The answer will point you straight to the right format.
Can I Batch Convert Images Without Losing Quality?
That depends entirely on the formats you're working with. If you're converting from one lossless format to another (say, from a raw camera file to a TIFF), you won't lose a single bit of image data. It's a perfect copy.
However, the moment you convert to a "lossy" format like JPEG, some compression and data loss is unavoidable. That's just how JPEGs work to keep file sizes down.
The key is finding that sweet spot. A JPEG saved at 85-95% quality often looks virtually identical to the original, but it can be dramatically smaller in file size. It's a trade-off, but one that's almost always worth it for everyday use.
Do Batch Conversions Affect My Original Files?
No, they shouldn't. Any reputable batch conversion tool will always create new, converted copies of your images, usually saving them in a separate output folder you specify. Your original files should be left completely untouched. This is a critical safety feature of any good software.
Even with that safety net, it's always a smart habit to work on copies of your most important images, especially if you're trying out a new tool or workflow for the first time. Better safe than sorry!
Ready to stop converting images one by one and finally reclaim your time? Compresto gives you powerful, intuitive workflows for batch conversion, compression, and automation, all handled securely right on your Mac. Download Compresto today and see just how much faster your workflow can be.