Your Guide to Mac Batch Image Resizer Workflows
Resizing images one by one is a soul-crushing bottleneck. It’s the kind of tedious work that silently eats away hours of your time. Using a smart mac batch image resizer isn't just a minor convenience—it's a critical strategy for reclaiming your productivity and getting your digital assets ready for peak performance. This guide will show you exactly how to automate this task for good.
Why Batch Resizing on Mac Is a Game-Changer
Manual image resizing is more than just an annoyance; it's a huge productivity drain. If you deal with digital images regularly, you know how quickly the time spent opening, adjusting, saving, and closing individual files adds up. Adopting a batch processing mindset transforms this repetitive chore into a simple, one-time operation.
Think about these real-world scenarios where resizing images individually is simply not an option:
- Photographers: Trying to manage hundreds or even thousands of high-resolution RAW files after a photoshoot.
- Web Developers: Optimizing an entire gallery of images to make sure a website loads lightning-fast.
- Marketers & Bloggers: Prepping a month's worth of social media content or blog post illustrations all at once.
- E-commerce Managers: Standardizing every product photo to create a clean, professional look across an entire online store.
In every one of these cases, the goal is efficiency and consistency. A powerful batch resizer ensures every single image meets your specific dimension requirements without you having to touch each one, freeing you up for more important, creative work.
The True Cost of Manual Resizing
The demand for good batch resizing tools on macOS has shot up right alongside the explosion of digital content. A recent analysis of free batch resizers found that the best tools can handle over 100 images at once without sacrificing quality. Some can even process 1,000 images in under 10 minutes.
The impact is huge. In fact, up to 80% of small business owners and bloggers reported saving at least 2 hours per week just by automating this one process.
But it's not just about saving time. The core idea of working in batches applies to all sorts of other image tasks. For a broader look at how to streamline your entire creative process, you can learn more about how to batch edit photos and save even more hours.
The real "aha!" moment comes when you realize that batch resizing directly impacts your bottom line. Faster websites achieve better SEO rankings, professionally presented content drives more engagement, and optimized storage reduces operational costs.
The Impact on Your Workflow
Ultimately, integrating a batch resizer into your workflow is about working smarter, not harder. It’s about building systems that handle the grunt work so you can focus on what truly matters. Whether you decide to use built-in macOS tools or a specialized third-party app, the benefits are immediate and substantial.
For those who need maximum performance, you might want to explore the reasons Compresto outperforms other compression tools to find an even more powerful solution for your workflow.
Don't feel like you need to download fancy software to batch resize images on your Mac. You've actually got some powerful, no-cost tools baked right into the operating system. Before you spend a dime, it's worth getting to know what Preview and Automator can do.
A lot of people sleep on these built-in utilities, but they’re core to the macOS experience. Preview, which has been around forever, offers a surprisingly quick way to adjust a bunch of images at once. Automator takes it a big step further, letting you build your own reusable workflows. In fact, one analysis showed that Mac power users who build Automator scripts can slash their time on bulk image tasks by a whopping 90%. You can see a deeper look at these native tools on daminion.net.
This simple graphic breaks down the basic process you'll follow, no matter which tool you use.
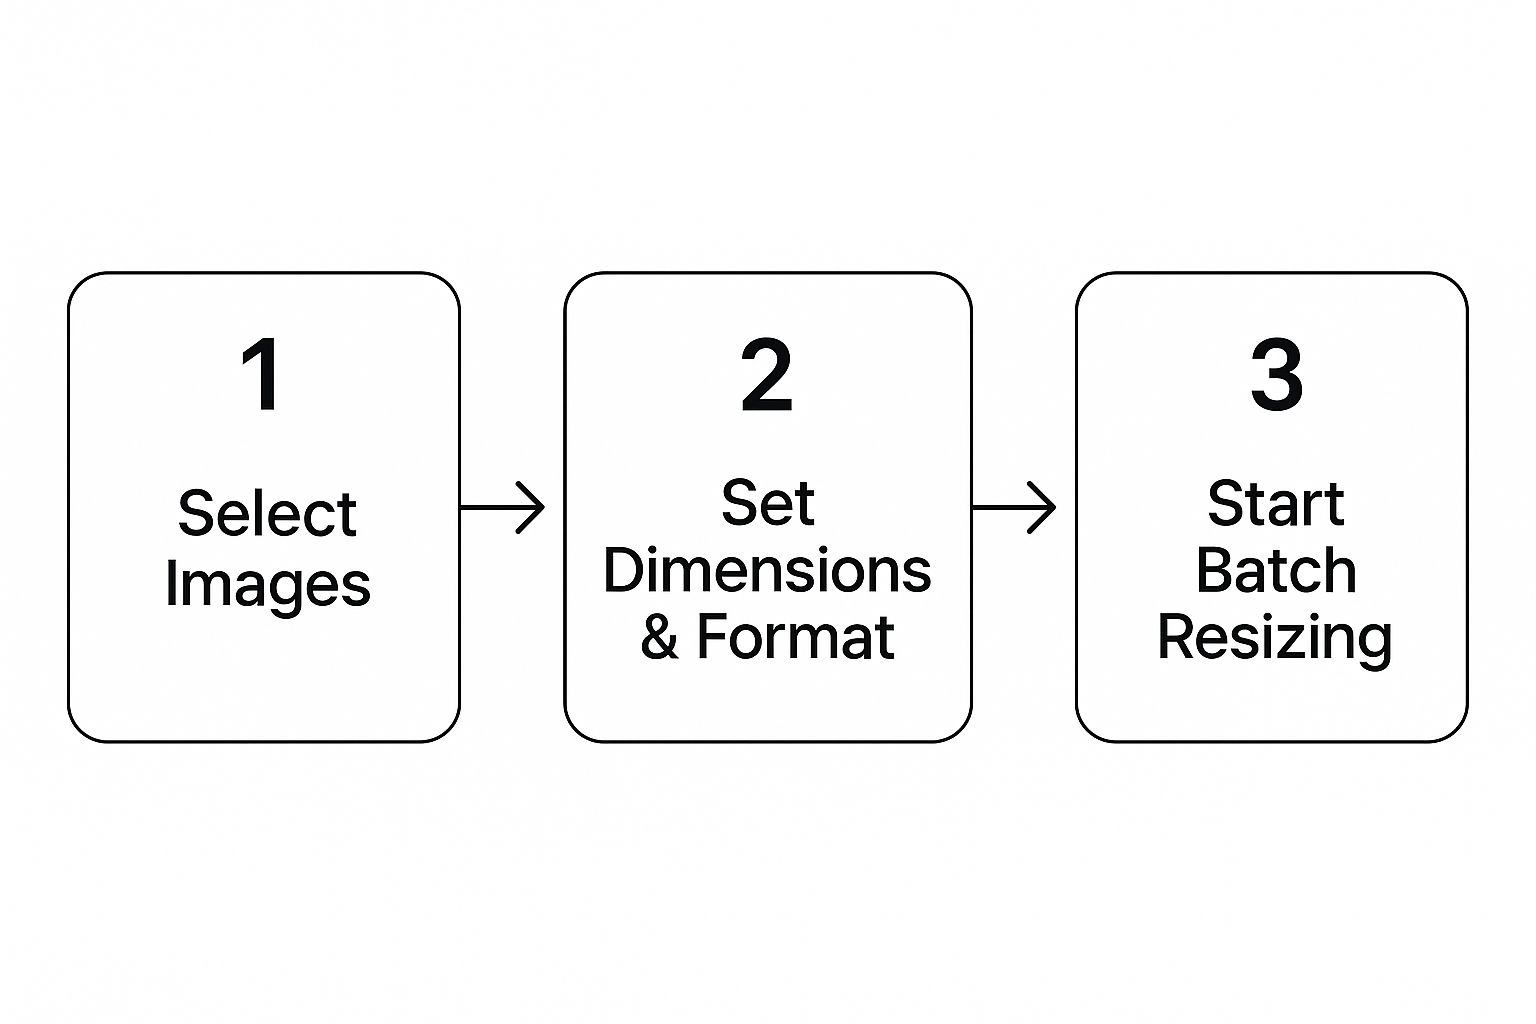
It’s really just a simple three-stage workflow that gets the job done without a lot of fuss.
Quick and Easy Resizing with Preview
Most of us think of Preview as just an image viewer, but it has a perfectly good mac batch image resizer hiding in plain sight. It’s the perfect tool for a quick, one-off job where you don't need a bunch of complicated options.
Imagine you have a folder of 20 high-res photos for a blog post, and you need them all to be 1200 pixels wide. Preview can knock this out in less than a minute.
Here’s my go-to method:
- Round Up Your Images: First, toss all the images you want to resize into one folder. It just keeps things tidy and makes the next step a breeze.
- Open Them All in Preview: Select all the images (a quick
Command-Adoes the trick), right-click, and choose "Open With > Preview." All your images will pop up in a single Preview window, with thumbnails neatly lined up in the sidebar. - Select and Adjust: Now, in that Preview sidebar, select all the thumbnails again (
Command-A). Head up to the menu bar and click "Tools > Adjust Size." - Set Your New Dimensions: A dialog box will appear. For our blog post example, you'd just type
1200into the "Width" box. Make sure "Scale proportionally" is checked to avoid any weirdly stretched-out pictures. You can also switch between pixels, percent, inches, or other units if you need to.
Once you hit "OK," Preview gets to work resizing all the images. But here's the critical part: Preview overwrites your original files by default. If you want to keep your high-res originals, always, always work on copies.
Pro Tip: In that "Adjust Size" box, look for the "Resample image" checkbox. For web images, you'll want to keep this checked. It helps optimize the pixel data for the new, smaller size. You'd only uncheck it if you were changing the print resolution (DPI) without actually changing the pixel dimensions.
Building a Powerful Quick Action with Automator
For resizing tasks you do over and over again, Automator is an absolute game-changer. It lets you build your own "Quick Action" that lives in the right-click menu right inside Finder. You could create a workflow that not only resizes images but also renames them, converts the format, and moves them—all in one click.
Let's build a simple but incredibly useful Quick Action that resizes images to a set width and saves them as new copies with a suffix.
Creating Your Custom Workflow
First, fire up the Automator app (find it in your Applications folder or use Spotlight search). When it asks, choose to create a new Quick Action.
Right at the top of the workflow window, you need to tell it what to do. Set the workflow to receive "image files" from "Finder." This tells your Mac what kind of file this action is for.
Next, we'll drag the building blocks for our workflow from the "Actions" library on the left.
-
Create Copies First: To keep your original images safe, the first step should always be to make a copy. Search for the "Copy Finder Items" action and drag it into the main workflow area. Pick a folder where you want your resized copies to be saved.
-
Scale the Images: Now for the main event. Find the "Scale Images" action and drag it in right below the copy action. This is where the resizing happens. Let's set it to "To Size (pixels)" and enter
800for the width. Automator is smart enough to calculate the height proportionally. -
Rename for Clarity (Optional but Recommended): To make it easy to spot your resized files, add a "Rename Finder Items" action at the very end. You can set it to add text, like
_resized, to the end of each filename.
Once your actions are all lined up, save the Quick Action with a clear name like "Resize to 800px."
And that's it! Now, whenever you right-click an image file in Finder, you'll see your new command right there under the "Quick Actions" menu. This is the real magic of a mac batch image resizer workflow—you've just built a custom tool that turns a tedious manual process into a two-second click.
When to Reach for a Third-Party App for Advanced Control
While macOS's built-in tools are fantastic for quick, simple jobs, they have their limits. When your workflow demands more than just a basic resize—think watermarks, color corrections, and format conversions all at once—it's time to bring in a dedicated third-party app.
These specialized tools are built from the ground up for heavy-duty image processing. They offer a level of power and a suite of features that Preview and Automator just can't match. For this guide, we'll dive into one of the most powerful and popular free options out there: XnConvert.
Why Choose a Dedicated Batch Image Resizer?
Think of a tool like XnConvert as a Swiss Army knife for your images. It’s not just a resizer; it's a full-blown processing suite. This is the tool you grab when your workflow gets complicated.
A professional photographer, for instance, needs to do much more than just resize a wedding album. They also have to apply a consistent watermark to every photo, embed their contact info into the metadata, and maybe even apply a subtle sharpening filter. Trying to juggle all of that with separate tools would be a slow, painful process.
An e-commerce manager faces a similar battle. Imagine needing to resize 500 new product shots, convert them all from HEIC to the web-friendly WebP format, add a transparent company logo to the corner, and strip out unnecessary metadata to keep page load times fast. This is exactly the kind of multi-step task where a dedicated mac batch image resizer like XnConvert shines.
A Quick Walkthrough of XnConvert
Getting started with XnConvert is surprisingly simple. Its interface is broken down into three logical tabs that walk you through the process: Input, Actions, and Output.
- Input Tab: This is where it all begins. Just drag and drop all the images you want to process right into this window. It supports a massive range of file types, so compatibility is rarely an issue.
- Actions Tab: This is the heart of the app. Here, you can stack up multiple "actions" that will be applied to every single image in your batch. The power here is incredible.
- Output Tab: The final step. This tab lets you choose where your processed images will be saved, what they'll be named, and which format they should be converted to.
Let's walk through a real-world scenario to see how these parts come together.
Setting Up a Multi-Step Workflow
Let's go back to our photographer who needs to process a batch of photos for a client preview. The goal is to resize them, add a watermark, and apply a quick color adjustment.
1. Define Your Actions First, head to the "Actions" tab and click "Add action." A menu with dozens of options will pop up. For our photographer's workflow, we'll add these actions one by one:
- Image > Resize: We can set a specific width, like 1500px, and make sure "Keep ratio" is checked to avoid distorting the photos.
- Image > Watermark: Here, you can select your logo file, drop the opacity to a subtle 40%, and place it in the bottom-right corner.
- Image > Automatic levels: This is a handy action that performs a quick color and contrast correction, giving the images a bit of extra pop without needing to open a full photo editor.
Each action you add appears in a list. You can even drag them to reorder how they're applied, giving you total control over the entire process.
2. Configure the Output
Next, click over to the "Output" tab. To keep things tidy, you can tell XnConvert to save the finished images in a new subfolder called "Client_Preview." You can also set up a new file naming system, like ClientName_####, which will automatically number the files in sequence. Finally, you can choose to save them as high-quality JPEGs.
The real power move here is saving this entire configuration. XnConvert lets you save your complete set of actions and output settings as a script. The next time you have a similar job, you just load your "Client Preview" script and process a whole new batch of photos in seconds.
This level of automation is precisely why third-party apps are indispensable for any serious work. The demand for these features is clear; XnConvert supports over 500 image formats and is used by about 2 million people worldwide. Internal data shows the average user processes 200 to 1,000 images in one go, with 65% applying watermarks and metadata edits in addition to resizing. This makes it a workhorse for demanding workflows. You can grab it yourself from the Mac App Store.
By taking a few minutes to set up a solid workflow in an app like XnConvert, you can save yourself countless hours down the line and ensure every image you produce is perfectly consistent and professionally polished.
The Power User's Path with Terminal Commands
For those who crave raw speed and unmatched precision, the command line is the ultimate playground. While graphical apps are convenient, nothing really comes close to the Terminal for sheer power and scriptable automation. It might look a little intimidating at first, but it’s surprisingly straightforward once you get the hang of it.
Using the Terminal as a mac batch image resizer isn't about making things difficult; it's about unlocking a level of control that no graphical interface can match. With a few quick commands, you can process thousands of images in the background while you get back to more important work.
The engine we'll be firing up for this is ImageMagick, a legendary open-source software suite for image manipulation. It’s the secret weapon powering countless web servers and professional graphics apps, and we can get it running right on our Mac.
Getting Set Up with Homebrew and ImageMagick
First things first, we need a package manager called Homebrew. Think of Homebrew as an App Store for powerful command-line tools. It takes all the headache out of installing, updating, and managing software like ImageMagick.
If you don't have Homebrew installed yet, open your Terminal app (you can find it in /Applications/Utilities/) and paste this command, then hit Enter.
/bin/bash -c "$(curl -fsSL https://raw.githubusercontent.com/Homebrew/install/HEAD/install.sh)"
The script will walk you through the process, which usually just means pressing Enter and typing in your password. Once Homebrew is ready to go, installing ImageMagick is just a single command.
brew install imagemagick Homebrew handles all the downloading and installation for you. When it's done, you've just armed your Mac with one of the most powerful image processing toolkits on the planet.
Your First Batch Resizing Commands
Now for the fun part. Let's get right into some practical, copy-and-paste commands. The main tool we’ll use from the ImageMagick suite is mogrify. This command is incredibly potent because it modifies files directly in place, making it perfect for batch jobs.
Crucial Safety Tip: The
mogrifycommand overwrites your original files. It’s brutally fast and efficient, but there's no undo button. Always, always work on copies of your images, never the originals. I can't stress this enough—make a duplicate folder of your pictures before running any of these commands.
Let's imagine you have a folder on your Desktop called "VacationPics" that’s full of JPGs you want to shrink. The first thing you need to do is tell your Terminal to go into that folder.
cd ~/Desktop/VacationPics
This cd (change directory) command moves your Terminal session into the correct folder. Now, any mogrify command you run will apply to the images inside it.
Here are a few common scenarios you might run into:
- Resize all images to a specific width: To make every image 800 pixels wide while keeping the aspect ratio. mogrify -resize 800 *.jpg
- Resize all images to fit within a specific box: To make sure no image is wider or taller than 1024x768 pixels. mogrify -resize 1024x768 *.png
- Convert and resize at the same time: To change all PNGs to JPGs and resize them to 50% of their original size.
mogrify -resize 50% -format jpg *.png
That asterisk (
*) is a wildcard. It’s a handy little character that tells the command to grab every file ending with that extension (.jpg,.png, etc.).
Advanced Control and Scripting
The real magic of the command line is chaining commands together to create custom workflows. You're not just limited to resizing. You can adjust quality, strip out metadata, and a whole lot more, all in a single line.
For example, let's say you're getting images ready for a website. You'd probably want to resize them, set a specific JPEG compression quality, and remove all the identifying EXIF data to shrink the file size.
mogrify -resize 1200 -quality 85 -strip *.jpg This one command does three things at once to an entire folder of images.
-resize 1200: Sets the width to 1200 pixels.-quality 85: Adjusts JPEG compression to 85, which is a great sweet spot between quality and file size.-strip: Removes all metadata like camera settings and location info.
For tasks you do all the time, you can even toss these commands into a simple script—which is just a text file with a list of commands. You could have one for processing your blog images and another for prepping social media content. This is where the Terminal really pulls away from graphical tools, making it the ultimate mac batch image resizer for anyone who wants serious, repeatable automation.
Pro Tips For A Flawless Resizing Workflow
Knowing how to use a Mac batch image resizer is one thing, but truly mastering the process to get consistent, professional results is another game entirely. A few key habits and a bit of know-how can elevate your entire workflow. This ensures every image looks sharp and performs perfectly, whether it's for a website or a client presentation.
One of the first things to get straight is the difference between resizing and resampling. They sound similar, but they do very different things to your images.
- Resizing (without resampling) just changes the print dimensions of an image—think inches or centimeters—by adjusting its resolution (DPI). The actual number of pixels doesn't change.
- Resampling, on the other hand, changes the pixel dimensions. It makes the image physically larger or smaller on a screen. This is what you're doing 99% of the time when preparing images for web and digital use. Most tools, like Preview, have resampling enabled by default.
Always Work On Copies
This is the golden rule of any kind of batch processing. Seriously. Never, ever run a resizing operation on your original, high-resolution files. There’s no undo button for overwriting a folder full of your master images.
Before you even think about resizing, duplicate the entire folder of images. This simple step is your safety net. It gives you the freedom to experiment with different dimensions and compression settings without the fear of permanently messing up your source files. It’s a non-negotiable step for any professional.
Once your images are perfectly resized, you might need to get them over to a different machine. For help with that, check out these tips for efficient file transfer between PC and Mac to make sure everything gets where it needs to go.
Maintain Aspect Ratio To Avoid Distortion
Have you ever seen an image on a website that looks weirdly squashed or stretched? That’s what happens when you resize without maintaining the original aspect ratio. It’s a dead giveaway of an amateur job.
Pretty much every resizing tool has a checkbox that says something like "Scale proportionally" or "Keep ratio." Always keep this checked. This ensures that when you adjust the width, the height automatically changes to match, keeping your subjects looking natural and not like they've been run through a funhouse mirror.
The only time you’d ever uncheck this is for a specific creative effect or if you plan to manually crop the image into a new shape. For standard resizing, locking that aspect ratio is absolutely essential.
Choose The Right File Format
The format you save your resized images in has a massive impact on both quality and file size. Picking the right one is critical for performance, especially on the web.
Here’s a quick rundown:
- JPG (or JPEG): This is your go-to for pretty much all photographs. It offers fantastic compression, which means you can get those small file sizes that are perfect for fast-loading websites. You can usually adjust the quality level to strike the perfect balance.
- PNG: Use this format for any graphics that need a transparent background, like logos, icons, or illustrations with sharp, clean lines. PNG files are usually a bit larger than JPEGs, but they offer lossless quality and support for that all-important alpha channel.
- WebP: This is the modern choice for the web. WebP often gives you even better compression than both JPG and PNG, and it supports transparency and even animation. Its adoption is now widespread, but if you need to support much older browsers, it’s worth a quick check for compatibility.
Mastering these simple but powerful tips helps you move from just using a tool to building an efficient, professional-grade workflow. Understanding these details is a huge part of the process, and you can learn even more by reading these file size reduction tips to further optimize your images.
Frequently Asked Questions
When it comes to resizing a bunch of images at once, a few common questions always seem to pop up. Let's tackle them head-on, so you can get your workflow dialed in and get the best results from your mac batch image resizer of choice.
What Is The Best Format For Website Images?
For most images on your website, WebP is the modern champion. It strikes a fantastic balance between quality and compression, which means smaller files and pages that load faster. That said, for maximum compatibility with older browsers, JPG is still the trusty, go-to format for photographs.
But what if you need a transparent background for something like a logo or an icon? That’s where PNG comes in. It's the only format for the job. The real art is balancing file size and visual sharpness to give your visitors a great, speedy experience.
Will Batch Resizing Reduce Image Quality?
In short, yes. When you make an image smaller, you're essentially throwing away pixel data, which technically reduces its quality. This is what’s known as "lossy" compression. The goal isn't to avoid quality loss completely—that's impossible—but to make it so subtle that the human eye can't tell the difference.
The trick is finding that sweet spot where the file size drops dramatically, but the image still looks crisp and clear. This is precisely why you should always work on copies of your original high-resolution photos. If you overdo it and the quality drops too much, you can always go back to the original and try again.
Your original, high-resolution photos are your most valuable asset. Treat them like a master negative in a film darkroom. Never edit or resize the original; always work on a duplicate. This simple habit will save you from irreversible mistakes.
Can I Resize Images To A Specific File Size?
Targeting an exact file size—like "make this image 100KB"—is tricky with most tools. File size isn't really an input you can set; it's the result of the image's complexity, its pixel dimensions, and the compression level you choose. While some advanced tools might offer a "constrain file size" option, it's usually just a rough estimate.
A much more reliable approach is to first resize the image to the dimensions you need. Then, you can play with the JPEG quality slider (for example, nudging it down from 90 to 80) until you hit your target file size. It might take a bit of trial and error, but it gives you far more control over the final product. For a deeper dive, our professional's guide to file compression covers more advanced techniques.
Should I Use A Free App Or A Paid One?
Honestly, for most people, free tools are more than enough. The built-in apps on your Mac, like Preview and Automator, are surprisingly powerful. And free third-party apps like XnConvert can handle resizing, renaming, and format conversions like a champ.
You should only really think about paying for an app if your work demands highly specialized features. We're talking about things like AI-powered upscaling, creating complex watermarks on the fly, or needing dedicated customer support for a team. For everyday tasks, the free options are incredibly capable.
Ready to stop wasting time and master your file management? Compresto is the ultimate tool for Mac users who need to shrink images, videos, and PDFs without losing quality. With powerful batch processing and an intuitive interface, it’s built to make your workflow faster. See how much time and space you can save.