what is video encoding: a simple guide to codecs and bitrate
At its core, video encoding is the process of compressing massive raw video files into smaller, more manageable formats that are perfect for streaming and storage.
Think of it as a digital shrink ray. It's what makes it possible to watch high-quality video on Netflix, YouTube, or even a video call without waiting hours for it to download. It’s truly the unsung hero of our modern media experience.
Why Video Encoding Is Essential

Imagine trying to send a full-length movie through your email. The original, uncompressed video file from a professional camera would be enormous—way too large to send, store, or stream efficiently. This is the fundamental problem that video encoding solves.
It intelligently removes redundant visual information to drastically reduce the file size while preserving as much quality as possible.
Without this crucial step, the internet as we know it would grind to a halt. Every video would buffer endlessly, and your phone’s storage would fill up after just a few minutes of recording. Encoding is the bridge between the gigantic raw files created by cameras and the smooth, instant video playback we all expect on our devices.
From Gigabytes to Megabytes
The sheer scale of this compression is remarkable. A raw 1080p video can gobble up data at a rate of 3 Gbps (gigabits per second). Through encoding, that can be slashed by over 95%, shrinking it to a streamable 5 Mbps with hardly any noticeable loss in quality. This is the magic that makes high-definition streaming possible.
So how does it work? The process involves complex algorithms that analyze every single frame of a video. It's a delicate balancing act, governed by a few key principles:
- Removing Redundancy: First, it identifies and discards visual data that's repetitive or that the human eye won't even notice is missing. For example, a static background in a scene doesn't need to be re-recorded in every frame.
- Predicting Motion: Next, it analyzes movement between frames to record only the changes rather than the entire picture over and over again.
- Balancing Quality and Size: The main goal is always to achieve the smallest possible file size for a given level of visual quality. This trade-off is central to all data compression methods.
At its heart, video encoding is about making video practical. It translates raw, unmanageable data into a universal language that any device can understand and display quickly and efficiently.
Ultimately, understanding video encoding means recognizing it as the foundational technology that enables our digital video world. It’s a sophisticated form of data compression tailored specifically for moving images. From blockbuster films on streaming platforms to the quick videos you share on social media, encoding is the invisible process working behind the scenes to deliver a seamless experience.
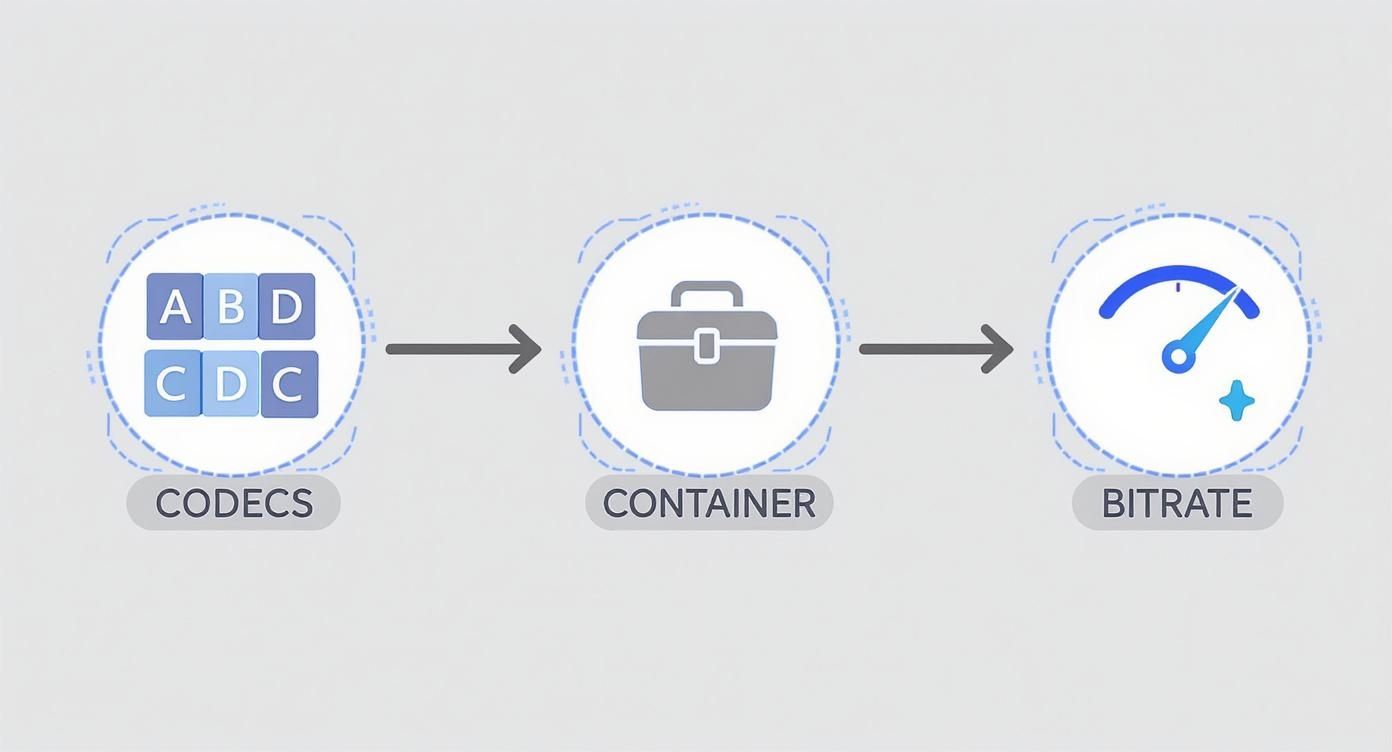
The Building Blocks of Video Encoding
To really get what video encoding is, you need to understand its three key parts. Think of them like the main ingredients in a recipe—each one has a unique and vital job. Once you get a handle on codecs, containers, and bitrate, you’ll see exactly how a massive raw video file gets squeezed into a compact, playable final product.
These three elements don't just exist on their own; they work together in a specific order. A codec compresses the video, a container bundles everything together, and the bitrate sets the overall quality and file size. Let's break them down one by one.
Codecs: The Language of Compression
A codec is the real engine behind the encoding process. The name itself is a mashup of "coder-decoder," which perfectly describes what it does. Imagine it as a specialized language or a set of rules for making a video file smaller. Just like some languages can express an idea with fewer words, some codecs are far more efficient at shrinking video than others.
When you're encoding, the "coder" part of the codec analyzes all the visual data and uses clever algorithms to shrink it down. Then, when you hit play, the "decoder" on your device reads that compressed data and perfectly reconstructs the image on your screen.
Codecs generally follow one of two philosophies to get this done:
- Lossy Compression: This is the most common method for online video. It smartly throws away tiny bits of data that the human eye is unlikely to notice anyway. Think of it like a really good summary of a book—you get the entire story, but some of the finer descriptive details might be left out. This allows for huge reductions in file size.
- Lossless Compression: This approach reduces file size without tossing out a single piece of the original data. It’s like putting a book into a zip file; all the original words are still there, ready to be perfectly reconstructed. Professionals use this for editing and archiving when every last detail counts, but the files are much, much larger.
The codec is the "how" of video compression. It defines the specific math and methods used to shrink video data, which directly affects both the final file size and how good it looks.
Containers: The Digital Lunchbox
Once the codec has done its job compressing the video and audio streams, they need to be packaged up. This is where a container format comes into play. The best way to think of it is as a digital lunchbox that holds everything you need for playback—the video, the audio, and more—all in one neat file.
But a container doesn't just hold the main course. It also stores important metadata, like subtitles, chapter markers, and crucial sync information that makes sure the audio lines up perfectly with the video.
You see container formats all the time, even if you don't recognize the name. They're just the file extensions at the end of your video files:
- .MP4 (MPEG-4 Part 14): The king of containers. It's the most universal and widely supported format, perfect for the web, mobile, and just about any device you can think of.
- .MOV (QuickTime File Format): Originally from Apple, this one is still a huge favorite in professional video editing workflows.
- .MKV (Matroska Video): A super flexible, open-source container that can hold a nearly unlimited number of video, audio, and subtitle tracks in a single file.
- .AVI (Audio Video Interleave): An older format from Microsoft. It doesn't have all the modern features, but you'll still run into it from time to time.
The file extension tells your device what kind of "lunchbox" it's about to open, so it knows how to find all the different pieces inside.
Bitrate: The Data Budget
Finally, we have bitrate. If the codec is the language and the container is the lunchbox, then the bitrate is the data budget you get to create each second of video. It's usually measured in megabits per second (Mbps).
A higher bitrate means you're using more data for each second of video, which gives you better quality but also a bigger file. Go with a lower bitrate, and you get a smaller file, but you risk seeing visual problems like blockiness or blurriness, especially when there's a lot of action on screen.
Imagine you're painting a picture. A high bitrate is like having an endless supply of paint and a set of fine-tipped brushes—you can capture every subtle detail. A low bitrate is like having just a small watercolor set and a thick brush; you can still paint a recognizable picture, but a lot of the nuance will be lost.
The relationship between bitrate, resolution, and motion is also tightly connected to another core concept. You can dive deeper by exploring what frame rate is in video and seeing how it affects the smoothness of what you watch.
There are two main ways to manage this data budget:
- Constant Bitrate (CBR): This keeps the data rate steady for the entire video. It's predictable and works well for live streaming, but it's not very efficient. It often wastes data on simple, static scenes while starving complex, fast-moving scenes of the data they desperately need.
- Variable Bitrate (VBR): This method is way smarter. It adjusts the data budget on the fly, giving more data to complex action sequences and less to simple, static shots. This gives you the best of both worlds—optimizing for both quality and file size—making it the go-to choice for most modern encoding.
To bring these concepts together, here’s a quick-reference table that breaks down how each component works.
Key Video Encoding Components Explained
| Component | Analogy | Role | Common Examples |
|---|---|---|---|
| Codec | The "language" | Compresses and decompresses video data to reduce file size. | H.264 (AVC), H.265 (HEVC), AV1, ProRes |
| Container | The "lunchbox" | Bundles video, audio, subtitles, and metadata into a single file. | .MP4, .MOV, .MKV, .AVI |
| Bitrate | The "data budget" | Determines the amount of data used per second, affecting quality and size. | 10 Mbps (4K streaming), 5 Mbps (1080p), 1 Mbps (720p) |
Each of these building blocks—the codec, container, and bitrate—plays a critical role. Understanding how they interact is the key to creating high-quality videos that are also small enough to share and stream efficiently.
How a Video File Actually Gets Compressed
So, how does video encoding actually work in the real world? Let's follow a raw video file from the moment it's captured by a camera to when it becomes a compact, streamable file. The process is a clever mix of efficiency and smart predictions, all aimed at saving as much space as possible.
Imagine a raw video as a digital flipbook. Each page, or frame, is a complete, high-resolution picture. If you simply saved every single page as-is, the flipbook would be enormous and incredibly heavy. Video encoding is the art of redrawing that flipbook to be much thinner and lighter without messing up the story.
This journey shows how the key players—codecs, containers, and bitrate—team up to make this compression happen.
As you can see, the codec first applies its compression rules, the container packages everything up, and the bitrate dictates the final balance between quality and file size.
The Two Fundamental Compression Techniques
Video encoders rely on two main strategies to shrink that digital flipbook: compressing individual pages and then finding shortcuts between them. These two methods, known as intraframe and interframe compression, work in tandem to achieve huge reductions in file size.
Intraframe Compression: Compressing a Single Frame
First up, the encoder uses intraframe compression. This process looks at each video frame by itself and compresses it, almost like turning a huge, unedited photo into a much smaller JPEG. The "intra" part just means "within," so it’s all about finding and tossing out redundant data within a single frame.
For instance, a frame with a big patch of blue sky doesn't need to store the exact color value for every single blue pixel. The codec can just say, "This whole area is this specific shade of blue," which saves a ton of space. This method is great for maintaining quality but doesn't offer the biggest file size savings on its own.
Every so often, the encoder creates a complete frame compressed this way, called an I-frame (or keyframe). This I-frame acts as a solid reference point, like a fully drawn page in our flipbook that all the following pages can build upon.
Interframe Compression: Finding the Differences
Now for the real magic. Interframe compression works by comparing frames that are next to each other and only recording what changes between them. The "inter" prefix means "between," which tells you its job is to spot what’s different from one frame to the next.
If you have a person walking across a static background, the encoder is smart enough not to redraw the background in every single frame. It just takes the first frame (our I-frame) and then creates tiny update instructions for the frames that follow.
A video encoder's core principle is to avoid redundant work. Instead of re-drawing an entire scene for every frame, it focuses only on what moves or changes, resulting in an exponential reduction in data.
To pull this off, the encoder uses a few types of predictive frames:
- P-frames (Predicted frames): These look backward to a previous I-frame or P-frame and only store what’s changed since then.
- B-frames (Bi-directional predicted frames): These are even more efficient. They can look both backward and forward to other frames to find redundant information and predict motion.
The Brains of the Operation: Motion Estimation
So how does an encoder figure out what changed between frames? It uses a process called motion estimation. The encoder divides a frame into small blocks of pixels (often called macroblocks) and then tries to find where those same blocks ended up in the next frame.
Instead of storing the entire block all over again, it just stores a tiny piece of data called a motion vector. This vector is essentially a note that says, "That block of pixels from the last frame? It moved over here." This is an incredibly efficient way to describe any kind of movement, from a person walking to a car driving by.
By combining these clever techniques—compressing individual frames and then meticulously tracking the changes between them—an encoder can shrink a video file by 95% or more. For a deeper dive into the tools and methods involved, you can explore guides on how video compression works with video compressors. Ultimately, it’s this sophisticated process that makes smooth, high-quality video streaming an everyday reality.
The Evolution of Video Compression Technology
The smooth, high-quality video streaming we take for granted didn't just happen. It's the result of decades of brilliant engineering that solved one of computing's toughest puzzles: how to shrink massive video files down to a manageable size.
This journey is a fascinating story of one innovation building on another, turning a theoretical challenge into the technology that powers our daily digital lives.
Surprisingly, the big ideas behind video encoding go way back. The first concepts for analog video compression showed up as early as 1929. A huge step forward came in 1952 with something called Differential Pulse-Code Modulation (DPCM) from Bell Labs.
But the real turning point was in 1988 with the H.261 codec. This was the first digital video compression standard that really caught on, and it introduced foundational concepts—like macroblocks and motion compensation—that are still at the heart of how video works today.
From Theory to the First Digital Standard
Before we could have digital video, we needed the right tools. One of the most important was the Discrete Cosine Transform (DCT), a mathematical formula cooked up in the 1970s. Think of the DCT as a clever way to separate the must-have visual details from the "nice-to-have" ones, making the video data much easier to compress.
This breakthrough was the key ingredient that made H.261 possible. By today's standards, H.261 was primitive, designed for clunky video conferencing over old ISDN phone lines. But at the time, it was a total game-changer.
H.261 created the blueprint that nearly every video codec has followed since. Its main contributions were:
- Macroblocks: It broke each video frame into 16x16 pixel chunks, making them easier for computers to process.
- Motion Compensation: It figured out how to predict movement between frames, so it didn't have to wastefully re-send pixels that hadn't changed.
- A Hybrid Approach: It brilliantly combined motion prediction with DCT-based compression—a model still in use today.
Building on the Foundation for a Connected World
Once H.261 proved what was possible, innovation took off. The Moving Picture Experts Group (MPEG) soon followed, bringing compressed video to CDs and DVDs with standards like MPEG-1 and MPEG-2. Each new generation of codecs got dramatically better at squeezing higher quality into smaller files.
This relentless drive for efficiency is the engine of video's history. Each major codec represents a significant leap in compression, allowing for higher resolutions and smoother playback over slower connections.
This steady march of progress has continued ever since, giving us the H.264, H.265, and AV1 codecs that power everything from 4K streaming to our daily video calls. And the technology keeps pushing forward, now branching into new areas like the tech behind viral AI-generated videos.
What started as a niche solution for laggy video calls has become the invisible backbone of modern entertainment, communication, and culture.
Comparing Common Video Codecs You Use Every Day
Not all codecs are created equal. While the core idea of encoding is the same, the specific "language" a codec uses to shrink a file makes a huge difference in its final size, quality, and where it can be played.
To really get a handle on video today, you need to know the big three: H.264, H.265, and AV1. Think of them as an evolutionary path, with each new standard making massive leaps in efficiency. Let's dig into what sets them apart.
H.264 (AVC) The Universal Standard
If there were a hall of fame for compatibility, H.264 would be the first inductee. For years, it’s been the undisputed champ, powering everything from Blu-ray discs to YouTube streams and your daily video calls. It’s also known as Advanced Video Coding (AVC).
Its superpower is universal support. Pretty much any device made in the last decade—your phone, laptop, or smart TV—can play H.264 video without breaking a sweat. This rock-solid reliability makes it the go-to choice when your content absolutely has to work everywhere, for everyone.
H.265 (HEVC) The 4K Powerhouse
When video resolutions jumped to 4K and beyond, our old codecs started to struggle. We needed something much more efficient, and that’s where H.265 came in. Also called High Efficiency Video Coding (HEVC), its mission is simple: deliver the same visual quality as H.264 but at roughly half the file size.
This incredible efficiency is what makes streaming crisp 4K video possible on a normal internet connection. It’s the engine behind premium streaming services and any modern, high-res video you watch. For a deeper dive, check out our guide on H.264 vs H.265.
The one catch? H.265 adoption has been held back by a messy and sometimes expensive licensing situation. This has made some companies hesitate, keeping it from becoming quite as universal as its older sibling.
The history of video encoding is a story of constant improvement. Each new standard aims to cut the required bitrate by about half while maintaining the same perceived quality, enabling higher resolutions on existing networks.
This isn’t just a random trend. H.264 offered a 50% bitrate reduction over its predecessor, MPEG-2. Then, H.265 improved on H.264 by another 50%. The newest standard, H.266/VVC, is aiming for a similar 50% jump over H.265, paving the way for 8K video. This historical timeline of video coding standards shows the remarkable progression.
AV1 The Royalty-Free Future
Tired of the licensing headaches that came with H.265, a group of tech giants—including Google, Netflix, Amazon, and Apple—joined forces to create AV1. It’s an open and royalty-free codec designed to be the next-generation standard for the web, without any patent fees attached.
AV1 pushes efficiency even further, managing an extra 20-30% reduction in file size compared to H.265 at the same quality. This is a game-changer for streaming platforms, saving them massive amounts of bandwidth when delivering video to millions of users.
The trade-off is that AV1 is a bit of a workout for computers to encode, requiring more processing power. But as hardware support improves and software gets smarter, AV1 is quickly becoming the new favorite for any online platform that needs to stream high-quality video at a massive scale.
To make it even clearer, here’s a quick rundown of how these three popular codecs stack up against each other.
H.264 vs. H.265 vs. AV1 Codec Comparison
| Codec | Key Advantage | Best For | Primary Drawback |
|---|---|---|---|
| H.264 (AVC) | Universal compatibility | General web video, live streaming, compatibility-first scenarios | Least efficient for 4K/UHD content |
| H.265 (HEVC) | High efficiency (50% smaller than H.264) | 4K/UHD streaming, high-quality video delivery | Complex and costly licensing fees |
| AV1 | Royalty-free and highest efficiency | High-volume streaming (YouTube, Netflix), web video | Computationally intensive to encode |
Each codec has its place, but the trend is clearly moving toward greater efficiency and open standards. Understanding these differences helps you choose the right tool for the job, whether you're streaming, creating, or just watching.
Common Questions About Video Encoding Answered
Even after getting the hang of the basics, a few practical questions always seem to pop up. Let's tackle some of the most common ones to really solidify your understanding of how video encoding works in the real world.
What Is the Difference Between Encoding and Transcoding?
Though they sound almost the same, encoding and transcoding play very different roles in a video's journey.
Encoding is that very first step. It’s the process of taking a massive, raw video file—like the one straight off your camera—and compressing it into a manageable digital format for the first time. Think of it as the initial conversion from raw material to a finished product.
Transcoding, on the other hand, happens after that first encoding step. It’s all about taking an already compressed video and converting it into another format. A classic example is when you upload a high-quality .MOV file to YouTube. The platform then transcodes it, creating a whole family of .MP4 files at different resolutions (1080p, 720p, 480p, etc.) to ensure smooth playback for everyone, no matter their internet speed.
Why Does Video Encoding Take So Long?
Honestly, encoding is just an incredibly tough workout for a computer. The process digs into every single frame of a video, running complex math to figure out the most efficient way to store it. This isn't a quick glance; it involves heavy-duty calculations like motion estimation, discrete cosine transforms, and quantization for every pixel.
Imagine an artist being asked to meticulously redraw an entire movie, but with a catch: they have to make each frame take up as little space as possible without looking bad. That's what an encoder does. It analyzes blocks of pixels, predicts where they're going to move next, and makes millions of decisions a second about what visual information is safe to throw away. This computational marathon demands a ton of processing power and time, especially when you're dealing with massive 4K or 8K videos.
At its heart, the long wait comes down to the sheer volume of data being analyzed. To shrink a file without wrecking its quality, the encoder has to perform an exhaustive search for every tiny redundancy and motion pattern. It’s a fundamentally slow and resource-hungry job.
Is Hardware or Software Encoding Better?
This is one of those "it depends" situations. The choice between hardware and software encoding really boils down to what you care about most: speed, or quality and flexibility.
- Hardware Encoding: This method uses specialized chips built right into your computer, like the one on your graphics card (GPU), to do the heavy lifting. It's blazing fast, which makes it perfect for live streaming or any situation where you need a quick turnaround. The trade-off? You usually sacrifice a bit of quality and lose out on fine-tuning options.
- Software Encoding: This approach uses your computer's main brain, the CPU, to handle the entire process. It’s much, much slower. But in exchange for your patience, it delivers superior quality and total control over every setting. This is the go-to choice for that final export when you need your video to look its absolute best.
So, neither is "better" across the board. If speed is king, hardware encoding is your champion. If pristine quality is the goal, software encoding wins the crown.
Ready to stop waiting and start compressing? Compresto offers a fast, simple, and powerful solution for macOS to shrink your videos, images, and other files without compromising quality. Reclaim your storage and speed up your workflow today. Learn more at https://compresto.app.