Mastering video compression mac: A Practical Guide
Struggling with massive video files on your Mac? You're not alone. The easiest way to shrink a video on a Mac is often with the tools you already have. Apps like QuickTime Player and Photos come with simple presets that make it ridiculously easy to shrink files for emails, messages, or just to free up some precious disk space.
Why Smart Video Compression Is a Game Changer for Mac Users
Whether you’re a creator sending a final cut to a client, a marketer prepping a video for social media, or just trying to email a family memory, huge video files are a constant headache. They chew up your SSD space, take forever to upload, and often get rejected by platforms with strict size limits. This is where getting good at video compression becomes a crucial skill for any Mac user.
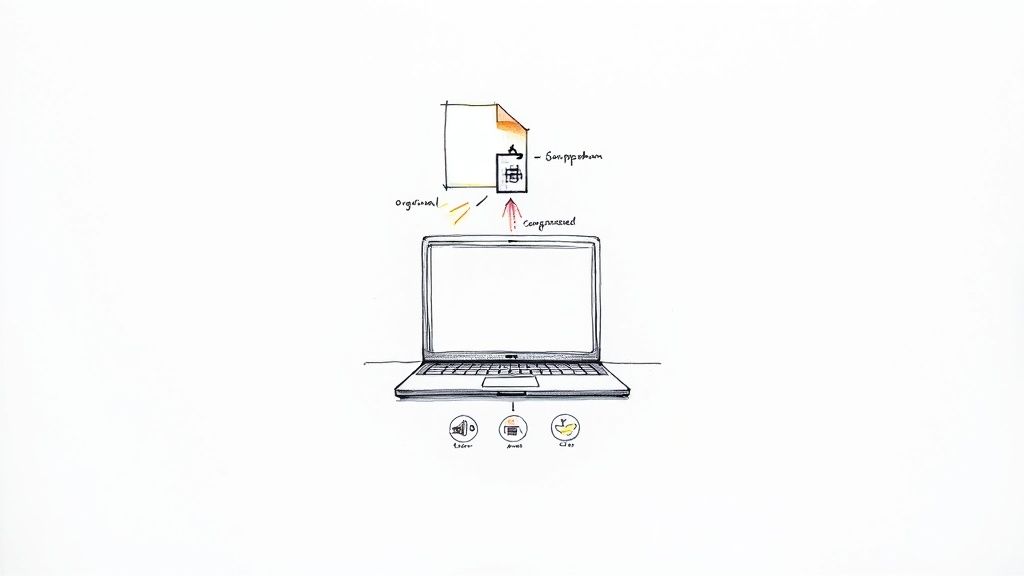
The idea is simple: make the file smaller without wrecking the quality. It’s a balancing act. By intelligently stripping out redundant data that our eyes can't easily see, you can turn a multi-gigabyte 4K monster into a much more manageable file.
Understanding the Benefits
Good compression is about more than just saving space. The real wins are:
- Faster Sharing and Uploads: Smaller files fly up to YouTube, Instagram, and cloud services in a fraction of the time.
- Improved Storage Management: Finally reclaim that valuable disk space on your Mac, which is a lifesaver for anyone with a smaller SSD.
- Wider Compatibility: Compressed videos in standard formats like MP4 just work better across different devices and platforms.
The history of video compression on Mac is actually pretty interesting, with roots in some major industry standards. The MPEG-2 standard, finalized way back in 1994, is what made DVDs possible by hitting incredible 100:1 compression ratios. When Apple integrated full MPEG-2 decoding into QuickTime 4, it was a huge deal—powering the first million DVD-equipped iMacs sold by 2001. You can read more about the evolution of video formats if you're curious.
The goal isn't just to make a file smaller; it's to make it more useful. A compressed video is more shareable, archivable, and accessible. This guide will walk you through the best ways to get it done on your Mac.
Using QuickTime Player for Effortless Compression
Believe it or not, your Mac already has a surprisingly handy video compressor built right in. QuickTime Player, the default video app, is perfect for quick and simple compression jobs. You don't need to download anything extra, making it the ideal first stop for shrinking a video file fast.
This is my go-to method when I just need to knock down a file's resolution without a fuss. Imagine you just shot a gorgeous one-minute 4K video on your iPhone. It looks amazing, but it's a massive 350 MB. Good luck emailing that or sending it over Slack. QuickTime to the rescue.
All you have to do is open the video and head to the export menu. It's so straightforward that even if you've never touched a video setting in your life, you can handle this in seconds.
Navigating the Export Options
First, open your video file in QuickTime Player. Look up at the menu bar at the top of your screen and click File > Export As. This opens up a simple list of preset resolutions.
You’ll see a menu that looks something like this, giving you a few choices to downsize your file.
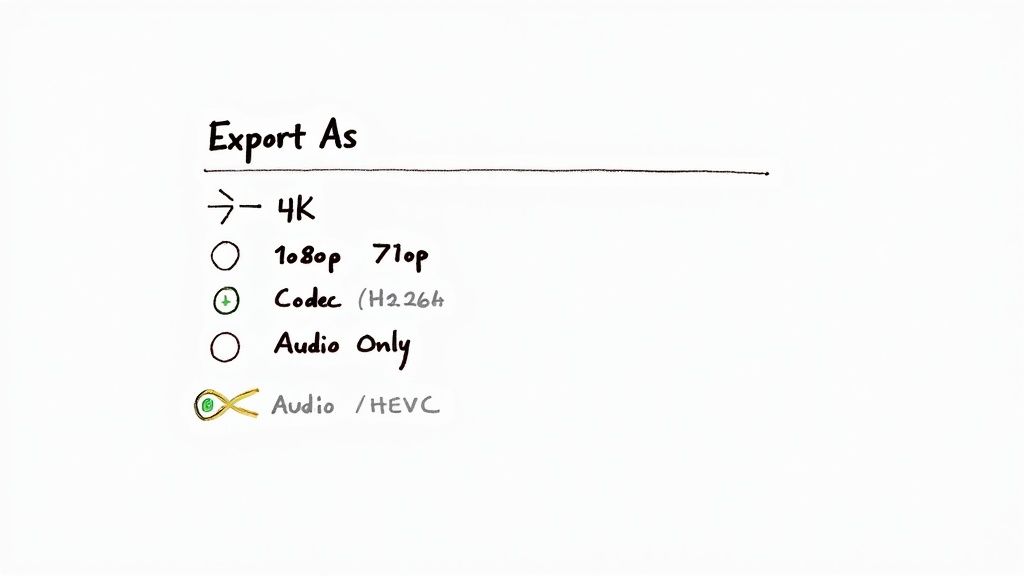
This little menu is your control panel for basic compression. Each option represents a different trade-off between file size and video quality.
The logic is simple: a lower resolution means a smaller file. Taking that 350 MB 4K clip and exporting it as 1080p will likely land you with a file around 80 MB. That's a massive reduction of over 75%, making it way easier to share.
To give you a clearer idea, here’s a quick comparison of what to expect from QuickTime’s presets using our 1-minute, 350 MB 4K video example.
QuickTime Export Presets Compared
| Preset | Resolution | Estimated Compressed Size | Best For |
|---|---|---|---|
| 4K | 3840x2160 | ~350 MB (No change) | Keeping the original, highest quality |
| 1080p | 1920x1080 | ~80 MB | Sharing online, social media, email |
| 720p | 1280x720 | ~45 MB | Quick previews, messaging apps |
| 480p | 854x480 | ~20 MB | When file size is the absolute top priority |
| Audio Only | N/A | ~1 MB | Extracting the soundtrack or voiceover |
As you can see, even the 1080p option offers a huge space saving while maintaining excellent quality for most screens. For quick shares where quality isn't critical, 720p is often more than enough.
Understanding H.264 vs. HEVC
When you export, QuickTime might give you a choice between "Greater Compatibility (H.264)" and "Smaller File Size (HEVC)." What’s the difference?
- H.264: This is the old faithful of video codecs. It plays on practically everything—laptops, phones, smart TVs, you name it. If you want to be 100% sure your video will work for anyone, pick this.
- HEVC (H.265): This is the newer, smarter codec. It delivers the same video quality as H.264 but in a smaller file size. The only catch is that it might not play on older devices.
For posting to social media or sending to clients, H.264 is the safest bet. If you’re just archiving files for yourself or sharing between modern Apple devices, HEVC is a fantastic way to save disk space. If you're working with MOV files specifically, our guide on how to compress a MOV file goes into even more detail.
Pro Tip: Don’t sleep on the "Audio Only" export option. I use this all the time to rip the audio from a video—perfect for saving a lecture, grabbing a song from a music video, or isolating a voiceover. It spits out a clean M4A audio file in a snap.
Sure, QuickTime doesn't have the granular controls of a professional video editor, but that's not the point. Its simplicity is its biggest strength. For a quick, no-headache compression job, it’s an amazing tool that’s already on your Mac, waiting to be used.
Unlocking Your Mac's Hidden Compression Tools
While QuickTime is a great starting point, your Mac is hiding a few other native tools that are perfect for specific compression jobs. These are the options I turn to for quick, everyday tasks when downloading a third-party app just feels like overkill.
Think of these as the hidden gems in your macOS toolkit.
One of the most powerful—and least-known—is a Quick Action built right into Finder. This thing is a lifesaver when you need to compress a bunch of files at once. Say you’re a vlogger with a dozen short clips from a day of shooting. Instead of opening each one individually, you can batch-process the whole lot in just a few seconds.
The Finder Quick Action for Batch Compression
This feature is all about efficiency. You can encode videos without ever opening an app.
Here’s how you do it:
- Select one or more video files in a Finder window.
- Right-click (or Control-click) on the files.
- Hover your cursor over Quick Actions.
- Choose Encode Selected Video Files.
A small dialog box pops up, giving you a few simple choices. You can adjust the resolution (from 480p up to 4K) and pick between H.264 for wider compatibility or HEVC (H.265) for better quality at a smaller file size. For repetitive compression tasks, it's a game-changer.
This kind of built-in power is a direct result of Apple's deep history with video codecs. Their shift to H.264/AVC way back in 2003 was a huge leap, delivering twice the efficiency of older formats. That same technology became the backbone for tools like QuickTime X and FaceTime, which by 2010 handled 70% of Mac video calls at a lean 500 kbps over WiFi. You can discover more insights about the evolution of video compression if you're curious.
Using iMovie for a Bit More Control
When the Finder action is too basic, iMovie is your next best bet. It’s obviously a video editor first, but its export settings offer a fantastic middle ground for video compression on a Mac.
Let’s say you’re trying to email a 3-minute clip of a school play, but the original file is way too big. Just drop the clip into iMovie, trim any dead space, and hit the "Share" button to export it.
The export screen lets you fine-tune the settings:
- Resolution: Choose from 540p, 720p, or 1080p.
- Quality: Select Low, Medium, High, or Best (ProRes).
- Compress: Opt for a Faster export or Better Quality.
What’s really helpful is that iMovie gives you an estimated file size as you tweak the settings, so there’s no guesswork. I’ve found that selecting Medium quality at 1080p usually hits the sweet spot, shrinking the file significantly with almost no visible loss in quality.
Quick and Dirty Compression in the Photos App
Finally, don’t sleep on the Photos app. It’s not a dedicated compression tool by any means, but its sharing feature can shrink videos for you on the fly.
If you select a video in your library and click the Mail icon in the Share menu, Photos will ask if you want to send the video in a smaller size. It’s perfect for compressing personal videos from your iPhone before sending them off to family and friends. Simple, effective, and right where you need it.
Taking Control with Advanced Third-Party Apps
When the built-in macOS tools just don’t cut it for your compression needs, it’s time to call in the specialists. Dedicated third-party apps give you the granular control that QuickTime and iMovie simply can't offer, letting you fine-tune every single aspect of your video. This is how you strike that perfect, elusive balance between a tiny file size and crisp visual quality.
If you're ready to graduate from one-click presets, two names dominate the Mac ecosystem: HandBrake and Compressor. HandBrake is a free, open-source beast, beloved by everyone from hobbyists to seasoned pros for its sheer versatility. On the other side, you have Compressor—Apple’s professional-grade encoding engine built for demanding workflows and seamless integration with Final Cut Pro.
So, which one is right for you? Your choice often boils down to your specific project needs. This decision tree lays out the typical paths Mac users follow when picking a compression tool, usually starting with whether you need to process files in bulk or make edits.

As the flowchart shows, the need for batch processing is often the fork in the road that sends people toward more powerful applications that can chew through a queue of files without breaking a sweat.
Mastering HandBrake for Flexible Compression
For many, HandBrake is the first real step into the world of advanced video compression mac workflows. The interface can look a bit intimidating at first glance, but once you know your way around, it's an incredibly powerful tool. Getting started is as simple as dragging your source video right into the app.
The main screen is your command center, putting presets, codecs, and quality sliders front and center. This is where the real magic happens.
From this hub, you can control everything from resolution and filters to advanced audio tracks and subtitles.
Let's take a common scenario: compressing a large screen recording for a tutorial. My go-to starting point is usually the "Fast 1080p30" preset. After that, the most critical setting to tweak is the Constant Quality (RF) slider.
- For H.264 video: An RF value somewhere between 20-23 is a fantastic sweet spot.
- For H.265 (HEVC) video: You can push the RF value higher, often around 22-28, to get similar quality in an even smaller package.
Remember, lower RF numbers mean higher quality and bigger files; higher numbers do the opposite. A tiny nudge on this slider can make a massive difference in your final file size. If you want a deeper dive, we have a detailed walkthrough on how to use HandBrake for optimal results.
Leveraging Compressor for Professional Workflows
If you're a video editor living in the Apple ecosystem, Compressor is an absolute must-have. Its killer feature is its deep, seamless integration with Final Cut Pro, which lets you send projects directly for encoding without ever exporting a master file first.
Picture this: you’ve just wrapped up a 4K wedding video and the client needs it in three different formats—a high-quality master, a smaller version for YouTube, and another optimized for Vimeo.
With Compressor, you can build custom presets for each destination. You can dial in specific bitrates, bake in watermarks, and create encoding batches that process all three versions at the same time. This kind of automation is a monumental time-saver in any professional setting.
When you're ready to step beyond the built-in macOS tools, a whole world of powerful third-party applications opens up. If you'd like to see what else is out there, you can explore various video editing software options that often come with their own advanced compression features. Making the jump to these specialized tools gives you a level of precision that native apps just can’t touch, making them indispensable for anyone who's serious about video.
Feature Comparison Built-in vs. Third-Party Tools
To really understand the jump in capability, it helps to see the features side-by-side. Here’s a quick breakdown of what you get with macOS native tools compared to the more advanced third-party options.
| Feature | QuickTime/iMovie | HandBrake | Compressor |
|---|---|---|---|
| Batch Processing | Limited/None | Excellent | Excellent |
| Codec Support | Basic (H.264, HEVC) | Extensive (H.264, HEVC, VP9, etc.) | Pro-focused (ProRes, etc.) |
| Quality Control | Presets Only | RF Slider & Bitrate | Precise Bitrate Control |
| Custom Presets | No | Yes | Yes, extensive |
| Advanced Filters | No | Yes (Deinterlace, Denoise) | Yes (Watermarks, Timecode) |
| FCP Integration | Basic Export | No | Seamless |
| Cost | Free | Free (Open-Source) | Paid |
As you can see, while QuickTime and iMovie are great for quick, simple tasks, tools like HandBrake and Compressor are in a completely different league when it comes to control, flexibility, and professional features.
Making Sense of Compression Terminology
Jumping into video compression can feel like learning a new language. You’re suddenly hit with a wall of acronyms like HEVC, H.264, MP4, and MOV. Getting a handle on these terms is the key to making smart decisions and finding that perfect sweet spot between file size and quality.
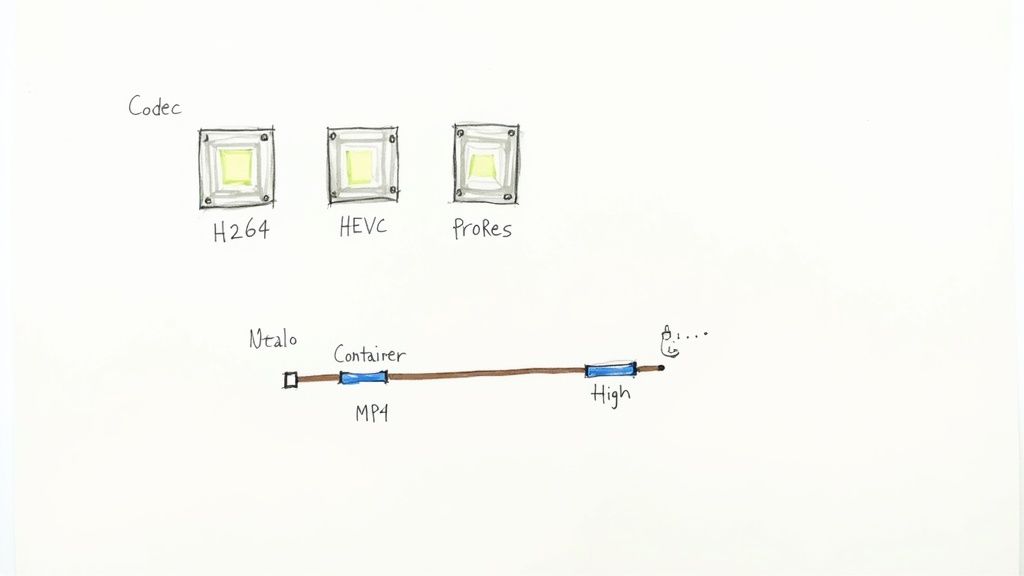
Here's an easy way to think about it: compressing a video is like packing a suitcase. You need two things: a smart method for folding your clothes to save space (the codec) and the suitcase itself to hold everything (the container). Nailing both is crucial.
You can learn much more by reading our detailed explanation of what video encoding is and how it all works behind the scenes.
Codecs: The Compression Engine
A codec (short for coder-decoder) is the algorithm that does the heavy lifting. It's the set of rules that intelligently removes redundant visual information to shrink your video file, then puts it all back together during playback. Different codecs use different strategies, which leads to wildly different results in file size and quality.
For Mac users, these are the three you'll run into most often:
- H.264 (AVC): The undisputed champion of compatibility. This is the industry standard for a reason—it plays on virtually any device or platform imaginable and offers a fantastic blend of quality and file size.
- HEVC (H.265): The high-efficiency successor to H.264. HEVC can deliver the exact same visual quality at a much smaller file size, which makes it a game-changer for 4K video.
- ProRes: This is Apple’s own professional-grade codec. It’s designed for the editing suite, not for sharing. It creates massive files that preserve the maximum amount of image detail, giving editors more flexibility.
The evolution of these standards has been a big part of the video story on the Mac. Today, macOS Sonoma hardware-accelerates HEVC, which can slash 4K file sizes by 40-60% compared to H.264. For instance, a one-hour Final Cut Pro project that might be 100 GB in H.264 can be squeezed down to just 40 GB with HEVC—with no perceptible loss in quality.
Containers: The Digital Wrapper
While the codec is busy compressing the video, the container is the file format that bundles everything together—the compressed video stream, the audio track, subtitles, and other metadata. This is the file extension you see, like .MP4 or .MOV.
The container format itself doesn't affect the video quality; it simply holds the data compressed by the codec. Think of it as the box, not the contents inside.
The two most common containers you'll encounter on a Mac are:
- .MP4: The most universal container format out there. It’s lightweight, supported everywhere, and is the go-to standard for web video.
- .MOV: Apple’s native QuickTime format. It’s generally more flexible than MP4 and can hold higher-quality codecs like ProRes, making it a favorite in professional editing workflows.
Bitrate: The Quality Dial
Finally, there’s bitrate. This measures how much data is used to represent one second of video, usually in megabits per second (Mbps). Think of it like a faucet.
A higher bitrate is like opening the tap all the way—more data flows through, resulting in higher quality but a much larger file.
A lower bitrate, on the other hand, restricts the data flow. This leads to a smaller file but can introduce visual artifacts like blockiness or blurriness if you turn it down too low. Fine-tuning the bitrate is often the most direct way to control the final file size and visual fidelity of your compressed video.
Your Top Video Compression Questions Answered
When you start shrinking video files on your Mac, a few questions always seem to pop up. It's totally normal. You might worry about losing quality or just feel confused about which format to choose. Let's clear the air and tackle the most common questions Mac users have about compression.
Will Compressing a Video on My Mac Ruin the Quality?
This is the big one—the fear that keeps people from even trying. The short answer? Not if you do it right.
Just about every compression method you'll use is 'lossy,' meaning some data gets thrown out to make the file smaller. But it’s not a random process. Smart algorithms are designed to get rid of the data your eyes are least likely to notice anyway. Think of it as trimming the fat without touching the good stuff.
Sure, if you go overboard with the compression settings, the quality will take a hit. But a well-done compression can slash the file size with virtually no perceptible difference, especially when viewed on a phone or laptop. It’s all about finding that sweet spot, and modern tools give you plenty of control to do just that.
What’s the Best Format for Compressing Video on a Mac?
This really comes down to what you're doing with the video. There isn't one "best" format, but there are two clear winners for different goals.
- For Maximum Compatibility: Go with MP4 (using the H.264 codec). It’s the undisputed champion here. Think of it as the universal language of video—it plays nicely on just about every device, browser, and social media platform out there. If you're sharing it far and wide, this is your safest bet.
- For Maximum Efficiency: The winner is HEVC (H.265). This format is a game-changer, offering the same visual quality as H.264 but in a file that's often 30-50% smaller. It's a lifesaver for 4K video or for anyone trying to archive large files. The only catch is that some older devices might not support it yet.
Key Takeaway: Choose MP4 (H.264) when you need it to play everywhere. Choose HEVC (H.265) when you want to save space.
Can I Compress a Bunch of Videos at Once?
You bet. Batch compression is a massive time-saver, and your Mac has a couple of great ways to handle it.
If you just need a quick-and-dirty solution, select all your video files in Finder, right-click, and choose Quick Actions > Encode Selected Video Files. This built-in tool is perfect for applying the same preset to a handful of clips without launching a full-blown application.
For more control, you'll want to turn to dedicated software like HandBrake or Apple’s own Compressor. These apps are built for heavy lifting. You can queue up dozens of videos, tweak the settings for each one, and then let the app process the entire batch while you grab a coffee or get back to other work.
Should I Compress a Video Before or After Editing?
This one’s a hard and fast rule: Always edit first, compress last.
Do all of your creative work—trimming clips, color correcting, adding graphics, mixing audio—on your original, high-quality source files. This gives you the most data and flexibility to work with, ensuring your final edit looks as good as possible.
Compression should be the very last step in your workflow, done only when you export the finished project. If you try to edit an already-compressed file, you risk degrading the quality even further and can run into performance issues with your editing software. Think of compression as the final step of packaging your video before you send it out into the world.
Ready to stop wrestling with huge files and start compressing intelligently? Compresto offers a simple drag-and-drop interface for Mac that shrinks videos, images, and PDFs in seconds without sacrificing quality. Reclaim your disk space and speed up your workflow by downloading it from https://compresto.app.