How to Compress WAV Files: Easy Tips for Better Audio
Understanding WAV Files And Why Size Matters
WAV files, short for Waveform Audio File Format, are the industry standard for high-quality audio. They are known for being lossless, meaning no audio data is lost during compression. This makes them perfect for professional audio editing, archiving, and situations where preserving the original sound is critical. However, this pristine quality comes with a trade-off: larger file sizes.
Why Are WAV Files So Large?
WAV files maintain their lossless quality by avoiding compression algorithms that discard data. Imagine taking a high-resolution photo versus a compressed image. The high-resolution photo contains more detail but requires more storage. Similarly, WAV files capture the full spectrum of sound, resulting in larger files. A standard 16-bit stereo WAV file at 44.1 kHz, for instance, can take up roughly 10 MB per minute of audio. This can accumulate quickly, especially for longer recordings or large audio libraries.
WAV files also frequently include metadata like artist, track title, and album information. While helpful for organization, this data adds to the overall file size, especially when managing numerous files. You can learn more about managing file sizes with this helpful resource: How to master file size reduction.
The Impact of Large File Sizes
The size of WAV files presents some practical challenges:
- Storage: Large WAV file collections can consume significant hard drive space.
- Transfer Speeds: Uploading or downloading these files can be slow, particularly with limited internet bandwidth.
- Processing Power: Editing large WAV files requires more computer resources, potentially slowing down your workflow.
This need for efficient storage and transfer is a key factor in the growing demand for data compression software. According to The Business Research Company, the market was valued at $1.03 billion in 2023 and is expected to reach $1.11 billion in 2024, demonstrating a CAGR of 7.6%. The need to compress files like WAVs is driving this market expansion. Learn more about the data compression market.
The Balancing Act: Size vs. Quality
Audio professionals often need to balance maintaining high audio quality with manageable file sizes. Effective planning and communication are essential for any project. For instance, a family meeting agenda can help facilitate clear communication within a team. The decision to compress a WAV file depends on its intended use. Archiving original recordings generally requires lossless compression. However, for online distribution or casual listening, lossy compression might be suitable. Careful consideration of these factors ensures that quality is balanced with practicality. Choosing the right compression method depends on understanding the trade-offs and your project's needs.
Lossless Vs Lossy: Making The Right Choice For Your Audio
Choosing the right compression method for your WAV files involves a crucial trade-off: file size versus audio quality. Understanding the fundamental difference between lossless and lossy compression is key to making informed decisions about your audio. Each method has its own set of pros and cons, impacting your final audio in significant ways.
Lossless Compression: Preserving Audio Fidelity
Lossless compression, true to its name, retains all the original audio data. Imagine packing a suitcase meticulously—you fold and organize your clothes to fit, but nothing is left behind. This method shrinks file size without sacrificing any audio quality. Popular formats like FLAC (Free Lossless Audio Codec) and ALAC (Apple Lossless Audio Codec) utilize this approach. These formats typically achieve a file size reduction of around 50%, making them ideal for archiving high-quality audio or situations where perfect sonic reproduction is paramount.
Lossy Compression: Prioritizing Smaller Files
Lossy compression, conversely, selectively discards audio data. Clever algorithms identify and remove sounds less likely to be perceived by the human ear. This results in significantly smaller files, often achieving reductions of up to 90%. Common formats like MP3 and AAC employ lossy compression. This makes them well-suited for web streaming, podcast publishing, and general listening where storage space and bandwidth are key considerations. For more information on file compression, check out this article: How to compress files without losing quality.
Visualizing the Differences
The infographic below provides a visual comparison of lossless and lossy compression. It highlights the key differences in file size reduction, audio quality retention, and typical use cases.
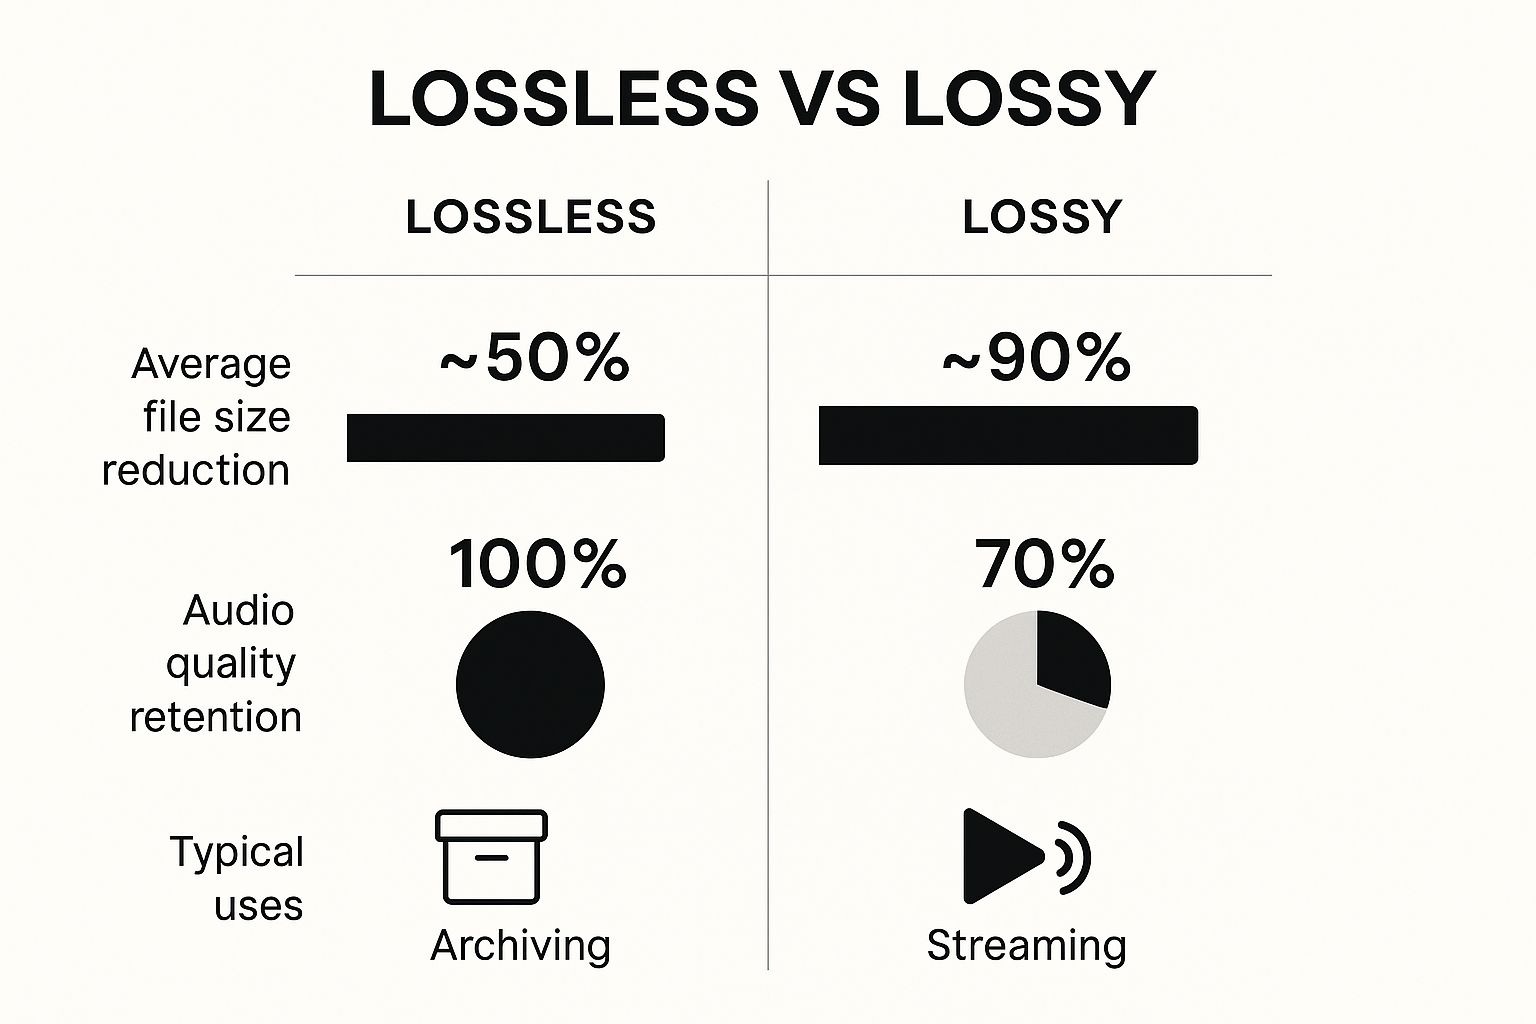
As the infographic illustrates, lossy compression significantly reduces file size but at the expense of some audio fidelity. Lossless compression, while offering less dramatic size savings, ensures perfect audio preservation. This makes it the go-to choice for archiving and professional audio applications. The difference in quality retention (100% for Lossless vs ~70% for Lossy) is a deciding factor when choosing the right compression method.
To further illustrate the differences, let's look at a table summarizing the key aspects of each method:
Lossless vs Lossy Compression Comparison A detailed comparison of compression methods, file size reductions, quality retention, and best use cases
| Method | Typical Size Reduction | Quality Loss | Best Use Cases | Popular Formats |
|---|---|---|---|---|
| Lossless | ~50% | None | Archiving, professional audio editing, high-fidelity listening | FLAC, ALAC, WAV |
| Lossy | ~90% | Some (perceptually minimal in many cases) | Web streaming, podcasts, general listening, mobile devices | MP3, AAC, OGG |
This table highlights the core trade-off: Lossless preserves perfect quality at the cost of larger files, while Lossy prioritizes smaller files with some acceptable quality loss.
Hybrid Approaches: The Best of Both Worlds
Sometimes, a hybrid approach is the most effective strategy. Archiving original recordings in a lossless format like FLAC while creating lossy versions in MP3 for online distribution balances quality preservation with practical accessibility. This allows you to retain a master copy while offering smaller, easily shareable files. This strategy is often employed by music producers, podcasters, and archivists.
Making the Right Choice: Key Considerations
When deciding how to compress your WAV files, consider these key questions:
- Intended Use: Is the audio for archiving, online distribution, casual listening, or professional editing?
- Quality Importance: How crucial is preserving the absolute highest audio quality?
- Storage and Bandwidth: What are your storage and bandwidth limitations?
Answering these questions will provide a clear framework for selecting the appropriate compression method. This ensures your compressed audio meets your specific requirements.
Step-By-Step WAV Compression With Popular Software
Ready to compress your WAV files? This section provides practical, step-by-step guidance using readily available software. We'll cover both free and premium options, offering clear instructions and highlighting essential settings.
Free Software Solutions: Audacity and VLC Media Player
Free software offers a convenient entry point for compressing WAV files. Audacity, a versatile audio editor, and VLC Media Player, known for its broad format support, both provide compression capabilities.
-
Audacity:
- Import your WAV file into Audacity.
- Click "File" then "Export" and choose your desired compressed format (e.g., MP3, OGG).
- Adjust the bitrate and quality settings in the export window. A higher bitrate generally means better quality but a larger file size.
- Click "Save" to export the compressed file.
-
VLC Media Player:
- Open your WAV file in VLC.
- Click "Media" and then "Convert / Save."
- Add your WAV file and choose a destination file name.
- Select your desired compressed format under "Profile."
- Click "Start" to begin the compression process.
While these free tools offer basic compression, they may lack advanced features found in professional software.
Premium Software: More Control, More Options
For advanced control and specialized features, premium software offers a significant advantage. Programs like Adobe Audition and Steinberg WaveLab provide extensive options for customizing your compression settings.
- Adobe Audition: Allows for detailed adjustments of bitrate, sample rate, and other parameters, offering precise control over compression levels and quality. Batch processing features make handling multiple files quick and efficient.
- Steinberg WaveLab: Provides professional-grade tools specifically designed for mastering and audio editing. This includes a range of codecs and advanced dithering options for optimal compression results.
The choice between free and premium tools often depends on your specific needs and budget.
Batch Processing and Quality Verification
Whether you're using free or premium software, efficient batch processing is essential for handling numerous WAV files. Most audio software allows you to apply the same compression settings to multiple files simultaneously, significantly speeding up your workflow. Remember, the global file compression tools market is booming. The market stood at USD 1.2 billion in 2024 and is projected to reach USD 2.5 billion by 2033, with a CAGR of 9.1% between 2026 and 2033. This growth reflects the increasing need for efficient file management, including compressing WAV files to popular formats like FLAC or MP3, often reducing file size by 50-90% depending on the settings. Discover more insights about the file compression market. For instance, a 10 MB WAV file can be compressed to a 1-2 MB MP3 file.
After compressing, it’s crucial to verify the quality of your compressed files. Compare them to the original WAV files using A/B testing to ensure the compressed versions meet your desired quality standards. Consider factors like audio fidelity, dynamic range, and the presence of any unwanted artifacts.
Command-Line Tools for Advanced Users
For maximum control and automation, command-line tools like FFmpeg offer a powerful alternative. These tools allow for intricate scripting and batch processing, streamlining complex compression workflows. However, they require more technical expertise and familiarity with command-line interfaces. With these techniques, you can significantly optimize your WAV compression workflow.
Online Tools And Cloud Solutions That Actually Work
Sometimes, installing software just isn't an option. Maybe you're using a public computer, working on a Chromebook, or simply prefer the convenience of online tools. Whatever the reason, web-based WAV compression provides a practical alternative. But it's important to remember that not all online converters are equal. This section will guide you through the available options and help you make informed decisions.
Popular Online WAV Compressors
Several popular platforms offer WAV compression services. Each has its own advantages and disadvantages:
-
CloudConvert: This versatile online converter handles a wide range of file formats, including WAV. You can adjust the compression options to find the right balance between file size and audio quality. CloudConvert makes it easy to manage various conversion needs.
-
Online Audio Converter: This tool focuses specifically on audio conversion. It offers a streamlined interface for compressing WAV files into common formats like MP3. Online Audio Converter simplifies the audio compression process.
-
Convertio: Convertio is another multi-format converter that supports WAV compression and conversion. It's known for its clean, user-friendly design. Convertio provides a straightforward conversion experience.
Evaluating Online Compression Tools
The right online tool depends on your specific requirements. Keep these key factors in mind when comparing different platforms:
-
Compression Quality: Does the tool maintain good audio fidelity after compression? Listen carefully for any noticeable artifacts or distortions.
-
Processing Speed: How long does it take to compress your files? This is a critical consideration, especially for larger WAV files.
-
File Size Limitations: Some free services restrict the size of files you can upload. Check for any limitations before you start.
-
Security: If you're dealing with confidential audio, choose a service that prioritizes security and data privacy. Look for features like SSL encryption or automatic file deletion.
For instance, if speed is paramount, choose a platform designed for fast conversions, even if it offers fewer advanced settings. If audio quality is your top priority, a dedicated audio converter is usually the better option.
Mobile Apps for WAV Compression
With the growth of mobile content creation, there's increasing demand for WAV compression on smartphones and tablets. Numerous apps cater to this need, enabling you to compress audio directly on your mobile device. These apps are particularly useful for podcasters, musicians, and content creators on the go. Many also integrate with cloud storage services for a smoother workflow.
Cloud-Based Solutions: Trade-offs and Considerations
Cloud-based compression is convenient, but it does have some drawbacks. A stable internet connection is essential. Privacy is another important factor. Always review a platform's data handling policies before uploading any sensitive audio files. The growing popularity of online tools highlights the expansion of the data compression market. According to Datamation, this market was valued at $3.01 billion in 2020 and is projected to reach $4.51 billion by 2026, a CAGR of 5.2%.
Compression methods for WAV files vary widely. Simple ZIP compression might reduce file size by 10-15%. Specialized lossless codecs like FLAC typically achieve 30-50% reduction without any quality loss. Lossy formats can reduce file size by up to 90%, but there's a trade-off in audio quality. Choosing the best compression strategy for your needs is more critical than ever.
To understand different compression methods and their performance, consider the following table:
Compression Method Performance Comparison: Statistical comparison of different compression methods showing file size reduction percentages and quality metrics
| Compression Type | Average Size Reduction | Quality Retention | Processing Time | Compatibility |
|---|---|---|---|---|
| ZIP | 10-15% | Excellent | Fast | Very High |
| FLAC | 30-50% | Excellent | Moderate | High |
| MP3 | 75-90% | Good to Fair (dependent on bitrate) | Fast | Very High |
| WAV (uncompressed) | 0% | Excellent (lossless) | N/A | High |
The table clearly illustrates the trade-offs between size reduction and quality retention across various compression methods. ZIP offers minimal compression but retains the original quality. FLAC delivers significant compression without sacrificing quality, while MP3 prioritizes size reduction, accepting some quality loss.
By carefully evaluating the pros and cons of online and cloud-based WAV compression, you can choose the method that best fits your requirements. Understanding the trade-offs, comparing different platforms, and making security a priority will help you compress your WAV files efficiently and effectively.
Advanced Optimization Techniques For Maximum Results
Beyond basic compression, several advanced techniques can dramatically improve your results when compressing WAV files. These methods empower audio engineers to achieve optimal file sizes without compromising the listening experience. Let's delve into some of these approaches.
Bit Rate Optimization and Sample Rate Conversion
Bit rate refers to the amount of data processed per second. Optimizing the bit rate involves selecting a rate that balances file size and audio quality.
A higher bit rate generally results in better sound but also a larger file. This is where careful consideration of your project's specific needs becomes critical.
For example, a podcast intended for online distribution might prioritize a smaller file size with a lower bit rate. Archiving a master recording, however, demands a higher bit rate to preserve every subtle detail.
Additionally, strategic sample rate conversion can yield significant size reductions. The sample rate, measured in kHz, represents the number of audio samples captured per second.
Reducing the sample rate can drastically shrink the file size, though it might impact the highest frequencies. This technique is particularly relevant when the final audio is intended for playback on devices with limited frequency response.
Channel Configuration and Psychoacoustic Principles
Intelligent channel configuration plays a vital role in optimization. If your audio doesn't require stereo, converting to mono can significantly decrease the file size without dramatically impacting the perceived quality.
This is a common practice for voice recordings or other audio where spatial separation isn't essential.
Furthermore, understanding psychoacoustic principles can inform your compression decisions. Psychoacoustics explores how the human ear and brain perceive sound.
Modern compression algorithms leverage these principles to remove audio data less likely to be noticed, thus maximizing file size reduction while minimizing perceived quality loss.
Variable Bit Rate Encoding and Pre-processing Techniques
Variable bit rate (VBR) encoding dynamically adjusts the bit rate throughout the audio file. This means simpler sections with less sonic information can be encoded at a lower bit rate. More complex sections with greater dynamic range receive a higher bit rate.
VBR offers a highly efficient way to optimize file size without compromising overall quality.
Also, consider employing pre-processing techniques such as noise reduction before compression. Reducing background noise or unwanted artifacts can enhance the effectiveness of the compression algorithm, further reducing the final file size. You might be interested in: How to master video compression without losing quality.

Metadata Management and Mastering Considerations
Proper metadata management can streamline your workflow, especially when managing extensive audio libraries. While metadata such as track title and artist information is important, it contributes to the overall file size.
Evaluate which metadata is truly necessary and remove any unnecessary tags to keep file sizes manageable. For further reading on topics like images and marketing, you can explore general blog resources: Blog.
Finally, professional audio engineers should consider how compression fits into their mastering workflow. Mastering is the final stage of audio production, where the overall sonic balance and loudness are finalized.
Applying compression during mastering requires careful consideration of the target loudness and dynamic range. This ensures consistent, predictable results across different platforms.
Mastering engineers often use specialized software and hardware like iZotope Ozone or FabFilter Pro-L to achieve precise control over the compression process and maintain the highest possible audio quality. Through these advanced techniques, audio professionals can optimize WAV file compression for maximum efficiency and quality.
Avoiding Common Mistakes And Maximizing Your Success
Achieving high-quality WAV compression involves understanding the process and avoiding common pitfalls. These mistakes can result in poor audio quality, compatibility problems, or excessively large files. This section explains how to avoid these issues and optimize your workflow for the best possible results.
Common Compression Mistakes and How to Avoid Them
Beginners often encounter predictable challenges when learning audio compression. Fortunately, these issues are easily preventable with some planning:
-
Over-Compression: Just like squeezing all the air out of a balloon, too much compression can create lifeless, distorted audio. Start with minimal settings and incrementally increase the compression until you achieve a balance between reducing file size and preserving quality.
-
Ignoring the Target Platform: Different platforms have different requirements. Audio destined for online streaming may require a lower bitrate than audio for a CD. Consider the intended use before adjusting your settings.
-
Neglecting A/B Testing: Don't assume your compressed audio sounds good simply because the file size is smaller. Always compare the compressed version to the original WAV file. This ensures the compression hasn't introduced unwanted artifacts or degraded the audio. A/B testing provides a clear way to assess the impact of compression settings.
-
Failing to Back Up Originals: Always create backups of your original WAV files before compressing them. This simple precaution safeguards against data loss during the process. It’s a crucial step to protect your valuable work.
Quality Control: A/B Testing and Beyond
Effective quality control is paramount. A/B testing, comparing two versions to determine which performs better, is an invaluable tool. This involves carefully listening to both the original and compressed files, toggling between them to identify any audible discrepancies.
-
Blind Testing: For a truly objective assessment, conduct blind A/B testing. This removes bias by concealing which file is which, ensuring you evaluate the audio purely on its merits.
-
Focus on Key Elements: Pay particular attention to the clarity of vocals, the impact of the drums, and the overall dynamic range. These elements are typically most susceptible to the effects of compression.
-
Use Multiple Playback Devices: Test your compressed audio on a variety of devices, ranging from high-quality headphones to basic laptop speakers. This gives you a comprehensive understanding of how the compression affects the listening experience across different systems.
Backup Strategies and Workflow Organization
Backing up original WAV files is essential to protect against accidental data loss and maintain access to your uncompressed audio. Establish a reliable backup strategy using external hard drives, cloud storage (Dropbox), or a combination of both.
Well-organized workflows are vital, especially when dealing with a large number of audio files. Here are some best practices:
-
Descriptive File Naming: Use a consistent file naming system that clearly indicates the file's content, compression settings, and version number. For example, "SongTitle_FLAC_48kHz_v1.flac".
-
Folder Structure: Organize your files within clearly labeled folders to streamline file management and simplify retrieval.
-
Batch Processing Documentation: When using batch processing, meticulously document the settings used. This maintains consistency and facilitates collaboration.
Legal and Copyright Considerations
Always respect copyright laws when compressing and distributing audio. If you're working with copyrighted material, secure the necessary permissions before distributing compressed versions to avoid legal complications.
Optimizing Your Entire Compression Workflow
Optimizing your workflow goes beyond choosing the right software and settings; it's about creating an efficient process from beginning to end.
-
Choose the Right Tools: Selecting appropriate tools, whether software or online converters, greatly impacts efficiency. Consider factors like processing speed, file size limits, and advanced features.
-
Automate When Possible: Explore automation options for repetitive tasks. Many compression tools provide batch processing capabilities or scripting features that can drastically reduce manual work, especially for large projects.
By implementing these strategies, you can minimize errors, preserve audio quality, and improve your WAV compression results. You’ll achieve smaller file sizes without sacrificing the integrity of your audio.