A Mac User's Guide to Converting MP4 to MPEG
It might feel like a step backward, but converting an MP4 file to an MPEG format is often a necessary move, especially when dealing with older hardware. You're essentially re-encoding a modern video file into a legacy format—usually MPEG-1 or MPEG-2—so it plays nice with devices like DVD players or specific broadcast systems. This isn't about downgrading; it's about ensuring your video works everywhere.
Why You Still Need to Convert MP4 to MPEG
While MP4 is the undisputed king of online video, the need for older formats hasn't vanished. In plenty of professional and personal projects, converting MP4 to MPEG isn't just a preference—it's a hard requirement.
This demand fuels a surprisingly large market. In 2023, the global video converter industry was valued at USD 1.2 billion and is expected to more than double to USD 2.8 billion by 2032. This growth shows just how vital these tools are for bridging the gap between modern and legacy video standards. If you're interested, you can read more about the growing video converter market to see the full picture.
Legacy Hardware Compatibility
The number one reason for this conversion is simple: compatibility. A lot of hardware was built long before MP4 became the standard and was never updated to handle it.
- DVD Authoring: If you need to burn a video onto a standard DVD that will play in any consumer player, you absolutely need an MPEG-2 video stream. MP4 files are just not compliant with the universal DVD-Video specification.
- Older Digital Signage: Many commercial displays, especially those you see in public transit or retail stores, were designed to loop MPEG-1 or MPEG-2 files. They simply don't have the codecs to play a modern MP4.
- Broadcast Systems: Some television broadcasting equipment still relies on MPEG-2 transport streams for video ingest and playback, sticking with a standard that has been incredibly reliable for decades.
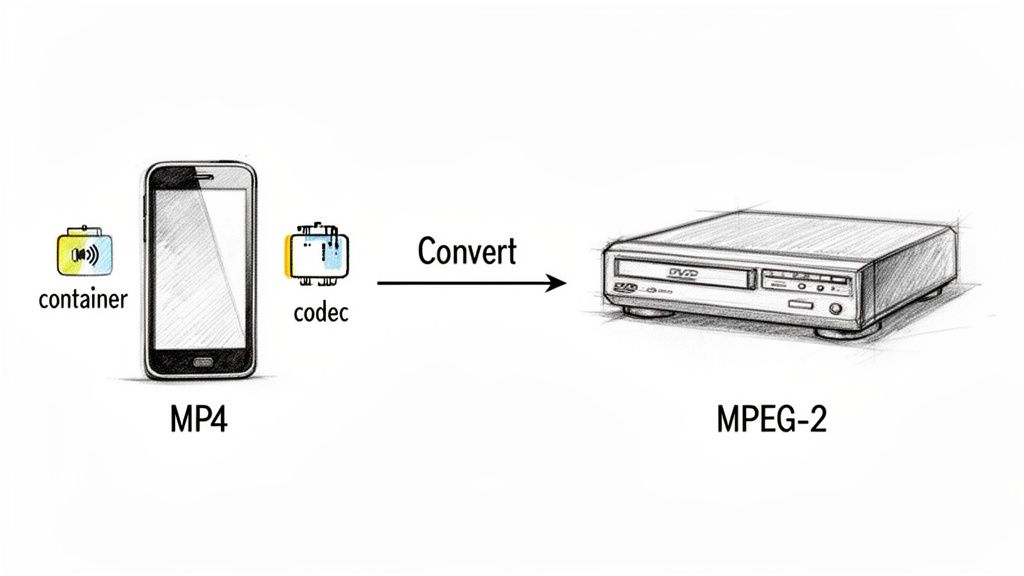
Understanding Containers vs. Codecs
A common point of confusion is the difference between a video's container and its codec. It's an important distinction to make.
Think of a container (like .mp4 or .mov) as the box. The codec (like H.264 or MPEG-2) is how the video and audio are actually packed inside that box.
When you convert an MP4 to an MPEG, you're not just swapping the box for a different one. You're fundamentally re-packing the contents using a completely different method. This ensures the playback device knows exactly how to unpack and display your video, heading off any compatibility headaches before they even start.
Let's break down the key differences to help you decide which output you really need.
MP4 vs MPEG At a Glance
| Feature | MP4 (typically H.264/H.265) | MPEG (MPEG-1 / MPEG-2) |
|---|---|---|
| Primary Use Case | Web streaming, modern devices (phones, computers) | DVD authoring, broadcast, older hardware |
| Compression | High efficiency, smaller file sizes for high quality | Lower efficiency, larger file sizes |
| Compatibility | Universal on modern devices, poor on legacy hardware | Excellent on older devices (DVD players), less common now |
| Quality | Excellent, supports up to 8K and beyond | Good for its time, typically limited to SD/HD |
| Typical Codecs | H.264 (AVC), H.265 (HEVC) | MPEG-1 Part 2, MPEG-2 Part 2 |
This table makes it clear: the format you choose depends entirely on where the video needs to play. For a DVD, MPEG-2 is your only real choice. For just about everything else in the modern world, MP4 is the way to go.
Effortless Conversions with GUI Tools on macOS
If you'd rather not touch the command line, you're in luck. Converting MP4 to MPEG on a Mac can be a simple, click-based affair. Graphical User Interface (GUI) tools offer a visual and intuitive way to manage your files, making the whole process accessible to just about anyone.
We'll look at two of the best options you can get on your Mac. One is already built right in, perfect for quick jobs. The other gives you a massive leap in control for more demanding projects. Either way, you won't need to open the Terminal.
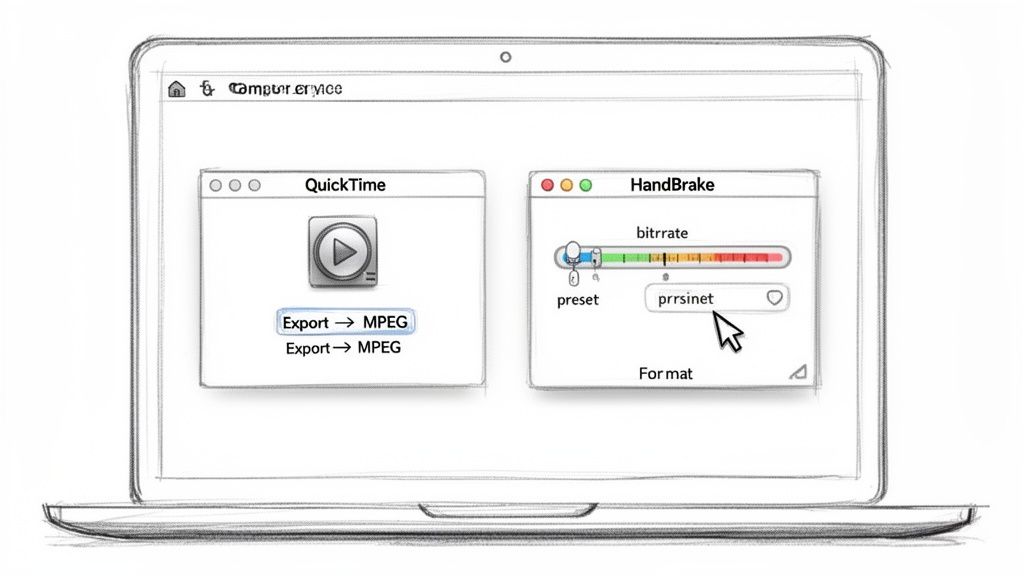
QuickTime Player for Simple Exports
Your Mac’s own QuickTime Player is the absolute fastest way to handle a simple, one-off conversion. It's the perfect tool when you just need to get a file into a different format without getting bogged down in technical settings.
Just open your MP4 file in QuickTime Player, then head up to the menu bar and select File > Export As. You'll see a few resolution options like 4K, 1080p, 720p, and 480p.
While QuickTime mainly exports to the .mov container, this format still uses MPEG-4 video codecs. For many older systems that struggle with highly compressed MP4s, a MOV file is often exactly what you need for compatibility.
Pro Tip: Don't sleep on the "Audio Only" export option in QuickTime. It's an incredibly fast way to rip the audio from a video and create an M4A file, no third-party software needed.
This method is all about speed and simplicity, not fine-grained control. For anything more complex, you'll want to reach for something with a bit more muscle.
HandBrake for Advanced Control
When you need precise control over codecs, bitrates, and presets, HandBrake is the undisputed champion of open-source video tools. It’s a powerful video transcoder that puts you in complete command of the output, making it ideal for tasks like preparing a video for a standard-definition DVD.
Let's say you have a 1080p MP4 marketing video that needs to be burned onto a DVD for distribution. Here's how you'd tackle that in HandBrake:
- Open Source: First, you'd select your MP4 file to load it into the program.
- Choose a Preset: A good starting point is the "Legacy" presets. Something like "Apple 240p30" can serve as a solid base to build from.
- Set the Format: On the "Summary" tab, you'll switch the format from MP4 to MPEG-2, which is what DVDs use.
- Adjust Video Settings: Jump over to the "Video" tab. This is where you can fine-tune the bitrate and quality to meet the strict specifications required for DVDs.
HandBrake’s real power comes from its massive library of presets and its deep customization options. It can handle everything from a simple format swap to a complex re-encoding job. If you're new to the app, it's definitely worth checking out a guide on how to use HandBrake effectively to really unlock what it can do. It'll give you the confidence to master converting MP4 to MPEG.
Unlocking Precision and Power with FFmpeg
When GUI tools feel too restrictive and you need surgical precision, speed, and automation, the command line is your best friend. This is where FFmpeg, the open-source engine behind countless video applications, truly shines. It’s the professional’s choice for a reason—it offers complete control over every aspect of the video conversion process.
While the wall of text in a Terminal window can seem intimidating, the basic command for converting MP4 to MPEG is surprisingly straightforward. Think of it as giving your computer a very specific, direct instruction.
At its core, the command structure follows a simple pattern. You call the program (ffmpeg), specify your input file (-i input.mp4), add any special instructions or flags, and finally, name your output file (output.mpeg).
Your First FFmpeg Conversion Command
Let’s start with the most basic conversion. This command takes your MP4 file and converts it to an MPEG file using FFmpeg's default settings, which are often good enough for general use.
Open your Terminal, navigate to the folder containing your video, and type the following:
ffmpeg -i your-video-name.mp4 your-video-name.mpeg
That’s it. FFmpeg handles the complex work of re-encoding the video and audio streams into the MPEG format. While simple, this command forms the foundation for more advanced operations. To get a deeper understanding of FFmpeg's capabilities, our guide on how to compress videos using FFmpeg provides additional examples and context.
Tailoring Your Output with Specific Flags
The real power of FFmpeg comes from using flags to customize the output. These are small text commands that tell FFmpeg exactly how you want it to behave. This is crucial when you're converting MP4 to MPEG for a specific purpose, like DVD authoring or legacy device playback.
Here are a few essential flags you'll use constantly:
-c:v mpeg2video: This explicitly tells FFmpeg to use the MPEG-2 video codec, which is a common requirement for DVDs.-q:v: This flag controls the video quality on a scale. A lower number, like2, means higher quality and a larger file, while a higher number like8means lower quality and a smaller file.-b:v: Sets a target video bitrate. For example,-b:v 5000kwould aim for a constant bitrate of 5000 kilobits per second.-c:a mp2: Specifies the audio codec. MP2 is the standard audio format for MPEG-2 video streams.
By combining these flags, you can build powerful, repeatable commands that deliver consistent results every single time, eliminating the guesswork of GUI presets.
Practical Command Examples
Let's put this into practice. Imagine you need to prepare a video for a standard-definition DVD. The specifications are strict, requiring MPEG-2 video and MP2 audio.
You could use a command like this:
ffmpeg -i input.mp4 -c:v mpeg2video -q:v 4 -c:a mp2 -b:a 192k output.mpg
This command specifies the video codec, sets a decent quality level (-q:v 4), and encodes the audio to MP2 at a bitrate of 192kbps. This level of control is simply unavailable in most basic GUI tools and is essential for professional workflows.
Automating Your Workflow with Batch Conversion
Let's be honest: converting files one by one is a soul-crushing way to spend your time, especially when you've got a whole folder of videos staring back at you. Making the switch to a batch workflow for converting MP4 to MPEG isn't just about saving a few minutes; it’s a fundamental upgrade to how you manage your media. You stop being the bottleneck and let your system do the heavy lifting in the background.
The most direct way to get started with automation on a Mac is by using a simple for loop with FFmpeg right in the Terminal. A single line of code can chew through every single MP4 file in a folder, run your conversion command, and spit out a new MPEG file for each one. It's an incredibly powerful way to process an entire project's worth of clips in one shot.
Using a Simple FFmpeg Batch Script
Imagine you have a folder on your Desktop called source-videos that's filled with MP4 files. You can convert all of them with a single command.
Just open your Terminal, navigate to the Desktop, and run this script:
for f in source-videos/*.mp4; do ffmpeg -i "$f" -c:v mpeg2video "${f%.mp4}.mpg"; done
So, what's happening here? The command finds every file ending in .mp4 inside that source-videos folder. For each one it finds, it runs our FFmpeg command, keeping the original filename but swapping the extension to .mpg for the new output file. That's the core of command-line batch processing—it’s fast, clean, and you can scale it up for thousands of files.
This diagram breaks down the simple, three-step process FFmpeg repeats for every file in the batch.
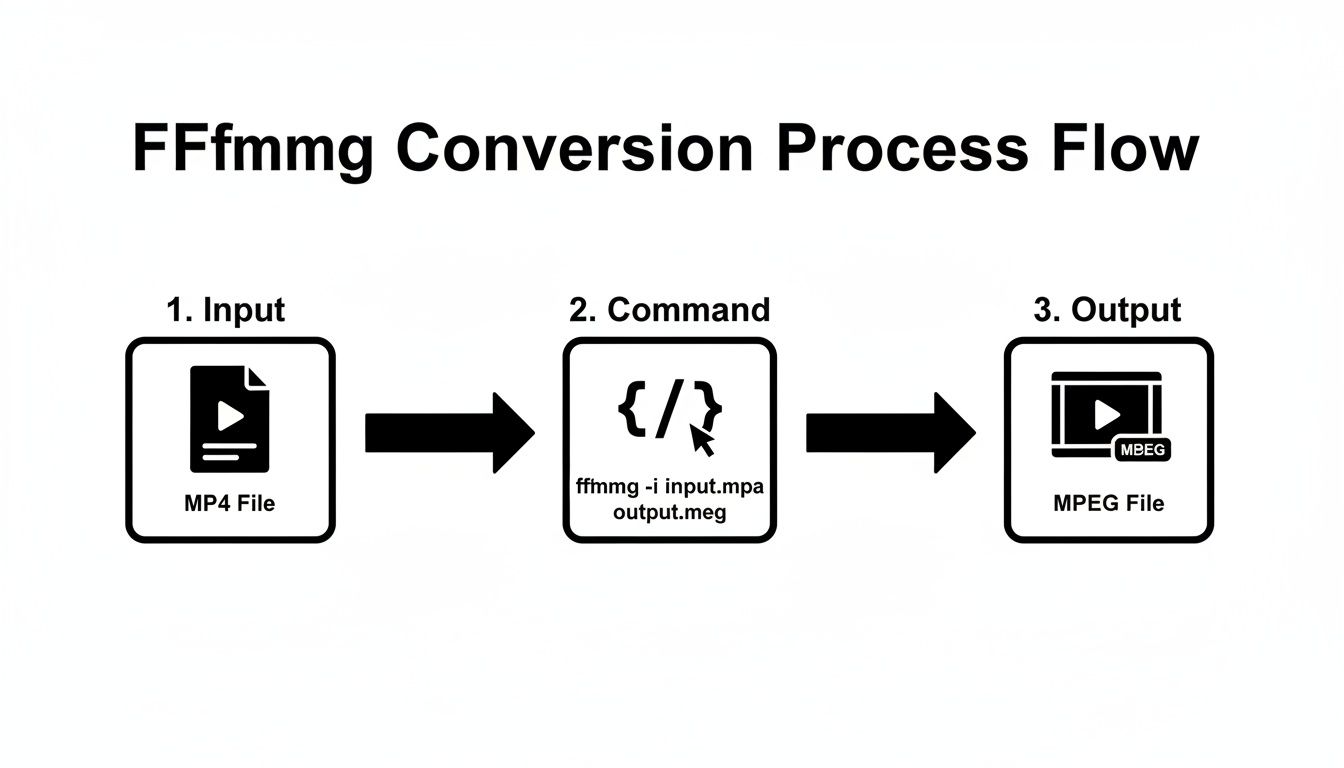
This cycle is the heart of the operation: an input file gets processed by your command to create the output format you need. Lather, rinse, repeat.
Advanced Automation with Dedicated Software
While FFmpeg gets the job done, not everyone wants to spend their day in the Terminal. This is where modern converter apps shine, offering user-friendly ways to do the same thing, often with more intuitive features like "Watched Folders" or "Drop Zones."
- Watched Folders: You tell the app to monitor a specific folder. Any MP4 file you add to that folder is automatically picked up and converted to MPEG based on your preset settings. It’s a genuine "set it and forget it" solution.
- Drop Zones: Some tools give you a small, persistent window or an icon in your menu bar. You can just drag a bunch of files onto it to start the conversion immediately, without even needing to open the main application.
This type of workflow automation is non-negotiable for professional production teams where speed and consistency are everything. Setting up a watched folder ensures every team member exports files to the exact same specs without having to memorize complex settings.
These advanced tools are completely changing the game. For instance, some video converters can hit speeds up to 30X faster on MP4 to MPEG batch jobs by tapping into GPU acceleration. In a world where 70% of TikTok's 500 million daily uploads are MP4, that kind of speed is a massive advantage. In North America's $250 billion video production industry, editors often convert up to 25% of their assets for different platforms. Batch processing can easily save them hours every single week. You can discover more about how high-speed converters impact professional workflows and check out the data for yourself.
Mastering Codecs and Quality Settings
Picking the right format is only half the battle. The real magic in converting MP4 to MPEG happens when you get the codecs and quality settings just right—this is how you ensure your final video looks sharp without ending up with a gigantic file.
Think of an MP4 file as just a container. Inside, it's usually holding a super-efficient video stream encoded with a modern codec like H.264 (AVC) or even H.265 (HEVC). When you convert it to an MPEG format, you’re essentially re-encoding that video into an older, less efficient, but often more compatible codec, like MPEG-1 or MPEG-2.
Choosing Between MPEG-1 and MPEG-2
Your choice here really boils down to where the video is going to be played. Each of these formats was built for a different era of technology, and their strengths reflect that.
- MPEG-1 is the old-timer of the group, originally designed for Video CDs (VCDs). The quality is pretty similar to old VHS tapes, so it’s not a great pick for most modern projects unless you’re dealing with seriously ancient hardware that needs maximum compatibility.
- MPEG-2 is the workhorse that powered DVDs and standard-definition digital TV. It looks worlds better than MPEG-1 and is the go-to standard if you're doing anything related to DVD authoring or need to meet specs for older broadcast systems.
The codec inside a modern MP4, like H.264, is actually part of the MPEG-4 standard. It’s a game-changer. MPEG-4 offers up to 50% better compression than MPEG-2, a leap forward that completely reshaped broadcasting. This is precisely why a 1080p MP4 file can be so much smaller than a 720p MPEG-2 file and still look way better.
Choosing the Right MPEG Format for Your Needs
Use this table to decide whether MPEG-1, MPEG-2, or MPEG-4 (in an MP4 container) is the best choice for your project.
| Format | Best For | Key Strengths | Common Drawbacks |
|---|---|---|---|
| MPEG-1 | Ancient hardware, VCDs | Maximum compatibility | Very low resolution, poor quality |
| MPEG-2 | DVD authoring, older broadcast systems | Good quality for standard definition | Large file sizes, inefficient compression |
| MPEG-4 | Web streaming, modern devices, general use | Excellent quality, high efficiency | May not be compatible with legacy systems |
Ultimately, sticking with MPEG-4 in an MP4 container is almost always the best option unless a specific legacy device forces you to use an older format.
Balancing Bitrate and File Size
Once you’ve picked your format, the next big decision is the bitrate. This setting controls how much data is used for each second of video, and it's the single biggest factor influencing both quality and file size. For a full rundown of how this all works, check out our detailed guide on what video encoding is.
You’ll usually run into two main ways to handle bitrate:
- Constant Bitrate (CBR): This method applies the same amount of data to every single second of video, regardless of what's happening on screen. It’s predictable and highly compatible but pretty inefficient—you end up wasting data on simple scenes.
- Variable Bitrate (VBR): This is the smarter way to do it. VBR is clever enough to allocate more data to complex, fast-moving scenes and less to simple, static shots. The result is much better overall quality for a similar file size when compared to CBR.
For almost any conversion task you'll face, VBR is the way to go. It strikes the best balance between quality and file size, preventing ugly pixelation during action scenes without bloating the file.
Let's say you need to prep a 1080p marketing video for a tradeshow display, but the display only accepts MPEG-2 files. In this real-world scenario, you’d select the MPEG-2 codec and use a VBR setting—maybe aiming for an average bitrate around 8,000 kbps—to keep the video looking crisp on the big screen while making sure the file is still a manageable size.
Common Questions About Converting MP4 to MPEG
Even with the best tools, converting MP4 to MPEG can sometimes throw a curveball. A few common issues tend to pop up, but thankfully, the solutions are usually straightforward.
Getting to the bottom of these problems will help you refine your workflow and ensure you get a perfect output every time.
Why Is My Audio Out of Sync?
One of the most frequent headaches is audio synchronization. You convert a file, and suddenly the audio is a few seconds ahead of or behind the video. This almost always happens because the source MP4 has a variable frame rate (VFR), which is super common in screen recordings or videos from smartphones.
Older formats like MPEG-2, on the other hand, expect a constant frame rate (CFR). When your conversion tool doesn't properly handle this VFR-to-CFR switch, the audio and video timelines can drift apart. Using a more robust tool like FFmpeg or HandBrake usually solves this, as they are built to correctly interpret and re-time the frames during the encoding process.
Why Is My Converted MPEG File So Big?
It can be jarring when your nice, compact MP4 file balloons in size after converting it to MPEG. A 50MB MP4 might easily become a 200MB MPEG-2 file, and it's not an error—it’s a direct result of how the underlying codecs work.
The H.264 codec used in most MP4s is just way more advanced and efficient than the older MPEG-2 codec. It achieves high quality at much lower bitrates. To maintain similar visual quality, MPEG-2 simply requires more data, which leads to a much larger file.
Key Takeaway: Don't judge the conversion by file size alone. A larger MPEG file is often a necessary trade-off for ensuring compatibility with legacy hardware like DVD players, which can't handle modern, highly-compressed video formats.
Do I Use MPG or MPEG as the File Extension?
You’ll see both .mpg and .mpeg out in the wild, and the good news is they are functionally identical. There's zero technical difference between them.
The three-letter .mpg extension is just a holdover from ancient file systems like MS-DOS that had a strict three-character limit for extensions. Modern systems handle the longer .mpeg extension just fine, but both point to the exact same kind of file. For maximum compatibility with the oldest systems imaginable, .mpg is a slightly safer bet, but in 99% of cases today, it truly doesn't matter which one you choose.
Can I Convert Back from MPEG to MP4?
Absolutely. You can convert an MPEG file back to an MP4, and it's a pretty common task. Maybe you’ve archived old DVDs and now want to modernize the files for playback on phones, tablets, or for web streaming.
The process is the same, just in reverse. Your MPEG file becomes the input, and you select MP4 (with a modern codec like H.264) as the output.
Just keep in mind that video conversion is a "lossy" process. Every time you re-encode a video, you lose a little bit of quality. While converting an old MPEG to a high-bitrate MP4 can look great, you won't magically regain any detail that was lost in the original MPEG compression.
For a seamless, powerful, and user-friendly way to handle all your batch conversions and compressions on macOS, look no further than Compresto. It's designed to automate your workflow with features like Watched Folders and a simple drag-and-drop interface, making complex jobs effortless. Learn more and get started at https://compresto.app.