Compress Video Files Mac: Easy Ways to Reduce Size Quickly
So, you’ve got a massive video file sitting on your Mac, eating up storage and taking forever to upload. We’ve all been there. Learning to compress video files on a Mac isn’t just some technical chore—it’s a practical skill that makes life so much easier for creators, marketers, and anyone who just wants to share a family video without the headache.
Think of it as a superpower for your workflow. It turns clunky, frustrating tasks into a few simple clicks.

Streamlining Your Digital Life
At its heart, video compression is about making huge files manageable without wrecking the quality. It’s digital decluttering. A single hour of 4K footage can easily top 100GB, which is a serious chunk of anyone’s hard drive.
For anyone who works with video, this isn't a surprise; it's a daily reality. This is where knowing how to shrink a video file becomes a lifesaver.
To get a better sense of how compression helps in the real world, here’s a quick rundown of common situations where it makes a huge difference.
Common Scenarios for Compressing Mac Videos
| Scenario | Problem Without Compression | Benefit of Compression |
|---|---|---|
| Sending a Client a Draft | Your 50GB file fails to send via email and takes all night to upload to a transfer service. | The file shrinks to a manageable 5GB, sending in minutes and letting you get feedback faster. |
| Uploading to YouTube | A 20-minute 4K video takes hours to upload, and then even longer to process. | The upload is finished in a fraction of the time, and your video is live for your audience sooner. |
| Archiving Old Projects | Your external hard drive is full after just a few projects, forcing you to buy more storage. | You can fit 5-10 times more projects on the same drive, saving money and keeping things organized. |
| Sharing a Family Video | Your iCloud storage is maxed out, and relatives can't download the massive file you sent. | The video is small enough to send through iMessage or WhatsApp, and everyone can watch it instantly. |
| Website Performance | A large hero video on your homepage makes the site slow to load, causing visitors to leave. | The optimized video loads instantly, keeping visitors engaged and improving your site's performance. |
These everyday examples show that compression isn't just about saving space—it's about making your entire digital life run more smoothly.
The Practical Benefits of Smaller Files
Beyond freeing up your hard drive, properly compressed videos unlock some serious perks. It’s not just about storage; it’s about speed and efficiency.
For starters, smaller files mean lightning-fast uploads to platforms like YouTube and Vimeo. In a world where timing is everything, getting your content published quickly is a huge advantage. This is especially true for anyone following video marketing best practices, where speed and engagement are key.
Compressed files are also way easier to archive. Long-term storage becomes more affordable and organized, saving you from a sea of expensive hard drives.
Ultimately, mastering video compression on your Mac lets you work smarter, not harder. You’ll spend less time waiting and more time creating.
Using Your Mac's Built-in Tools for Fast Results
You don't always need to download new software to get a video file compressed on your Mac. Believe it or not, your machine already has a couple of surprisingly good tools baked right in, perfect for those quick, no-fuss jobs. These are my go-to options when I just need a smaller file and don't want to get bogged down in technical settings.
Let's start with the one everyone knows: QuickTime Player. It’s way more than just a video player; its export function is a simple, effective compressor.
Quick Compression with QuickTime Player
Imagine you just wrapped up a screen recording for a quick tutorial. The raw file is a massive 4K video, way too big to email. With QuickTime, you can shrink it down in just a few clicks.
All you have to do is open your video in QuickTime Player, then head up to File > Export As. You'll get a few straightforward options like 1080p, 720p, and 480p. The trick is simply to choose a lower resolution than your original. Exporting that 4K video as 1080p, for instance, will slash the file size while keeping the quality perfectly fine for most screens.
Pro Tip: When you export, QuickTime also offers a choice between "Greater Compatibility (H.264)" and "Smaller File Size (HEVC)." For maximum shareability, I'd stick with H.264. But if your only goal is the smallest possible file and you know the recipient's device can handle it, HEVC is the more modern, efficient codec.
The Finder's Hidden Encoding Feature
Looking for an even faster method that can handle multiple files at once? The Finder has a hidden gem that I use all the time when prepping a folder of clips for a client preview. You don't even need to open an app.
Just select one or more video files right in a Finder window, right-click (or Control-click), and hover over Services. From there, choose Encode Selected Video Files. A small dialog box pops up with simple presets where you can pick a resolution and decide whether to prioritize quality or compatibility. It’s incredibly efficient.
The infographic below shows this in action, illustrating how a 1GB 4K file gets trimmed down using both QuickTime and the Finder's encoder.
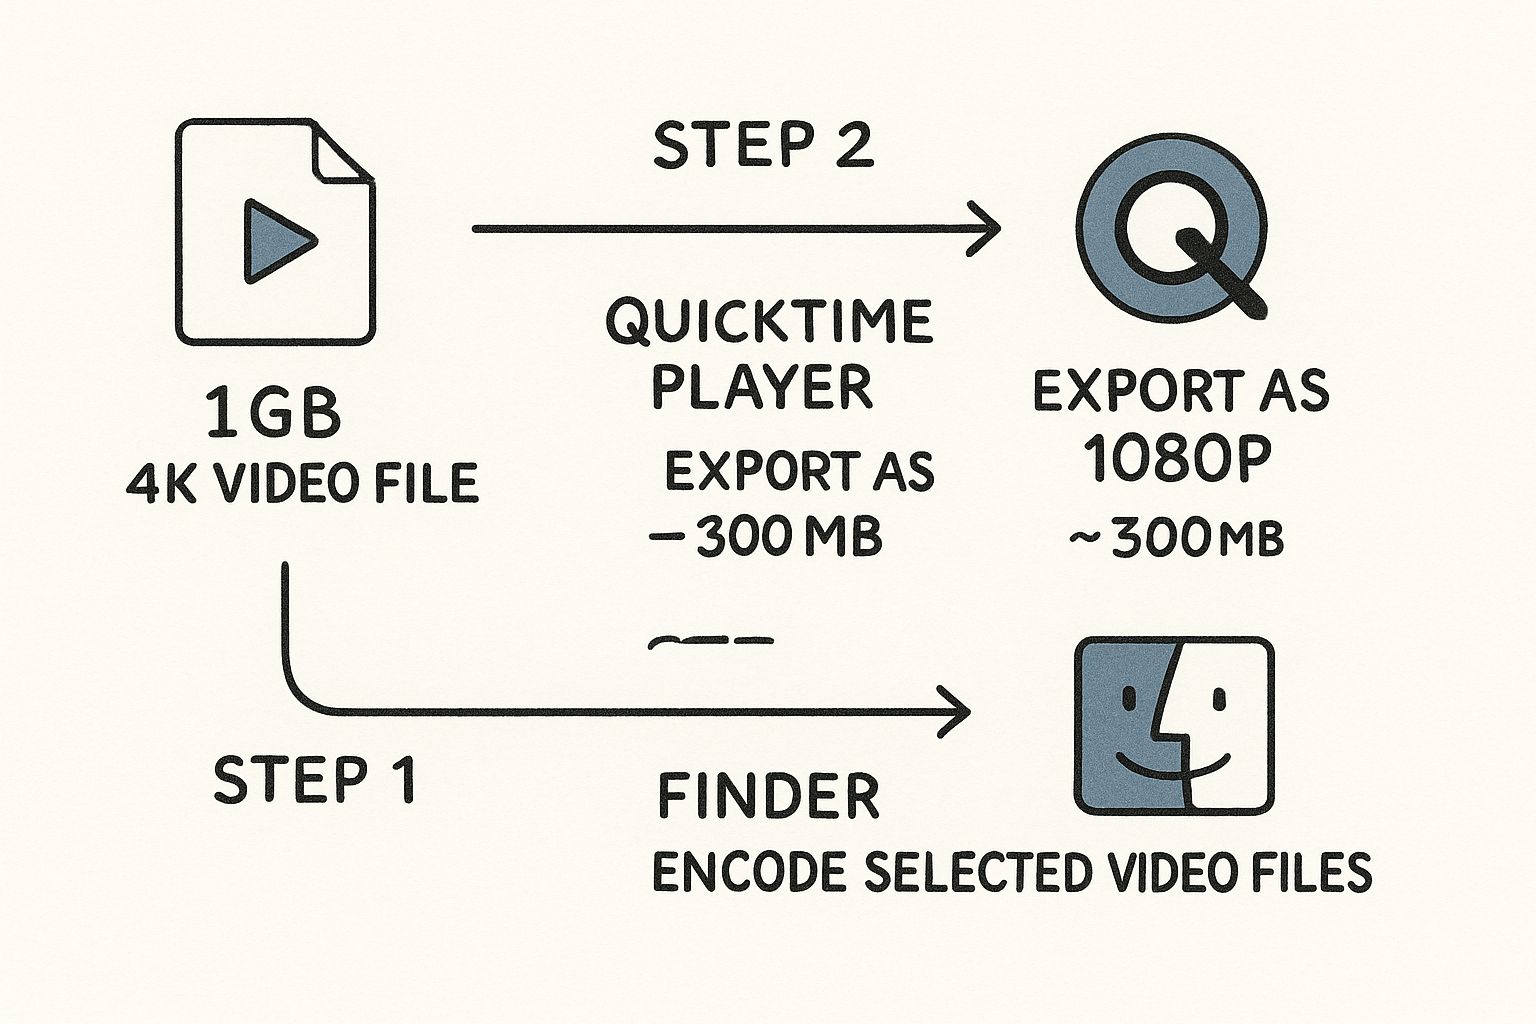
As you can see, both of these built-in methods deliver a serious reduction in file size—often over 65%—with almost no effort. They are perfect for getting things done quickly.
Real-World Results and Modern Codecs
These tools work so well largely because of huge leaps in video codec technology. With codecs like HEVC becoming standard, it's now routine to compress a massive 4K video into something practical for cloud storage or sharing. It’s not unusual to see a 1GB 4K video shrink down to 500MB or less—that’s a 50% reduction that has become the new normal for Mac users.
While these built-in tools are fantastic for speed and convenience, they do have their limits. You don't get much control. For those times when you need more granular adjustments, our comprehensive guide on how to compress files on Mac dives into more advanced techniques and software. When you absolutely have to hit a specific file size or tweak the audio settings, it's time to move on to a dedicated app.
Gaining Full Control with Third-Party Software
When your Mac's built-in tools just don't give you the precision you need, it's time to call in a specialist. This is where third-party software really shines, offering granular control over every last detail of the compression process. For many folks, the go-to app is HandBrake, a seriously powerful (and free) open-source tool that lets you fine-tune everything from bitrate to codecs.
Its interface can look a bit intimidating at first, I'll admit. But once you get the hang of it, you unlock a new level of efficiency. Instead of settling for a generic preset, you can dial in the exact settings your project needs, whether it's for a YouTube upload, a quick email attachment, or a social media post.
A Practical Example: Compressing for Instagram Reels
Let's walk through a super common scenario: you’ve got a beautiful 4K video, but you need to compress it for an Instagram Reel. Instagram is picky about its video specs, and getting them wrong leads to ugly compression artifacts or, worse, a file that's too big to even upload. The goal is to create something that's small, sharp, and perfectly formatted.
Here’s the main HandBrake interface, where all the magic happens.
Don't get overwhelmed. For this task, we're just going to focus on the "Summary," "Dimensions," and "Video" tabs to get the job done right.
To start, you’ll want to tweak these core settings for the best results on social media:
- Format: Stick with MP4. It’s the universal standard and guarantees your video will play on pretty much any device.
- Video Codec: I recommend choosing H.264 (x264). While its cousin HEVC (H.265) can create smaller files, H.264 has much better compatibility with social platforms like Instagram.
- Frame Rate (FPS): Set this to 30 and, importantly, select "Constant Framerate." Instagram prefers this, and it helps prevent any weird audio sync issues down the line.
Diving Deeper into Quality Settings
Now for the most important part—the delicate dance between quality and file size. Under the "Video" tab, you'll find the Constant Quality slider, often labeled RF (Rate Factor). For H.264, a value between RF 20-23 is a fantastic starting point for high-quality web video.
Here’s the trick: a lower RF number means higher quality and a larger file, while a higher number squeezes the file down more at the cost of some detail.
You can also control the bitrate, which is just the amount of data used to encode one second of video. While Constant Quality is usually the way to go, you can switch to "Average Bitrate" if you absolutely need to hit a specific file size—like keeping a one-minute clip under 100MB.
By mastering these settings, you transition from simply making files smaller to intelligently engineering them for a specific purpose. This control is what separates a quick-and-dirty compression from a professional, polished final product.
The demand for this level of control is why the global video compression software market keeps growing. In a telling move, Apple acquired WaveOne in March 2023, a company that was all about AI-powered video compression. This signals a big push toward smarter compression, where codecs like HEVC can slash file sizes by up to 50% compared to older standards without a noticeable drop in quality.
For a complete walkthrough of all the settings, check out our in-depth guide on how to use HandBrake.
Create Presets and Batch Process for Insane Efficiency
The real power of an application like HandBrake comes from building a repeatable workflow. Once you've nailed your settings for Instagram Reels, you can save them as a custom preset. The next time you have a video for Insta, you can apply your preset with a single click. Boom.
It gets even better. You can use the Queue feature for batch processing. Say you have ten videos to prep. Just add them all to the queue, apply your custom preset to each one, and let HandBrake do all the work in one go. This kind of workflow can save you hours of mind-numbing, repetitive work, freeing you up to focus on creating content instead of fighting with file formats.
Understanding Compression Settings to Balance Quality and Size
To truly master how you compress video files on a Mac, you have to look under the hood. The settings you choose are the dials and levers that let you find that perfect sweet spot between a tiny file and a beautiful, crisp image. This isn't about just picking a preset; it’s about making informed choices that fit your specific needs.
Each setting controls a different piece of the final video, and getting a handle on them turns compression from simple guesswork into a precise craft. Let's break down the four most important ones you'll run into.
Codec: The Language of Your Video
A codec (which is just short for coder-decoder) is the algorithm that does the heavy lifting of shrinking your video data. The two you’ll see most often are H.264 (AVC) and HEVC (H.265). Think of them as the engines of compression.
H.264 is the old reliable. It’s been the standard for years and is compatible with virtually every device and platform on the planet. If you need your video to play absolutely everywhere without a hitch, H.264 is your safest bet.
HEVC (H.265) is the newer, much more efficient model. It can deliver the same visual quality as H.264 but at a significantly smaller file size—often cutting it down by a whopping 25-50%. The main trade-off is compatibility; some older devices might struggle to play it back smoothly.
My Personal Rule of Thumb: Use HEVC for archiving or when you control the playback environment (like sending a file to another modern Mac). Stick with H.264 for maximum shareability on social media or with clients who might be using older tech.
To help you decide, here’s a quick breakdown of how these two codecs stack up. We're comparing the essentials: file size, visual quality, and how well they play on different devices.
Codec Comparison H.264 vs HEVC (H.265)
| Feature | H.264 (AVC) | HEVC (H.265) |
|---|---|---|
| Compression Efficiency | Good | Excellent (up to 50% smaller files) |
| Video Quality | Very Good | Excellent (better at the same bitrate) |
| Compatibility | Universal (works almost everywhere) | Modern (supported by new devices) |
| Best For | Social media, web video, general use | 4K video, archiving, storage savings |
Ultimately, your choice depends on who's watching and where. If you're interested in a deeper technical dive, you can learn more about the differences in our detailed comparison of H.264 vs H.265.
Bitrate: Data Per Second
Think of bitrate as the data allowance for each second of your video. It's measured in megabits per second (Mbps), and it’s pretty straightforward: a higher bitrate means more data, which translates to better quality and a larger file. A lower bitrate means less data, a smaller file, and potentially a drop in quality.
Most software will give you two options:
- Constant Bitrate (CBR): This assigns the exact same amount of data to every single second of the video, whether it's a static shot of a wall or a fast-paced action scene. It's predictable but really inefficient.
- Variable Bitrate (VBR): This is almost always the smarter choice. VBR allocates more data to complex, fast-moving scenes and less to the simple, static ones. This optimizes for quality while doing a much better job of keeping the overall file size down. If you see a VBR option, use it.
Resolution: The Pixel Dimensions
Resolution refers to the number of pixels that make up the image, like 1920x1080 (1080p) or 3840x2160 (4K). This is one of the most direct ways to slash your file size.
Let’s be honest—there's rarely a need to keep a video in glorious 4K if its final destination is a tiny phone screen or an email attachment. Downscaling from 4K to 1080p can shrink the file size by up to 75% with very little noticeable quality loss on smaller displays.
Frame Rate: Smoothness of Motion
Frame rate, measured in frames per second (fps), determines how smooth the motion in your video looks. The higher the frame rate, the smoother the motion—but also the bigger the file.
Here's what you'll typically see:
- 24fps: The standard for that "cinematic" look. It’s perfect for narrative content or anything you want to feel like a movie.
- 30fps: This is the workhorse of online video and broadcast TV. It looks clean, standard, and familiar to most viewers.
- 60fps: Ideal for capturing fast-action content like sports, video games, or anything that needs ultra-smooth motion to look good.
For most projects, sticking to 24fps or 30fps is perfectly fine and helps keep file sizes manageable. Only jump up to 60fps if the content genuinely demands that level of buttery smoothness.
Common Compression Mistakes and How to Avoid Them
Even with the best tools, it’s easy to make a few wrong turns when you first start to compress video files on a Mac. I've seen it happen plenty of times. Learning from these common mistakes upfront will save you from frustrating re-exports and help you produce professional-quality results from day one.

Let's break down the most frequent pitfalls and, more importantly, how to sidestep them.
Over-Compressing into a Pixelated Mess
This is the big one. You were aiming for the smallest file possible, but now your video is a blurry, blocky disaster. The details are gone, and any fast-moving scenes look like abstract art.
It happens when you push the bitrate or quality settings too far. By starving the video of data, the codec has to throw away too much visual information, leading to those tell-tale compression artifacts.
The fix? Start with a more conservative setting. In a program like HandBrake, an RF value of 22 for H.264 is a fantastic baseline. If the file is still too big, lower the quality in small steps—don’t just crank the slider all the way to the "smallest file" setting and hope for the best.
A good rule of thumb is to compress a short, 10-second clip of your video first. This quick test lets you check the quality before committing to a full, time-consuming export of the entire file.
Choosing the Wrong Codec for the Job
So, you compressed your video using the ultra-efficient HEVC codec to save a ton of space. Now, your client can't play the file, or it stutters badly on their older computer. Sound familiar?
While HEVC (H.265) offers superior compression, H.264 (AVC) has far greater compatibility. Many devices and platforms, especially older ones, just don't have the hardware support to decode HEVC smoothly.
The solution is to know your audience and where the video will end up. For maximum shareability—like emailing a client, posting to social media, or embedding on a website—stick with the universally accepted H.264. Save HEVC for when you're archiving files for yourself or you know for a fact that the recipient has modern hardware.
Forgetting About the Audio
It's easy to get laser-focused on the visuals and forget what's happening with the sound. The video looks great, but the audio sounds tinny and distorted, or worse, it's completely out of sync with the picture.
This often happens because compression software defaults to heavily compressing the audio to shave off a few extra kilobytes. The out-of-sync issue can also pop up if you use a variable frame rate setting, which some editing platforms and players really struggle with.
Always pay attention to the audio tab in your compression software. Here’s what to look for:
- Audio Bitrate: Don't go below 128 kbps for stereo audio. I'd even argue that 160 kbps is a safer bet for decent quality.
- Frame Rate: Always select a "Constant Framerate" instead of a variable one. This is a simple click that prevents a world of sync headaches down the road.
By sidestepping these common errors, you'll ensure your final output is not just small, but also clean, compatible, and professional.
Your Top Questions About Mac Video Compression, Answered
Even with the best tools, a few questions always come up once you start compressing videos on a Mac. Let's walk through the most common ones I hear—the practical stuff that comes to mind when you're actually doing the work. This should clear up any lingering doubts and get you compressing with total confidence.
Will Compressing a Video on My Mac Reduce Its Quality?
Technically, yes. Standard (or "lossy") compression works by strategically removing some data from the file. But here's the thing: the entire goal is to do this so cleverly that the quality loss is completely invisible to the human eye.
It's a trade-off. By using a modern codec like HEVC and dialing in the right bitrate, you can slash the file size dramatically without seeing any difference in how sharp or clear the video looks. You're just getting rid of the data you don't need, making the file manageable without hurting the viewing experience.
What Is the Best Format for Sharing a Compressed Video Online?
If you want a format that works absolutely everywhere—websites, social media, you name it—the MP4 container with an H.264 video codec and AAC audio is the undisputed champion. It’s the closest thing we have to a universal video language.
While HEVC (H.265) is more efficient and gives you smaller files at the same quality, H.264 is still the safest bet for maximum compatibility. Using it ensures that pretty much anyone can play your video without needing special software or running into playback issues.
Can I Compress Multiple Videos at Once on My Mac?
You sure can. For a quick and dirty batch job, you can actually do this right from the Finder. Just select a group of video files, right-click, and choose 'Encode Selected Video Files.' This applies one of Apple's basic presets to all of them at once, no app required.
For anything more serious where you need control over the settings, a dedicated app is the way to go. Tools like HandBrake are built for this. You can drag in an entire folder of videos, set up your custom compression settings once, and let it run through the whole batch automatically. It’s a massive time-saver.
Ready to reclaim storage space and speed up your workflow with a tool built for Mac users? Compresto offers powerful, drag-and-drop compression for videos, images, and more, all handled locally on your device for complete privacy. Try it today and see the difference. Learn more at https://compresto.app.