Master Zip Files on Mac A Practical Guide
If you've ever needed to zip a few files together on your Mac, you probably already know the drill: select your files or folder, right-click, and choose "Compress." Just like that, macOS creates a new .zip archive right where you are, ready to send off or tuck away for later.
Your Quick Guide to Zipping Files on Mac
Creating zip files on a Mac is one of those fundamental skills that comes in handy all the time. It's not just about shrinking file sizes—it’s about keeping things tidy. Bundling a bunch of project assets, photos, or documents into a single, manageable package makes them much easier to share and organize. The built-in tools in macOS are designed to be fast and dead simple, so you can get it done without needing to hunt down extra software.
The ZIP format has been a core part of macOS for years, baked right into the Finder. The right-click-to-compress method has been the standard for over a decade, and it’s beautifully efficient. It just works.
Deciding on Your Compression Tool
While using the Finder is perfect for most day-to-day zipping, you might wonder how it stacks up against more specialized apps. The decision really boils down to a classic trade-off: simplicity versus control.
For a quick visual, this infographic compares the built-in Archive Utility with what you'd typically get from a third-party app, looking at things like compression results, speed, and how many steps it takes.
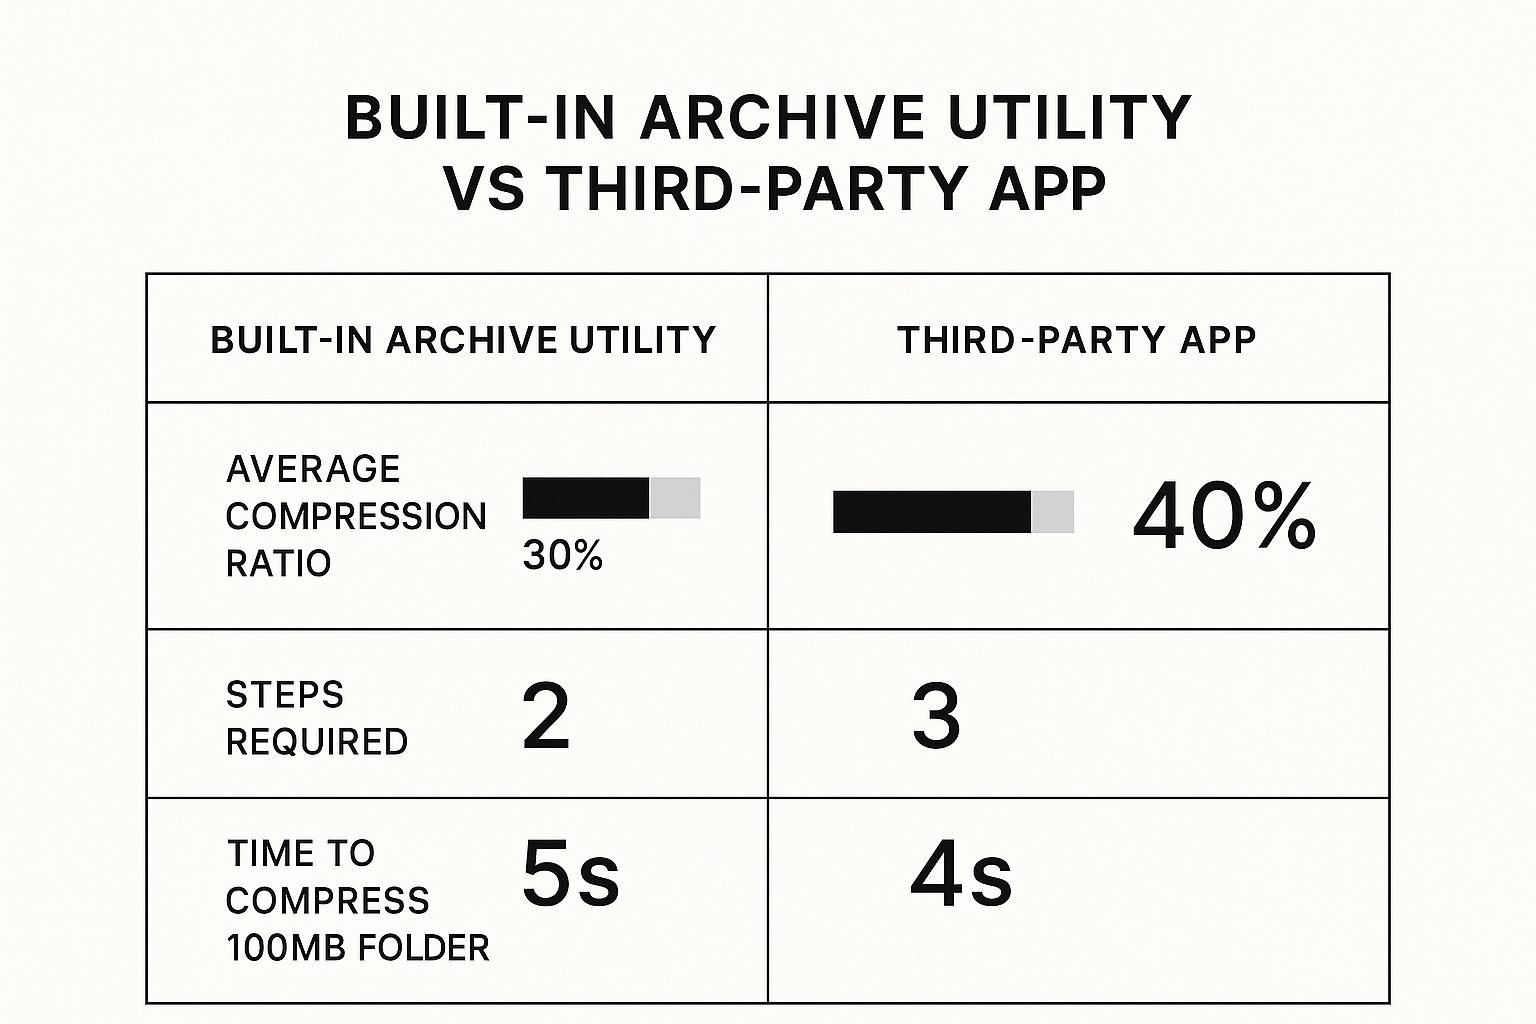
As you can see, dedicated apps can sometimes squeeze files a bit smaller, but the built-in tool is often faster and gets the job done with fewer clicks. For most people, the sheer convenience of the Finder's "Compress" option is all you'll ever need.
To help you choose the right tool for the job, here’s a quick breakdown of the main methods available on your Mac.
Mac Compression Methods at a Glance
This table gives you a snapshot of the two primary built-in methods for creating zip files on macOS and where each one really shines.
| Method | Best For | Ease of Use | Customization |
|---|---|---|---|
| Finder | Quick, simple archiving of files and folders | Excellent | None |
| Terminal | Password protection and advanced options | Requires commands | High |
For straightforward tasks, the Finder is your best friend. But if you need to do something more complex, like adding a password, it's good to know the Terminal is there to give you that extra bit of power.
Everyday Zipping and Unzipping with Finder
For most of your day-to-day work, you don’t need special software to create or open zip files on your Mac. The best tool for the job is already running: the Finder. It's built right into macOS and handles basic compression and decompression without any fuss.
Let's say you've just wrapped up a client project. You've got a folder filled with final documents, some PNG mockups, and a small presentation. Instead of cluttering an email with a dozen attachments, you can package them all into a single, clean file. Just select the project folder, right-click (or Control-click), and choose Compress "[Folder Name]". In a few seconds, a tidy .zip archive appears, ready to drag into your email.
The same idea works when you need to group files from different locations. Here's a trick I use all the time: create a new, empty folder first. Then, copy everything you need—like vacation photos from your Pictures folder and receipts from Downloads—into that new folder. Once everything is in one place, just compress the entire folder with a single click.
Unzipping Is Even Easier
So, what happens when you receive a zip file? Opening it is as straightforward as it gets. Just double-click the .zip file. macOS's built-in Archive Utility works instantly in the background, unpacking the contents into a new folder right where the original zip file is. The whole process is so seamless it feels like a natural part of the operating system—because it is.
Pro Tip: Before you hit send, take a second to rename your compressed file. By default, macOS names the archive after the original item or just calls it "Archive.zip" for multiple files. A clear name like "Project-Alpha-Final-Deliverables.zip" looks way more professional and tells the recipient exactly what they're getting.
Handling Single vs. Multiple Files
It's worth noting a small difference in how Finder handles compressing one item versus several.
- A Single Item: Compressing one file or folder (like
MyDocument.pages) creates a zip archive with the same name (MyDocument.pages.zip). - Multiple Items: If you select a handful of files at once and compress them, macOS makes a generic file named
Archive.zip.
This is exactly why creating that temporary container folder is often the best move when bundling multiple files. It keeps your original file structure intact and lets you give the resulting zip files on Mac a meaningful name right from the start.
How Compression Really Works on a Mac
Ever zipped up a folder of documents and watched the file size plummet, only to try the same thing with your photo library and barely see a change? It’s a common experience, and the reason isn’t magic—it’s all about redundancy.
Compression algorithms are designed to find and eliminate repetitive data. Think about a simple text file where the word "the" appears hundreds of times. Instead of storing that same three-letter word over and over, a compression tool creates a tiny shortcut for it, which dramatically shrinks the file size.
This simple concept is why some files are perfect candidates for zipping, while others just won't shrink.
Why Some Files Compress Better Than Others
The real secret lies in whether a file is already compressed. It turns out that many of the file types we work with every day—especially media files—have sophisticated compression built right into their DNA.
- Excellent for Zipping: Raw text files (.txt), documents (.pages, .docx), spreadsheets (.numbers, .xlsx), and uncompressed image formats like .bmp or .tiff. These files are full of raw, repetitive data that a zip algorithm can easily condense.
- Poor for Zipping: JPEGs, PNGs, MP3s, and MP4s. These formats are already heavily compressed. Trying to zip them is like trying to vacuum-pack a rock; there’s just no more air to suck out. You might shave off a tiny bit, but it’s rarely worth the effort.
For example, zipping a 100 MB folder of Word documents could easily result in a file that’s only 30 MB. But zipping a 100 MB video file? You might be lucky to save a megabyte or two. The built-in zip files on Mac thrive on raw, unoptimized data.
I've seen text-heavy folders shrink by 20% to 80% using Mac's built-in tool. But for already-compressed media like JPEGs or videos, the reduction is almost always less than 5%. You can find countless users sharing similar experiences on Apple's discussion forums.
Understanding this helps you set realistic expectations for when zipping is actually useful. The built-in macOS tools are fantastic for quick, simple tasks, but they offer zero control over how the compression happens. If you need to maximize every bit of space, you'll find that Compresto often outperforms other compression tools because it gives you smarter, more advanced options tailored for different kinds of files.
Unlocking Advanced Control with Terminal
While Finder’s "Compress" option is perfect for quick, everyday tasks, it’s really just a one-trick pony. For those moments when you need more granular control over your zip files on Mac, it’s time to get comfortable with the Terminal. The command line might look a little intimidating at first, but it opens up a world of powerful features that the standard graphical interface just doesn't offer.
With a single command, zip, you can start tailoring your archives to your exact needs. This is especially critical when security is a top priority. Instead of just sending off sensitive documents in an unprotected file, you can create a password-protected archive right from the command line, making sure only the right person can open it.
On top of that, the Terminal gives you precise control over exactly what goes into your archive. You can cherry-pick which files to leave out, a feature that’s incredibly useful for creating clean, professional archives without the junk.
Creating a Password-Protected Zip File
When you're dealing with sensitive information, protecting your data is non-negotiable. The Terminal makes this surprisingly straightforward. Let's say you have a folder named Client-Financials that’s full of private documents you need to send.
To lock it down, you'll first navigate to its parent directory in the Terminal. Then, you'll run a command like this:
zip -e -r Protected-Financials.zip Client-Financials
Let's quickly break that command down:
zip: This is the core command that kicks everything off.-e: This flag stands for "encrypt." It’s the magic ingredient that tells your Mac to prompt you for a password.-r: This means "recursive," which is just a fancy way of saying it will include all the files and folders inside theClient-Financialsfolder.Protected-Financials.zip: This is the name you're giving to your new, secure archive.Client-Financials: And this is the original folder you want to compress and protect.
Once you hit Enter, Terminal will ask you to type and then verify a password. The .zip file it creates will be securely encrypted. Simple as that.
Excluding Unwanted Files from Your Archive
Another huge win for using the Terminal is the ability to exclude all the clutter. If you've ever shared files with a Windows user, you know that macOS loves to litter folders with hidden .DS_Store files. They're useless to anyone not on a Mac and just make your archive look messy.
To create a clean archive of a folder—let's call it Project-Assets—without these pesky files, you can use the -x flag.
zip -r Clean-Assets.zip Project-Assets -x "*.DS_Store"
Here, the
-x "*.DS_Store"part is what does the trick. It tells thezipcommand to completely ignore any file matching that pattern. This single command ensures your final archive is pristine, containing only the files you actually intend to share. It's a small step that makes a surprisingly big professional difference.
How to Troubleshoot Common Zip File Issues
Even the simplest tools can hit a snag now and then. When you're zipping and unzipping files on your Mac, you might occasionally run into a frustrating error that blocks you from getting to your archived content. More often than not, these problems come from a file getting corrupted during a download or from compatibility mismatches between different systems.
One of the most common—and confusing—issues pops up with large zip files, especially those over 4GB created by third-party cloud services. A particularly stubborn challenge has emerged with archives from platforms like Microsoft OneDrive, which can sometimes refuse to open on macOS. This issue, which started getting more attention around 2020, seems to happen because of subtle differences in how the ZIP format is handled, making the file appear corrupt to your Mac. You can find more user reports and technical discussions about this OneDrive and macOS compatibility issue online.
What to Do When a Zip File Won’t Open
If you double-click a zip file and get nothing but silence, or you see an error like "Unable to expand" or "corrupt archive," don't panic. Before you give up, here are a few practical things you can try to get things working.
- Re-download the File: The simplest fix is often the best one. Your file might have been partially corrupted during the download. Before you try anything more complicated, just download it again.
- Check File Permissions: Every once in a while, macOS permission settings can stop the Archive Utility from creating a new folder. Right-click the zip file, select "Get Info," and look under the "Sharing & Permissions" section. Make sure your user has "Read & Write" access.
- Use a Different Unarchiver: While the built-in Archive Utility is handy, it can be a bit sensitive. A more robust third-party tool like The Unarchiver can often open archives that the default macOS tool struggles with.
Sometimes the problem isn't file corruption, but just the massive size of the original files. If you’re the one creating the archive, it helps to implement some basic file size reduction tips before zipping. Optimizing images and documents first can result in a much smaller and more stable archive.
Got Questions About Zipping on Mac?
Even when you've got the basics down, a few tricky questions always seem to pop up when you're working with zip files on a Mac. Let's walk through some of the most common ones to clear up any confusion.
A question I hear all the time is whether you can password-protect a zip file without firing up the Terminal. Unfortunately, the simple "Compress" option you see in Finder (which uses the built-in Archive Utility) doesn't give you a direct way to add a password. To do that, you'll either need to get comfortable with that Terminal command we covered earlier or grab a third-party app.
Handling Multiple Archives and Naming
What about zipping several items into their own separate archives all at once? The standard "Compress" command is designed to bundle everything you select into one single Archive.zip. If your goal is to create individual zip files for each item, you'll have to go through the process of selecting and compressing them one by one.
You've also probably noticed that if you compress something with the same name as an existing zip file, macOS just adds a number to it, like MyProject(2).zip. This is just the system's way of being helpful—it's preventing you from accidentally overwriting the original file.
When you're dealing with archives from an email, I always recommend dragging the attachment to your desktop or Downloads folder first. Trying to unzip it directly from your mail client can sometimes lead to weird permissions issues or save the extracted files to a temporary location that's a pain to find later.
Finally, for anyone who regularly needs to make files smaller for sharing, it pays to learn more about how to reduce file size in our professional's guide to file compression. This knowledge helps you create much more efficient zip files on Mac.
Ready to move beyond the basic zipping tools and get serious about file optimization? Compresto gives you the power to shrink images, videos, and PDFs while preserving quality, all in a beautiful and intuitive interface. Download Compresto today and see how much space you can save.