7 Ways to Reduce File Size Mac & Save Space (2025)
Unlock More Space: Your Mac's File Diet Starts Now
Is your Mac constantly warning about low disk space or feeling sluggish? Large files are often the culprit. This guide details 7 effective strategies to reduce file size Mac, helping you reclaim precious storage and boost performance in 2025. You'll learn to leverage built-in utilities, third-party compression tools, optimize images, PDFs, and videos, manage storage efficiently, and utilize cloud solutions. These methods will keep your Mac running smoothly and your files manageable.
1. Built-in File Compression with Archive Utility
One of the most straightforward and accessible methods to reduce file size mac users have at their disposal is the built-in Archive Utility. This native macOS application, seamlessly integrated into the Finder, provides a quick and efficient way to compress files and folders into ZIP archives. Developed by Apple Inc., Archive Utility is designed to be an intuitive, no-fuss solution for everyday compression needs, helping you reclaim valuable storage space and make files more manageable for sharing or long-term storage.

At its core, Archive Utility works by taking selected files or folders and packaging them into a single, smaller ZIP file. This process involves using industry-standard compression algorithms to identify and eliminate redundant data within the files. While it might not offer the highest compression ratios compared to specialized third-party software, its strength lies in its simplicity and deep integration within macOS. To reduce file size mac with Archive Utility, users don't need to download or install any additional software; it's ready to go right out of the box. The utility operates discreetly in the background when you choose to compress or decompress files, making the experience feel like a natural part of file management on your Mac.
Key Features and Benefits
Archive Utility boasts several features that make it an indispensable tool for Mac users:
- Native Finder Integration: Compressing files is as simple as a right-click (or Control-click) on any file or folder in Finder and selecting "Compress." This direct integration streamlines the workflow significantly.
- ZIP Format Compression: It primarily creates .zip files, a universally recognized and cross-platform compatible archive format. This ensures that files compressed on a Mac can be easily opened on Windows, Linux, or other operating systems.
- Batch Compression: You can select multiple files and folders simultaneously and compress them into a single ZIP archive or individual archives, depending on your settings in Archive Utility's preferences (accessible by opening Archive Utility via Spotlight).
- Automatic Decompression: Double-clicking a ZIP file (or other supported archive formats) automatically triggers Archive Utility to decompress its contents into the same folder.
- Password Protection: For sensitive information, users can add password protection to their ZIP archives, enhancing security before sharing or archiving. This feature can be configured within Archive Utility's preferences before compression.
- Maintains File Integrity: The compression process is lossless for most file types, meaning no data is lost, and the original files can be perfectly restored upon decompression. It also preserves file permissions and metadata, which is crucial for many professional workflows.
- Free and Reliable: Being a built-in macOS component, Archive Utility is completely free and maintained by Apple, ensuring reliability and compatibility with the operating system.
The primary benefit for users aiming to reduce file size mac is the immediate space saving. This is particularly useful for corporate professionals managing large documents, content creators dealing with media-rich project files, and any Mac user looking to optimize their storage.
When and Why to Use Archive Utility
Archive Utility is the go-to solution for quick, everyday compression tasks where convenience and system integration are paramount. It excels in scenarios such as:
- Emailing Files: Reducing the size of document folders, presentations, or a collection of images before attaching them to an email. This helps avoid exceeding attachment size limits and speeds up transfer times.
- Archiving Old Projects: Compressing completed project files or old documents that are no longer actively used but need to be kept for record-keeping. This helps reduce file size mac storage consumption without deleting potentially important data.
- Creating Simple Backups: Grouping and compressing important files into a single archive can be a rudimentary form of backup, making it easier to copy them to an external drive or cloud storage.
- Sharing Multiple Files: Instead of sending numerous individual files, compressing them into a single ZIP archive simplifies the sharing process for both the sender and the recipient.
It deserves its place as a primary tool because it's the most accessible way for any Mac user to start managing file sizes without any learning curve or additional cost.
Actionable Tips for Effective Compression
To get the most out of Archive Utility when you need to reduce file size mac:
- Right-Click and Go: The quickest method is to select your file(s) or folder(s) in Finder, right-click, and choose "Compress [item name]" or "Compress X items."
- Keyboard Shortcut Power: For even faster access after selecting files, use the keyboard shortcut
Command+Shift+C. (Note: This specific shortcut is not a default macOS shortcut for compression. The standard way isControl-click > Compress. Archive Utility itself can be assigned shortcuts via System Settings > Keyboard > Shortcuts, or some third-party tools might enable such a shortcut. For built-in, rely on the context menu.) To clarify, the primary method is the context menu; users should verify any specific system-wide compression shortcuts they might have configured. A more universally applicable quick action is simply selecting the items and choosing "Compress" from the File menu in Finder or the right-click context menu. - Pre-Compression Cleanup: Before compressing a folder, review its contents. Remove any unnecessary files, duplicates, or temporary files. Compressing only what's essential will yield a smaller archive and more significantly reduce file size mac storage.
- Consider Password Protection for Sensitive Data: If your archive contains confidential information, take the extra step to password-protect it. You can set Archive Utility to always ask for a password or define a default password in its preferences (Open Archive Utility > Preferences > select "Encrypt archive").
- Understand Archive Utility's Preferences: Open Archive Utility directly (via Spotlight search) to access its preferences. Here, you can define the default location for expanded files, what to do with the archive after expansion (e.g., move to trash), and the archive format (though ZIP is the primary for compression).
Pros and Cons
Pros:
- No additional software required: Built directly into macOS.
- Seamless integration: Works flawlessly within Finder.
- Free and reliable: Cost-effective and trustworthy.
- Maintains file permissions and metadata: Crucial for data integrity.
- Cross-platform compatibility: ZIP files are widely supported.
Cons:
- Limited compression format options: Primarily focuses on ZIP. It can decompress other formats like .tar, .gz, .bz2, but creation is mainly .zip or .cpgz.
- Basic compression ratios: May not achieve the same level of file size reduction as specialized tools like Keka or The Unarchiver (for more format support) when it comes to sheer compression power.
- No advanced compression settings: Lacks options for different compression levels, dictionary sizes, or encryption algorithms beyond basic password protection.
- Cannot compress system files or applications effectively: System files are often already optimized or protected, and applications are complex bundles that don't compress well with standard ZIP algorithms and may break if compressed improperly.
Despite its limitations, Archive Utility remains an essential first-line tool to reduce file size mac users should leverage. Its ease of use and native integration make it perfect for a wide range of common tasks, providing a solid foundation for file management and storage optimization on any Mac. For users needing more advanced features or higher compression ratios, exploring third-party applications would be the next step, but Archive Utility's contribution to managing file sizes efficiently cannot be understated.
2. Third-Party Compression Tools (The Unarchiver, BetterZip, Keka)
While macOS includes a built-in utility for handling ZIP files, its functionality is relatively basic. When your needs extend beyond simple zipping and unzipping, or when you're serious about wanting to reduce file size mac to its minimum, third-party compression tools step in as powerful allies. These specialized applications are designed to offer a broader range of features, support for more compression formats, superior compression ratios, and granular control over the entire archiving process. For corporate professionals managing sensitive documents, content creators sharing large project files, or any Mac user looking to optimize storage and transfer times, these tools are often indispensable.
These applications work by employing more advanced and often more potent compression algorithms than the standard Deflate algorithm used in most ZIP files. Formats like 7Z, for instance, utilize algorithms such as LZMA2, which can achieve significantly higher compression ratios, especially for certain types of files. This means you can reduce file size mac more effectively, saving valuable disk space and making uploads or email attachments faster and more manageable.
Why Third-Party Tools Deserve Their Place
The native Archive Utility on macOS is convenient for quick ZIP tasks, but it lacks the versatility and power many users require. Third-party tools fill this gap by providing:
- Superior Compression Ratios: By supporting advanced formats like 7Z and offering customizable compression settings (e.g., dictionary size, solid archiving), these tools can often shrink files much smaller than the built-in utility.
- Wide Format Compatibility: Beyond ZIP, they can handle a vast array of archive formats, including RAR, 7Z, TAR, GZIP, BZIP2, and many others. This is crucial if you frequently exchange files with users on other platforms or encounter less common archive types. The Unarchiver, for example, is renowned for its ability to open almost anything.
- Advanced Features: This is where these tools truly shine. Features like strong AES-256 bit encryption for password-protecting sensitive archives (a staple in BetterZip), the ability to split large archives into smaller, more manageable parts, batch processing for compressing multiple items simultaneously, and options to preview files within an archive before extraction significantly enhance workflow efficiency.
Key Players in Mac Compression
Several excellent third-party compression tools are available for Mac users:
- The Unarchiver (https://theunarchiver.com/): Primarily a decompression tool, The Unarchiver is celebrated for its simplicity and its unparalleled ability to open a vast range of archive formats, including older or obscure ones. It's free and an essential utility for ensuring you can open any compressed file you receive. (Popularized by: Circlecount)
- BetterZip (https://macitbetter.com/): A comprehensive, premium archive manager, BetterZip offers robust features for both creating and managing archives. It excels in encryption, archive modification (add/delete files without full recompression), preset configurations, and integration with macOS services like Finder and Automator. It’s an excellent choice for users who need fine-grained control and robust security to reduce file size mac. (Popularized by: Aone Software)
- Keka (https://www.keka.io/): Keka strikes a great balance between ease of use and powerful compression, particularly with its strong support for the 7Z format, known for high compression ratios. It also supports a wide range of other formats for both compression and extraction, offers encryption, and allows for splitting archives. (Popularized by: aONe)
Pros:
- Significantly better compression ratios compared to built-in macOS tools, leading to smaller file sizes.
- Extensive compatibility with a wide array of archive formats (7Z, RAR, TAR, etc.).
- Advanced functionalities such as strong encryption, archive splitting, and batch operations.
- Customizable compression levels to balance file size reduction against processing time.
- More robust and efficient handling of very large files and archives.
Cons:
- Premium tools like BetterZip involve an additional software cost, though Keka offers a direct free download alongside its App Store version.
- The array of advanced features can present a slight learning curve for new users.
- While rare, there's a potential for compatibility hiccups with major macOS updates, though developers are usually quick to adapt.
- The applications themselves will occupy some storage space, albeit typically minimal.
To assist you in selecting the most suitable third-party compression tool for your Mac from these powerful options, the infographic below presents a decision tree. It guides you through a few key questions to help you reduce file size mac effectively by choosing the right application.
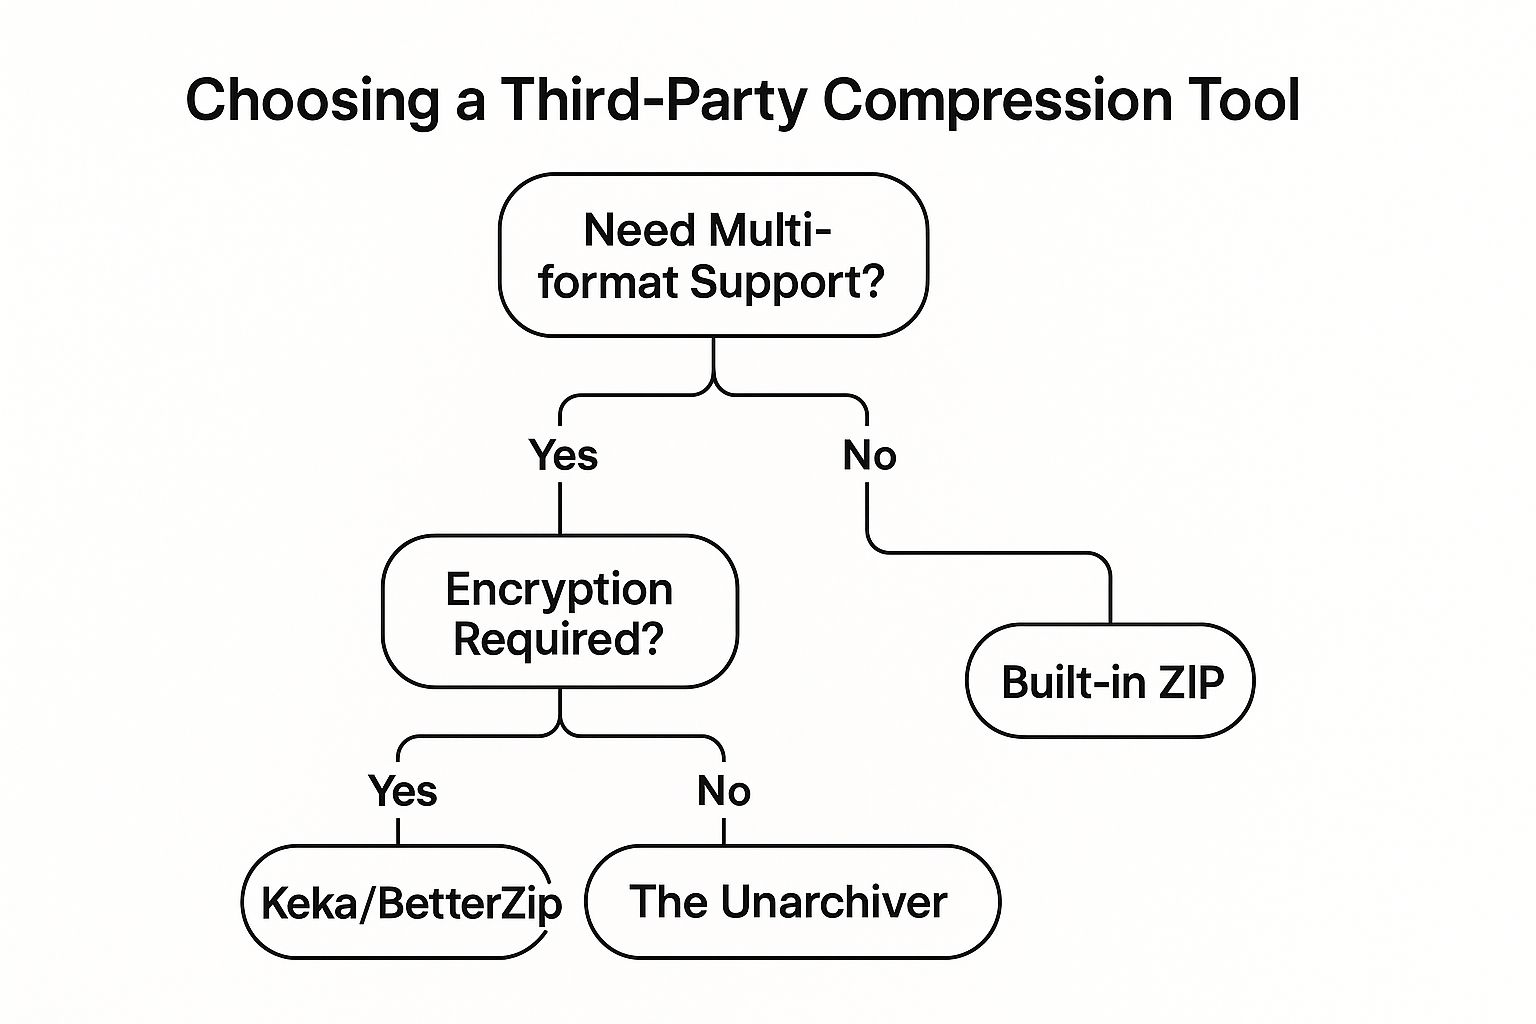
This decision tree illustrates that if your primary goal is to reduce file size mac using various archive formats beyond ZIP, Keka or BetterZip are initial considerations. If robust encryption is also a necessity for these multi-format archives, BetterZip stands out as the recommended choice. Conversely, if multi-format support is needed without a strong emphasis on creating encrypted archives yourself (or if your main need is decompressing various formats), The Unarchiver is suggested as a capable tool, particularly for handling a wide array of existing compressed files.
Actionable Tips for Using Third-Party Compression Tools:
- Experiment with Compression Levels: Most tools offer different compression levels (e.g., fastest, normal, ultra). Test these to find the optimal balance between the degree you reduce file size mac and the time it takes to compress, especially for large files.
- Choose 7Z for Maximum Compression (Usually): For most non-media files (documents, source code, data), the 7Z format, accessible via tools like Keka and BetterZip, generally provides the highest compression ratio.
- Utilize Encryption for Sensitive Data: When sharing confidential information, always use the encryption features (e.g., AES-256) offered by tools like BetterZip or Keka to password-protect your archives.
- Leverage Batch Processing: If you regularly need to compress multiple files or folders, use the batch processing capabilities to save significant time and effort.
- Split Large Archives: For emailing large files or uploading to services with size restrictions, use the archive splitting feature to break them into smaller, more manageable chunks.
- Keep Your Tools Updated: Ensure your compression software is up-to-date to benefit from the latest features, bug fixes, and compatibility with the newest macOS versions.
Examples of Successful Implementation:
- A marketing agency uses Keka to compress large folders of design assets (PSD, AI, image libraries) into 7Z archives before sending them to freelance designers, significantly reducing upload/download times.
- A legal firm relies on BetterZip to create AES-256 encrypted, password-protected archives of case files for secure digital storage and transfer, ensuring client confidentiality.
- A university student downloads various research papers and datasets archived in RAR and TAR.GZ formats and uses The Unarchiver to quickly and easily extract them all without issue.
In conclusion, while macOS provides basic ZIP functionality, third-party compression tools like The Unarchiver, BetterZip, and Keka offer a substantial upgrade in power, versatility, and efficiency. For anyone serious about their digital workflow and needing to effectively reduce file size mac, manage diverse archive formats, or secure their data, investing time (and potentially a modest sum) in one of these tools is a wise decision. They empower corporate professionals, content creators, and everyday Mac users to handle compressed files with greater control and achieve superior results.
3. Image Optimization and Compression
In our visually-centric digital landscape, images are fundamental. However, their often substantial file sizes pose challenges for storage and performance. This is where image optimization and compression become vital, especially for Mac users aiming to efficiently reduce file size mac demands and enhance system responsiveness. This method encompasses specialized techniques to significantly decrease image file dimensions while meticulously maintaining acceptable visual quality, an essential skill for managing digital assets on macOS.

Image optimization fundamentally works by intelligently removing redundant data or less perceptible visual information from an image file. This can be achieved through various approaches, primarily lossy and lossless compression, alongside converting images to more efficient formats and adjusting their resolution. For Mac users, from corporate professionals handling extensive marketing collateral to content creators managing vast high-resolution image libraries, mastering these techniques is key to improving workflow efficiency and effectively managing digital resources.
Understanding the Core Techniques
To effectively reduce file size mac for images, it's important to understand the main approaches:
-
Lossless Compression: This method shrinks file sizes without discarding any image data by eliminating statistical redundancy. The original image can be perfectly reconstructed. Formats like PNG (Portable Network Graphics) and GIF (Graphics Interchange Format) predominantly use lossless compression, making it ideal for graphics, logos, and images with sharp text where detail preservation is critical. Apple's HEIF (High Efficiency Image File Format) format also supports lossless options.
-
Lossy Compression: Achieving more significant file size reductions, lossy compression selectively discards some image data deemed less noticeable to the human eye. This process is irreversible. JPEG (Joint Photographic Experts Group) is the most common lossy format for photographs. Google's WebP and Apple's HEIF also offer highly efficient lossy compression. The art lies in balancing aggressive compression to reduce file size mac benefits against potential visual artifacts.
Beyond these compression types, other crucial optimization tactics include:
- Format Conversion: Selecting an optimal file format is paramount. For example, converting a large PNG screenshot of a photograph to JPEG or WebP can drastically save space. Similarly, migrating from older, less efficient formats like BMP or TIFF to modern ones is beneficial.
- Resolution Adjustment (Resizing): Images are often captured at far higher resolutions than needed for their final use. Resizing a large photo to fit the precise dimensions of a website container or email body before compression can massively cut down its size. Mac's Preview app or dedicated tools can handle this.
- Metadata Removal: Image files frequently contain EXIF data (camera settings, GPS) and other metadata. While sometimes useful, removing this non-essential information can trim kilobytes, especially beneficial for web-bound images.
Why Image Optimization is a Must for Mac Users
Adopting image optimization strategies provides substantial benefits when looking to reduce file size mac:
- Significant File Size Reductions: Reductions of 50-90% or more are common, freeing up considerable space. This directly addresses the need to reduce file size mac storage consumption.
- Maximized Storage Efficiency: Less disk space consumed on your Mac, external drives, and cloud services like iCloud.
- Faster Website Performance: Optimized images are vital for SEO and user experience, leading to quicker load times and better engagement. This is a key benefit for content creators using Macs.
- Efficient File Sharing: Smaller images upload, download, and attach to emails much faster, a practical advantage for corporate professionals.
- Batch Processing Power: Tools like ImageOptim (a favorite among Mac users) or Adobe Creative Suite can automate the optimization of numerous images, saving hours on large projects. This efficiency is crucial for anyone needing to reduce file size mac for many images at once.
Acknowledging the Trade-offs
While highly effective, image optimization has a few considerations:
- Potential Quality Loss (Lossy): Aggressive lossy compression can introduce visual artifacts. It's a balance between file size and fidelity.
- Irreversibility (Lossy): Discarded data cannot be recovered, so always work on copies if preserving the utmost original quality is essential.
- Learning Curve: Finding the optimal settings for different image types (e.g., JPEG vs. PNG vs. WebP) and use-cases may require some experimentation to achieve the best results when trying to reduce file size mac.
- Processing Time: Optimizing large batches of high-resolution images can be resource-intensive, even with powerful Mac hardware.
Actionable Tips for Effective Image Optimization on Your Mac
- Leverage the Right Tools: Mac users have excellent options. ImageOptim (free and highly effective) is a popular choice. Adobe Photoshop and Lightroom offer professional-grade features. Even macOS's built-in Preview app provides basic export controls for format conversion and quality adjustments.
- Choose Formats Wisely:
- JPEG: Best for photographs and complex gradients. Experiment with quality settings (e.g., a 60-80% quality level is often a good starting point).
- PNG: Ideal for graphics, logos, and images requiring transparency or sharp lines, where lossless quality is preferred.
- WebP: Excellent for web use, offering superior compression developed by Google for various image types, supporting both lossy and lossless.
- HEIF/HEIC: Ideal for photos within the Apple ecosystem, offering great compression for images taken on iPhones and managed on Macs.
- Resize First: Scale images to their final display dimensions before applying compression. This step alone can substantially reduce file size mac storage requirements, as unnecessary pixel data is removed.
- Strip Unnecessary Metadata: Use tools that allow metadata removal (like EXIF data) unless it's specifically needed for your workflow.
- Experiment with Quality Settings: For lossy formats, visually compare outputs at different compression levels to find the best balance between size reduction and acceptable visual quality for your specific needs.
- Embrace Batch Processing: For multiple files, this feature in tools like ImageOptim or Adobe Bridge is a significant time-saver when you need to reduce file size mac for an entire collection of images.
- Preserve Originals: Always apply lossy compression to copies of your images, keeping your original high-quality files intact in case you need to re-export or use them for other purposes later.
By diligently applying these image optimization and compression strategies, Mac users can significantly reduce file size mac impact, reclaim valuable storage space, and enhance overall digital efficiency. This careful management of image assets ensures they are lean and performant without undue compromise on visual fidelity. For those eager to explore further techniques in this area, you can Learn more about Image Optimization and Compression and discover additional ways to manage your files effectively.
4. PDF Compression and Optimization
When you're aiming to reduce file size Mac users often grapple with unwieldy PDF documents. PDF Compression and Optimization encompasses specialized techniques to shrink these files, vital for efficient storage and sharing. This process intelligently targets images, fonts, and other elements within PDFs, applying methods to compact them while striving to maintain document integrity and usability. It’s a critical skill for anyone dealing with digital documents, from corporate professionals managing reports to content creators distributing portfolios.
How PDF Compression and Optimization Works
Understanding the mechanics behind PDF compression can empower you to make better choices when you need to reduce file size Mac based. The reduction is typically achieved through several key methods working in concert:
- Image Re-compression and Downsampling: Images are often the biggest culprits in large PDF files. Optimization tools can re-compress these images using algorithms like JPEG (which is lossy and good for photographs) or JBIG2 (often used for bi-tonal images like scanned text, can be lossless or lossy). Furthermore, images can be downsampled, meaning their resolution is reduced (e.g., from a print-quality 300 DPI to a screen-friendly 150 DPI or 72 DPI), which significantly cuts down on size, especially for documents intended for on-screen viewing.
- Font Optimization and Subset Embedding: When PDFs use specific fonts not universally available on all systems, those fonts must be embedded to ensure the document displays correctly. Embedding an entire font character set can add considerable bulk. "Font subsetting" is a much more efficient technique where only the characters actually used within that particular document are embedded. This drastically reduces the data associated with fonts.
- Removal of Unnecessary Data and Objects: PDFs can accumulate a surprising amount of hidden or non-essential data. This includes extensive metadata (author details, keywords, creation software information), annotations and comments that are no longer needed, interactive form fields, hidden layers, or even entire embedded files (attachments). Optimization tools can intelligently identify and strip away this superfluous information, leading to a cleaner and smaller PDF.
- Page Content Stream Optimization: More advanced PDF optimization techniques involve analyzing and restructuring the PDF's internal code—the "content stream" that describes how pages are drawn. This can involve removing redundant or overlapping objects, flattening complex transparency effects (which can be data-intensive), and generally making the instructions for rendering the page more efficient.
Why and When to Use PDF Compression on Your Mac
Knowing when to employ PDF compression can significantly streamline your digital workflows, particularly when you want to reduce file size Mac systems are managing. This approach is particularly beneficial in several scenarios:
- Effortless Document Sharing: Large PDFs are notorious for exceeding email attachment limits or leading to frustratingly slow uploads to cloud services, intranets, or web portals. Compressing them makes sharing quicker, more reliable, and less taxing on bandwidth.
- Efficient Storage Solutions: Whether you are archiving important documents for the long term or simply trying to free up precious space on your Mac's internal SSD, external drives, or paid cloud storage, optimized PDFs consume considerably less room.
- Faster Loading and Improved Accessibility: Smaller PDF files load faster in PDF viewers and web browsers. This provides a significantly better user experience, especially for individuals with slower internet connections or those accessing documents on less powerful mobile devices.
- Managing Image-Heavy Documents: This method is almost indispensable for PDFs that are packed with images. Common examples include scanned documents, graphic-rich marketing materials or presentations, detailed architectural plans, product catalogs, or technical manuals filled with diagrams. The size reduction achieved in these cases can be dramatic.
Examples of Successful Implementation
The practical impact of PDF compression is often substantial and immediately noticeable:
- Compressing Scanned Documents: A common workplace task involves scanning multi-page contracts or research papers, which can easily result in a PDF of 50MB or more. Using a tool like Apple's built-in Preview, Mac users can often reduce file size Mac sees this shrink down to a more manageable 5MB or even less, without losing critical legibility for archival or sharing purposes.
- Optimizing Presentation PDFs for Email: When you save a Keynote or PowerPoint presentation as a PDF for wider distribution, it can still be quite large due to high-resolution images and embedded graphics. Optimizing these presentation PDFs makes them suitable for email, ensuring recipients can download and open them quickly without clogging their inboxes.
- Reducing File Sizes of Technical Manuals: Technical manuals, often laden with intricate diagrams, schematics, and product images, can become unwieldy. PDF optimization ensures these vital resources are accessible and distributable without consuming excessive bandwidth or storage, making them easier for field technicians or customers to use.
Actionable Tips for Mac Users to Reduce PDF File Sizes
To effectively reduce file size Mac users have several excellent options and strategies for PDF compression:
-
Utilize Apple Preview's Built-in "Reduce File Size" Filter: macOS comes with Preview, a surprisingly capable tool for quick PDF adjustments.
- Open your PDF document in Preview.
- Navigate to
File > Export...(in some older versions, it might beFile > Export as PDF...). - In the export dialog box that appears, ensure
PDFis selected as the format. - Click on the
Quartz Filterdropdown menu and select theReduce File Sizeoption. - Choose a new name or location if desired, and click
Save. - Important Note: While this method is very simple and often effective for a quick reduction, Preview's "Reduce File Size" filter can sometimes be quite aggressive. This may result in over-compression of images or a noticeable decrease in text clarity. Always open and check the output file to ensure the quality is still acceptable for your needs.
-
Leverage Adobe Acrobat Pro for Granular Control (If Available): If you have access to Adobe Acrobat Pro, it offers far more sophisticated and precise PDF optimization capabilities.
- Open your PDF in Acrobat Pro.
- Go to
File > Save As Other > Optimized PDF.... (Alternatively,File > Reduce File Size...offers a simpler, more automated interface but with fewer options). - The "PDF Optimizer" dialog box provides extensive settings. You can individually control image compression (choosing algorithms like JPEG or JBIG2, setting quality levels, downsampling resolutions), font handling (subsetting, unembedding specific fonts), transparency flattening, discarding objects (like form fields, comments, JavaScript), and various cleanup options. This allows for a highly tailored approach to maximize size reduction while preserving the necessary quality and functionality.
-
Optimize Images Before Inserting Them into PDFs: A proactive approach is often best. If you are creating a PDF from scratch (e.g., in applications like Microsoft Word, Apple Pages, or Adobe InDesign), take the time to optimize your images (resize them to the dimensions they'll actually appear, compress them appropriately) before you add them to your source document. This ensures they are already reasonably sized when the PDF is generated, leading to a smaller initial PDF.
-
Consider Splitting Extremely Large PDFs: For exceptionally lengthy documents, such as e-books, extensive research compilations, or comprehensive annual reports, consider breaking them into smaller, logical sections or chapters. This makes each individual PDF file more manageable for both storage and distribution.
-
Perform Manual Cleanup Before Compression: Before running any automated compression tool, take a moment to manually review your PDF. Delete any unnecessary pages, remove large hidden attachments, or clear out extensive annotations or markups that are no longer required. Every little bit helps.
-
Test Output Quality and Explore Dedicated Tools: After compressing a PDF, always open and thoroughly review it. Check image clarity, ensure text is easily legible, and verify that any essential interactive elements are still functional. If the quality has degraded too much, you may need to use less aggressive compression settings or try a different tool or method. For users seeking more advanced options and streamlined workflows beyond the standard Mac offerings, exploring specialized third-party compression applications can be very beneficial. Learn more about PDF Compression and Optimization to discover how dedicated software can offer enhanced control and features tailored to your specific PDF compression needs.
Pros and Cons of PDF Compression
While highly beneficial, it's important to be aware of the potential trade-offs:
-
Pros:
- Significant Size Reduction: This is the primary benefit, especially noticeable with image-heavy PDFs, where file sizes can often be shrunk by 50-90% or even more.
- Maintains Document Formatting and Layout: In most cases, the overall visual structure, fonts, and layout of the document remain intact, preserving its professional appearance and readability.
- Improves Email Attachment Compatibility: Smaller files easily fit within common email attachment size limits, ensuring smoother communication.
- Faster Document Loading and Sharing: Reduced file sizes mean quicker uploads to servers, faster downloads for recipients, and speedier opening times in PDF viewing applications.
-
Cons:
- Potential Reduction in Text Clarity: In documents that are very heavily compressed, or those containing small or intricate fonts that were originally part of an image (e.g., poorly scanned text), text legibility might suffer.
- Loss of Some Formatting or Interactive Elements: Aggressive optimization settings might strip out certain interactive elements (like complex form fields, JavaScript actions, or multimedia content) or flatten layers, which could be undesirable for specific use cases.
- Limited Effectiveness on Text-Only Documents: PDFs that are primarily composed of actual text (not images of text) are already quite efficient in size. Compression will yield minimal benefits for these types of documents.
- Quality Degradation of Embedded Images: This is the most common trade-off. While often perfectly acceptable for on-screen viewing or internal drafts, significant image compression can lead to visibly pixelated, blurry, or artifacted images, which may not be suitable for high-quality print or professional presentations.
Popularized By:
The ability for Mac users to easily manage and reduce file size Mac systems handle for PDF documents has been largely popularized and made accessible by two key software applications:
- Apple Preview: Included with every macOS, Preview provides an accessible, out-of-the-box solution for basic PDF viewing, editing, and compression needs, making it a go-to for many casual users.
- Adobe Acrobat (Pro): For corporate professionals, graphic designers, and users requiring more advanced features and finer control over every aspect of the optimization process, Adobe Acrobat (particularly the Pro version) has long been the industry-standard tool, offering a comprehensive suite for PDF manipulation and size reduction.
Why This Method Deserves Its Place in the List
PDF compression and optimization is not just a useful trick; it's a cornerstone technique for anyone looking to effectively reduce file size Mac systems handle in their daily digital lives. For corporate professionals managing client-facing documents, content creators distributing digital portfolios, or even students submitting assignments, the ability to shrink PDF files without losing essential information or critical usability is invaluable. In an age where seamless document sharing, efficient cloud storage, and rapid digital workflows are paramount, mastering PDF optimization directly addresses the common pain points of large file encumbrance. It makes digital document management significantly more efficient, cost-effective, and user-friendly, solidifying its place as an essential skill.
5. Video Compression and Format Conversion
Video files, especially high-resolution 4K or 8K recordings from modern cameras and iPhones, are notorious for their enormous sizes. If you're frequently grappling with your Mac's storage limits due to these large files, understanding advanced video compression and format conversion is not just helpful—it's essential. This method offers sophisticated techniques to significantly reduce file size mac users encounter, going far beyond simple trimming by delving into codec optimization, resolution adjustment, bitrate control, and changing video formats. For content creators, corporate professionals managing media assets, or anyone with a growing video library, mastering these techniques is a cornerstone for efficient file management.
At its core, video compression works by intelligently removing redundant data within video frames (intra-frame compression) and between consecutive frames (inter-frame compression). This is achieved through complex algorithms called codecs (coder-decoders). Key aspects you can control include:
- Codec Optimization: The choice of codec is paramount. While H.264 (AVC) is widely compatible, newer codecs like H.265 (HEVC) offer roughly double the compression efficiency, meaning similar visual quality at about half the file size. VP9 is another efficient codec, often used for web streaming. Selecting a more advanced codec is a primary way to achieve substantial size reductions.
- Resolution Adjustment: Resolution refers to the number of pixels in each frame (e.g., 3840x2160 for 4K, 1920x1080 for Full HD). Downscaling—for instance, converting a 4K video to 1080p—drastically reduces the amount of data per frame, leading to a much smaller file. This is particularly useful if the video's final viewing destination doesn't require ultra-high resolution (e.g., mobile devices, small web embeds).
- Bitrate Control: Bitrate is the amount of data allocated per second of video (measured in Mbps or kbps). Lowering the bitrate directly reduces file size, but too low a bitrate can introduce visual artifacts. Variable Bitrate (VBR), especially two-pass VBR, is often preferred as it allocates more bits to complex scenes and fewer to simpler ones, optimizing quality for a given file size.
- Frame Rate Adjustment: Frame rate (FPS) affects motion smoothness. While reducing FPS (e.g., from 60fps to 30fps) can decrease file size, the impact is generally less significant than changes to codec, resolution, or bitrate for typical content.
- Format Conversion: While the container format (e.g., MP4, MOV, MKV) itself has minimal impact on size, conversion often accompanies re-encoding with a more efficient codec and optimized settings. MP4 is generally the most versatile and widely compatible format.
The benefits of employing dedicated video compression software on your Mac are manifold:
- Massive File Size Reductions: It's possible to shrink video files by up to 90-95% in some cases. For example, a 1GB 4K iPhone video can often be compressed to a high-quality 1080p H.265 file of around 100-150MB.
- Hardware Acceleration: Modern Macs, especially those with Apple Silicon (M1, M2, M3 series) or Intel Macs with Quick Sync Video, can utilize dedicated hardware encoders. This dramatically speeds up the otherwise time-consuming compression process.
- Multiple Output Formats & Codec Support: Tools typically support a range of codecs (H.264, H.265/HEVC, VP9, AV1) and container formats, allowing you to tailor output for specific devices, platforms, or archival needs.
- Quality Preservation: While all lossy compression involves some data loss, careful settings (e.g., using H.265, two-pass encoding, appropriate bitrates) can maintain excellent visual quality that is often indistinguishable from the original for most viewers.
- Batch Processing: Queue multiple video files and apply the same compression settings to all, saving significant manual effort.
You should consider video compression and format conversion when:
- Your Mac's storage is critically low due to large video files.
- You need to share videos via email, messaging apps, or cloud services with upload limits.
- Preparing videos for web upload is crucial; smaller files mean faster uploads and better streaming for viewers. When dealing with large video files, understanding how to properly compress and format them is crucial. For more in-depth strategies on making your videos smaller and suitable for online use, check out this guide on optimizing videos for web performance.
- Archiving video projects for long-term storage where space is a concern.
- Ensuring compatibility with specific devices or platforms that have playback restrictions.
Popular tools like the free and open-source HandBrake have long been favored by Mac users. Apple itself has popularized efficient compression by adopting HEVC (H.265) as a default for iPhone video recording and providing robust hardware encoding support (VideoToolbox). Commercial software like VideoProc Converter AI also offers powerful features with user-friendly interfaces.
Here's a visual guide to help understand the process:
Actionable Tips for Mac Users:
- Prioritize H.265/HEVC: For the best balance of quality and file size, use H.265 if your target playback devices support it.
- Adjust Resolution Wisely: Don't keep videos in 4K if they'll be viewed on 1080p screens or smaller. Downscale appropriately.
- Use Two-Pass Encoding: Though slower, it generally yields better quality at lower file sizes by analyzing the video before encoding.
- Enable Hardware Encoding: In your software's settings (e.g., "VideoToolbox" in HandBrake), enable hardware encoding if your Mac supports it for significantly faster processing.
- Test with Short Segments: Before processing a lengthy video, compress a small portion to check if the quality and file size meet your expectations.
Pros:
- Massive file size reductions (can be up to 95%).
- Hardware acceleration on modern Macs significantly speeds up processing.
- Offers multiple output formats for broad device compatibility.
- Can maintain high visual quality with appropriate settings.
Cons:
- Processing can be very time-consuming for large files, even with hardware acceleration.
- Aggressive compression will lead to noticeable quality loss.
- Requires some technical understanding of codecs, bitrates, and resolutions for optimal results.
- The process can be hardware-intensive, consuming CPU/GPU resources.
Ultimately, video compression and format conversion are powerful techniques to reduce file size mac users need in their toolkit. While there's a learning curve, the storage savings and improved manageability of your video library are well worth the effort. For those looking to delve deeper into the command-line options or explore user-friendly alternatives, you can Learn more about Video Compression and Format Conversion.
6. Storage Optimization and Cleanup
When your Mac's storage starts to feel cramped, leading to sluggish performance or "Startup Disk Full" warnings, one of the most effective strategies to reclaim space and effectively reduce file size mac on a macro level is through comprehensive storage optimization and cleanup. This approach isn't about shrinking individual files through compression; instead, it focuses on system-level techniques to identify, manage, and eliminate unnecessary data, thereby reducing the overall volume of files stored on your drive. It’s about decluttering your digital workspace by removing redundant data, old caches, forgotten downloads, and unused applications that silently consume valuable gigabytes.

The core principle behind storage optimization and cleanup is intelligent file management. Over time, your Mac accumulates a significant amount of data that is no longer needed. This includes system logs, application caches, browser history, email attachments, multiple versions of documents, and large media files that might have been duplicated. By systematically identifying and removing this digital detritus, you can free up substantial disk space, which in turn can lead to a more responsive and efficient Mac. This method directly tackles the problem of a full drive, making it a primary step for anyone looking to reduce file size mac by decreasing the sheer quantity of stored items.
Key Features and Powerful Tools for Mac Cleanup
Several features and tools, both built-in to macOS and offered by third-party developers, facilitate this cleanup process:
- Automated Duplicate File Detection and Removal: Many applications, like the popular CleanMyMac, can scan your drive for duplicate files – identical documents, photos, or media – and help you safely remove them. This alone can free up surprising amounts of space.
- Cache and Temporary File Cleanup: macOS and its applications generate cache files to speed up operations. However, these can grow excessively large. Tools can identify and clear system caches, user caches, browser caches, and application-specific temporary files without harming your system.
- Large File Identification and Management: Often, a few very large files are the main culprits behind a full disk. macOS's built-in Storage Management utility (found via About This Mac > Storage > Manage) and visual analysis tools like DaisyDisk excel at helping you quickly spot these space hogs. DaisyDisk, for instance, provides an interactive sunburst map of your storage, making it easy to drill down into folders and identify large files or folders.
- Application Cleanup and Uninstallation: Simply dragging an application to the Trash often leaves behind associated preference files, support files, and caches. Dedicated uninstallers, often part of cleanup suites, ensure that all remnants of an application are removed, which is crucial for thoroughly managing how you
reduce file size mac. - Storage Usage Analysis and Visualization: Understanding where your storage is being used is the first step. macOS offers a basic overview, while tools like DaisyDisk or the "System Junk" module in CleanMyMac provide more detailed breakdowns and visualizations, empowering you to make informed decisions.
Apple itself has popularized storage management through its macOS Storage Management recommendations, prompting users to "Store in iCloud," "Optimize Storage," "Empty Trash Automatically," and "Reduce Clutter."
Practical Examples in Action
Consider these scenarios:
- Reclaiming Gigabytes with Cache Cleaning: A content creator using video editing software might find that application caches have ballooned to 20GB or more. Using a tool like CleanMyMac to specifically target and remove these cache files can instantly free up this space without affecting project files.
- Tidying the Downloads Folder: Corporate professionals often download numerous installers, presentations, and documents. Regularly clearing the Downloads folder of old
.dmginstallation files, archived.zipfiles, and one-time-use documents can prevent it from becoming a black hole for storage. - Pruning Unused Applications: Many users install applications for a specific, short-term need and then forget about them. Removing these unused applications, along with their associated support files, not only frees up disk space but can also prevent potential conflicts or background processes from consuming resources.
Actionable Tips for Maximizing Storage Recovery
- Start with macOS Storage Management: Access this via Apple Menu > About This Mac > Storage > Manage. Explore the recommendations:
- Store in iCloud: Moves files from your Desktop and Documents folders, as well as Photos and Messages, to iCloud, keeping recent files locally.
- Optimize Storage: Automatically removes already-watched iTunes movies and TV shows, and keeps only recent email attachments on your Mac.
- Empty Trash Automatically: Deletes items from the Trash after 30 days.
- Reduce Clutter: Helps you review large files, downloads, and unsupported apps.
- Regularly Empty Your Trash and Downloads Folders: This simple habit can prevent significant buildup over time.
- Leverage Third-Party Tools: For deeper cleaning and more advanced analysis, consider tools like CleanMyMac for comprehensive cleanup modules or DaisyDisk for visual storage mapping and identification of large files. These tools often provide a more granular control to
reduce file size maceffectively.
When and Why to Use This Approach
Storage optimization and cleanup should be your first line of defense when your Mac starts to slow down, you receive low storage warnings, or before you consider purchasing external storage or a new Mac. It’s particularly beneficial for users who work with large files, such as content creators, or those who download and install many applications. By proactively managing your storage, you ensure your Mac runs smoothly and efficiently. This method directly addresses the issue of disk space without any loss of quality to your essential files, as it focuses on removal rather than compression.
Pros:
- Frees up significant storage space quickly: Can result in tens or even hundreds of gigabytes reclaimed.
- Improves overall system performance: A less cluttered drive means faster boot times, quicker application launches, and smoother operation.
- No quality loss: Files are removed, not compressed, so there's no degradation of your important data.
- Can be automated: Some tools offer scheduled cleanups for ongoing maintenance.
Cons:
- Risk of accidentally deleting important files: Caution is crucial, especially with automated tools. Always review before deleting.
- May require manual review: Identifying what's safe to delete often needs user judgment.
- Some files (like caches) may regenerate over time: Regular cleanup is necessary.
- Limited effect if all files are actually needed: If your drive is full of essential, non-redundant data, this method's impact will be smaller.
Storage optimization and cleanup deserve a prominent place in any listicle about how to reduce file size mac because it addresses the root cause of storage consumption—excess files. Before resorting to compressing every document or image, ensuring your Mac isn't burdened by gigabytes of forgotten, redundant, or unnecessary data is a fundamental step towards a healthier and more spacious digital environment. It's a proactive strategy that maintains system health and user productivity.
7. Cloud Storage Integration and File Offloading
For Mac users grappling with limited local storage, especially those with sleek but often storage-constrained MacBooks, finding effective ways to reduce file size Mac impact is crucial. Beyond compressing individual files, a more holistic and increasingly popular solution is leveraging cloud storage integration with intelligent file offloading. This approach doesn't shrink the files themselves but cleverly manages where they reside, freeing up significant space on your Mac's internal drive while ensuring your data remains accessible.
What is Cloud Storage Integration and File Offloading?
At its core, this method involves using cloud storage services (like iCloud Drive, Dropbox, Google Drive, or OneDrive) not just as a backup or syncing tool, but as an extension of your Mac's local storage. macOS and various third-party cloud service applications can intelligently identify files that you haven't accessed recently. These less frequently used files are then "offloaded" – moved from your Mac's hard drive to the cloud.
Crucially, a placeholder or a link to the file often remains on your Mac. This means you can still see the file in Finder, and it appears as if it's stored locally. When you need to access an offloaded file, your Mac automatically downloads it on demand, provided you have an internet connection. This dynamic process helps you reduce file size Mac storage burden without manually deleting files or constantly managing an external hard drive.
How Does It Work?
The magic lies in sophisticated algorithms and seamless operating system integration:
- Usage Monitoring: The system (either macOS itself for iCloud or the cloud service's desktop app) continuously monitors your file access patterns. It learns which files are part of your active workflow and which are gathering digital dust.
- Automatic Offloading: Based on predefined rules or available disk space, the system automatically moves older or less-used files to your cloud account. For example, if your Mac's storage starts getting full, features like iCloud's "Optimize Mac Storage" will proactively offload files to free up space.
- On-Demand Access: When you click on an offloaded file, it's downloaded from the cloud. While this introduces a slight delay (dependent on your internet speed and file size), it ensures you retain access to your entire file library.
- Seamless Finder Integration: Offloaded files are often visually distinguished in Finder, perhaps with a small cloud icon. Despite being in the cloud, they appear within your existing folder structure, maintaining organizational consistency.
- Intelligent Caching: To mitigate download delays for recently accessed offloaded files, many systems employ intelligent caching. Files you've recently opened might be temporarily kept on your local drive for a period, anticipating you might need them again soon.
Why This Approach Deserves a Spot: Managing Voluminous Data
This method is a game-changer, particularly for corporate professionals dealing with extensive project archives, content creators managing vast libraries of high-resolution media, or any Mac user with a large digital footprint on a Mac with limited SSD capacity. Instead of agonizing over what to delete to reduce file size Mac issues, you can keep everything accessible. It's an elegant solution when the primary goal is to free up local disk space rather than shrinking the actual byte count of individual files. It's especially pertinent for:
- Users with smaller SSDs: MacBooks, in particular, can come with limited storage. Offloading extends this capacity virtually.
- Large media libraries: Photographers, videographers, and designers can keep their entire portfolio accessible without clogging their primary drive.
- Archival purposes: Storing years of documents or old projects without them consuming precious local space.
- Multi-device access: The inherent syncing capabilities of cloud services mean these files are also available on your other devices.
Examples of Successful Implementation:
- iCloud Drive with "Optimize Mac Storage": Apple's native solution. When enabled (System Settings > Apple ID > iCloud > Optimize Mac Storage), macOS automatically stores the full contents of iCloud Drive in the cloud if space is needed, keeping only recent files and optimized photos/videos on your Mac.
- Dropbox Smart Sync: Allows users to mark files or folders as "online-only." These files appear in Finder but don't take up local disk space until opened. It's a powerful way to reduce file size Mac storage impact for Dropbox users.
- Google Drive for desktop (formerly File Stream): Designed for business and individual users, this allows access to all Google Drive files on demand, streaming them directly from the cloud without needing to download them all first.
- Microsoft OneDrive Files On-Demand: Similar to Dropbox Smart Sync, this feature for Windows and macOS lets you see your entire OneDrive but only download files as you need them.
Actionable Tips for Readers:
- Enable "Optimize Mac Storage": If you're an iCloud user, navigate to System Settings > [Your Name] > iCloud, and ensure "Optimize Mac Storage" is checked. This is a primary Mac-native tool to reduce file size Mac storage load.
- Utilize Selective Sync/Online-Only Features: For Dropbox, Google Drive, or OneDrive, explore their settings. Most offer "selective sync" (choosing which top-level folders sync locally) or "online-only" options for individual files/folders.
- Monitor Internet Usage: Offloading and on-demand downloading rely heavily on your internet connection. Be mindful if you're on a metered connection, as frequent access to large offloaded files can consume significant data.
- Pin Frequently Accessed Files: Some services allow you to "pin" or "keep offline" specific cloud-based files or folders, ensuring they remain locally stored for instant, offline access, even if optimization is generally enabled.
- Consider Your Workflow: If you frequently work offline or with very large files that require instant access (e.g., video editing directly from files), ensure those critical project files are kept locally.
Pros:
- Significantly reduces local storage usage: Directly addresses the need to free up space on your Mac.
- Maintains access to all files: You don't lose sight of your data; it's just stored elsewhere.
- Automatic and transparent operation: Once set up, it largely works in the background.
- Works with existing file organization: No need to restructure your folders.
- Provides inherent backup and sync benefits: Your files are safer in the cloud and accessible across devices.
- Scales with cloud storage: As your data grows, you can simply upgrade your cloud storage plan.
Cons:
- Requires an internet connection: Accessing offloaded files is impossible without being online.
- Ongoing subscription costs: Most cloud services offer limited free storage, requiring paid subscriptions for larger capacities.
- Initial sync can be lengthy: Uploading a large existing library to the cloud for the first time can take hours or even days.
- Potential privacy concerns: Entrusting your files to a third-party cloud provider requires trust in their security and privacy policies.
- Slight access delay: Downloading files on demand introduces a delay compared to accessing local files.
By integrating cloud storage with intelligent offloading, Mac users can effectively manage and reduce file size Mac storage constraints, maintaining a lean local drive while keeping their entire digital world within reach. For more information, visit the official websites for Apple iCloud, Dropbox, Google Drive, or Microsoft OneDrive.
7 Mac File Compression Tools Compared
| Solution | Core Features & Formats | Quality & Efficiency ★★★★☆ | Value & Price 💰 | Target Audience 👥 | Unique Selling Points & Highlights ✨ |
|---|---|---|---|---|---|
| Built-in File Compression (Archive) | ZIP format, Finder integration, batch compression | Basic compression (20-50%), reliable | 💰 Free, no extra software | macOS users needing quick ZIP | 🏆 Native, seamless, password protection on ZIP |
| Third-Party Compression Tools | Multi-format (7Z, RAR, TAR...), advanced settings | High compression (up to 80%), customizable | 💰 Free - $30 depending on tool | Power users, advanced workflows | ✨ Multi-format, encryption, archive splitting |
| Image Optimization & Compression | JPEG, PNG, WebP, batch, metadata removal | High reduction (50-90%), quality trade-offs | 💰 Mostly free or bundled tools | Photographers, web developers | 🏆 Format conversion, batch optimization, metadata removal |
| PDF Compression & Optimization | Image & font optimization, metadata removal | Moderate-high (30-80%), format preservation | 💰 Free or paid (Adobe Acrobat) | Document handlers, office users | ✨ Maintains layout, reduces heavy PDFs |
| Video Compression & Format Conversion | Codecs (H.264, H.265), hardware acceleration | Very high (70-95%), quality-size balance | 💰 Free to paid specialized tools | Video editors, content creators | 🏆 Hardware acceleration, multi-codec support |
| Storage Optimization & Cleanup | Duplicate removal, cache cleanup, storage analysis | No quality loss, frees space quickly | 💰 Free to paid apps | All macOS users, system maintainers | ✨ Automates cleanup, improves system performance |
| Cloud Storage Integration & Offloading | Auto offloading, multi-cloud, on-demand download | Reduces local by 50-90%, requires internet | 💰 Subscription cost for cloud storage | Cloud users, remote workers | 🏆 Seamless integration, file access transparency |
Streamline Your Mac: Next Steps to Smaller Files
You've now explored a comprehensive toolkit to effectively reduce file size mac, covering everything from leveraging macOS's built-in Archive Utility and powerful third-party compression apps, to specific strategies for image, PDF, and video optimization. We've also covered crucial aspects like general storage cleanup and the smart use of cloud storage to further declutter your digital workspace. Mastering these diverse approaches empowers you to reclaim valuable disk space and significantly enhance your Mac's performance. The key takeaway is clear: a proactive approach to file size management leads directly to a faster, more spacious, and efficient machine, which is invaluable for demanding tasks and seamless daily use.
As your next step, identify the types of files that consume the most space on your Mac and begin applying the relevant techniques discussed. Whether you're a corporate professional managing extensive documents, a content creator working with large media files, or simply any Mac user aiming for optimal performance, the ability to reduce file size mac efficiently is a crucial skill. Embracing these strategies will not only free up gigabytes but also streamline your workflows, facilitate quicker file sharing, and contribute to the overall health and longevity of your Mac.
Take control of your digital footprint today, and experience the tangible benefits of a leaner, more agile Mac.
For those seeking an even more powerful and streamlined solution to reduce file size mac, especially for multimedia content like videos, images, GIFs, and PDFs while preserving quality, Compresto offers a dedicated macOS tool. With features like folder monitoring and an intuitive drop zone, it’s designed to boost your productivity and save substantial storage effortlessly, trusted by over 11,000 users.