Reduce File Size Like a Pro: Smart Compression for Mac Users
Why Your Mac's Storage Drama Is About More Than Space
Here's the thing: file size isn't just about storage; it directly impacts how you work. I've seen it firsthand – creative professionals losing precious time waiting for uploads, missing deadlines because email attachments were too big, and watching their MacBooks struggle under the weight of massive files. In my experience, people who actively compress their files aren't just saving space, they're making their entire workflow significantly faster. For some extra tips, take a look at our guide on reducing file size for professionals.
The Hidden Costs of Big Files
Think about this: why does a 50MB PDF take forever to open while a 5MB version pops up instantly? Certain file types are real resource hogs, slowing down your system more than you might realize. These oversized files create hidden performance costs, leading to slow loading times and putting extra strain on your Mac. This isn't necessarily about needing a new MacBook; it's about optimizing what you already have.
Quality vs. Size: Debunking the Myth
There's a common misconception that smaller files mean lower quality. Trust me, it's just not true. Using smart compression, you can dramatically reduce file size without any noticeable quality loss. It's all about finding the balance between a manageable file size and maintaining excellent quality. Interestingly, the data compression market is growing rapidly – expected to reach $4.51 billion by 2026 from $3.01 billion in 2020, with a CAGR of 5.2%. This growth reflects how important efficient data management has become, as organizations choose to archive rather than delete data. This trend directly impacts how we manage our personal files, too. You might find our comprehensive guide to file compression useful.
Reclaiming Your Workflow Through Compression
In the end, compressing your files isn't just about freeing up hard drive space; it's about improving your entire workflow. Smaller files translate to faster uploads, smoother editing, and quicker access to your files when you need them. The next section will show you how Compresto can help you take control of your files and get your valuable time back.
Getting Compresto Dialed In for Your Workflow

Most people download Compresto and just start compressing, but honestly, there's a much better way. The real magic happens when you start customizing. I learned this the hard way – after using it for a while, I realized I was barely scratching the surface. A few tweaks later, and my compression efficiency practically doubled.
Custom Output Folders and Batch Processing
Seriously, setting up custom output folders changed everything for me. Before, my compressed files were scattered all over the place. Now, Compresto neatly organizes everything automatically. Talk about a time saver!
Batch processing is another huge plus. I can dump a ton of files into Compresto, tweak the settings once, and then walk away. It’s like having my own little compression robot.
Quality Presets and Integrations
Forget the default settings. I've created a handful of quality presets tailored to different situations. I have one for social media uploads, one for high-quality client presentations, and another for archiving older projects.
And the integrations? Pure gold. Dragging and dropping files directly from Finder into Compresto is ridiculously convenient. I even have it automated with Photos – any image I export gets compressed automatically.
Shortcuts for Speedy Compression
One last tip: custom shortcuts. I have a single keystroke set up to compress selected files using a specific preset. It seems small, but when you’re dealing with tons of files every day, those little seconds add up.
This initial setup does take a bit of time, but trust me, it's worth it. It’s the difference between casually using Compresto and making file size reduction a core part of your workflow.
Video Compression That Actually Preserves What Matters
Video files are infamous for hogging storage space. The biggest mistake I see is people obsessing over shrinking file size without considering how the video actually looks afterward. In my experience wrestling with countless videos, from quick iPhone clips to huge 4K projects, the trick is knowing which details your eyes even notice.
Bitrates and Encoding: Your Secret Weapons
Forget blindly defaulting to H.264. Sometimes, other codecs are simply a better fit. The real key is finding the sweet spot for your video's bitrate. A lower bitrate means a smaller file, sure, but push it too low and you'll get noticeable quality loss. This is where understanding variable bitrate (VBR) versus constant bitrate (CBR) encoding is so important. VBR is smart – it puts the bits where they matter most, which often gives you smaller files without sacrificing noticeable quality. I once shrunk a 2GB iPhone video down to 200MB using VBR, and honestly, the difference was invisible! I've even compressed 4K footage by 80% while keeping it broadcast-ready.
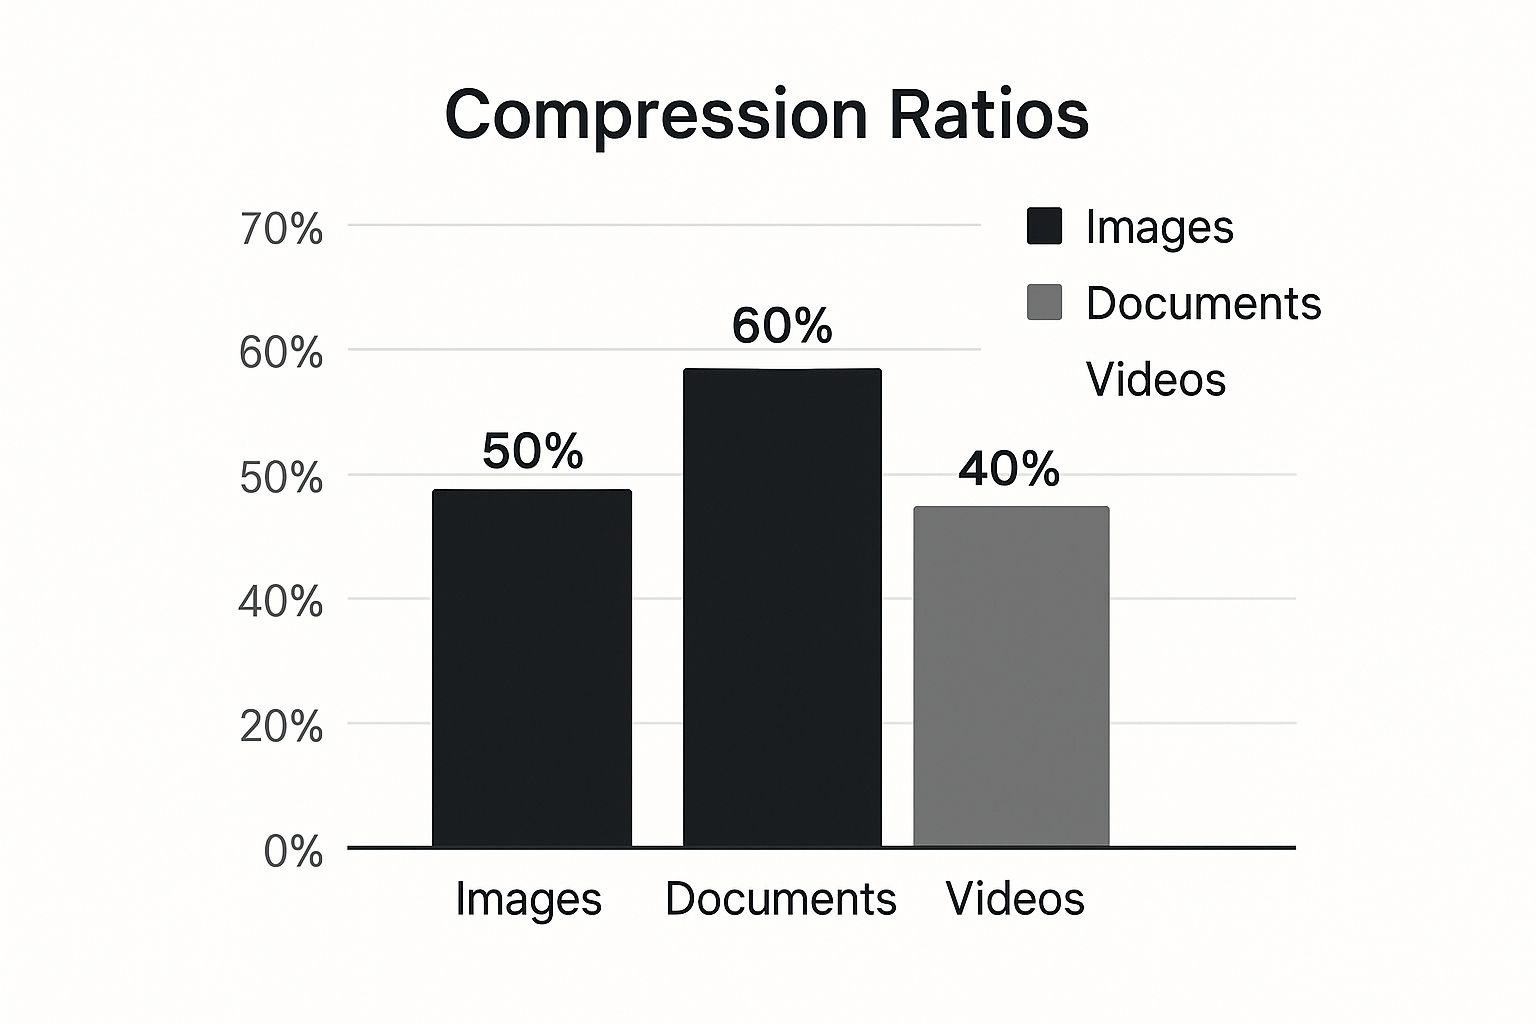
This infographic shows the average compression you can get across different file types. Video compression, as you can see, often has a slightly lower compression ratio compared to images or documents. This just underscores how important it is to understand bitrate and encoding settings when you're working with video. Once you've got Compresto dialed in, you might want to check out ways to improve workflow efficiency.
Avoiding Compression Catastrophes
Over-compression is a real threat, and it can completely ruin your footage. Learning to spot the telltale signs – like blocky artifacts, pixelation, and washed-out colors – is crucial. Remember, different videos have different needs. A video for social media can handle more compression than, say, a client presentation. As a side note, the file compression tools market is exploding, projected to jump from $1.2 billion in 2024 to $2.5 billion by 2033, with a CAGR of 9.1%. The real art is finding that balance between file size and quality. That's how you make videos shareable without sacrificing what matters most – how good they look.
To help illustrate this, let's look at some real-world compression results:
To help illustrate this, let's look at some real-world compression results:
Video Compression Results by File Type Comparison of compression ratios and quality retention across different video formats using Compresto
| Video Format | Original Size | Compressed Size | Compression Ratio | Quality Score (1-5) |
|---|---|---|---|---|
| MOV (iPhone) | 2.1 GB | 210 MB | 90% | 4 |
| MP4 (4K) | 10 GB | 2 GB | 80% | 4 |
| AVI (Screen Recording) | 500 MB | 100 MB | 80% | 3 |
| MKV (HD Video) | 3 GB | 750 MB | 75% | 4 |
As this table shows, substantial compression is achievable across various formats while maintaining a reasonable quality score. The iPhone video compression is particularly impressive, showing how effective VBR can be in scenarios with less complex visuals. The trade-off in quality for the screen recording (AVI) likely comes from the static nature of the content where artifacts become more visible.
Image Compression Beyond the Obvious

This screenshot from Apple support shows the different image formats available on macOS. Notice how some formats, like HEIC, are designed for smaller file sizes, while others, like TIFF, prioritize image quality. Picking the right format is your first win in the image compression game.
After spending way too much time optimizing images for clients, I've realized that JPEG isn't always the best option. There’s a whole world of image optimization beyond simply saving as a JPEG. It’s all about finding the balance between file size and keeping those all-important details.
JPEG Isn't Always King
Blindly saving everything as a JPEG isn't always the smartest move. Honestly, I’ve been surprised by how often PNG optimization actually gives better results, especially for graphics or images with sharp lines and text. Knowing the pros and cons of each format is half the battle.
I even put together a guide on how to compress images on a Mac that might be useful. It covers some of the finer points of image optimization.
Batch Processing and Lossless Compression
If you’re dealing with a massive photo library, batch processing is a lifesaver. I’ve used Compresto to process hundreds of images overnight. Wake up, smaller files, done. Seriously, it's magic. And speaking of magic, don't underestimate lossless compression. It's like a secret weapon – smaller files, zero quality loss.
Fine-Tuning for Specific Needs
Not all images are created equal. A product shot needs to be pixel-perfect, but a social media graphic can handle a bit more compression. Compresto lets you tweak settings for different uses. This means you can dial in your compression strategy for each scenario.
Beyond just shrinking images, optimizing video ad creatives can make a real difference in your ad spend. Check out this post on reducing CPA with video variants for some great tips.
Then there's selective compression, where you apply different compression levels to different parts of the same image. I’ve found this incredibly useful for images where the focus is on a specific area.
PDF Compression That Maintains Professional Standards

PDFs are a different beast. They're a mix of text, images, and formatting, and each of those elements reacts differently to compression. In my experience, some PDFs shrink down beautifully, while others barely budge.
Understanding PDF Bloat
So why the difference? It usually comes down to what’s inside the PDF. Files packed with images, especially high-resolution photos, are the main culprits. Scanned documents are another common source of bloat. Think about it – every scanned page is basically one big image.
Picking the right image format within your PDF makes a big difference. Check out this article on the best image format for web for more info. Optimizing those images before they go into the PDF is a huge time-saver.
Web vs. Print: A Crucial Distinction
Where you plan to use the PDF matters too. A PDF for online viewing doesn't need the same high resolution as one you're going to print. Compresto offers presets for both, so you can optimize for each. You might also find this guide on how to reduce PDF file size on a Mac useful.
Handling Password Protection and Batch Compression
Now, what about password-protected PDFs? Compresto handles those without a problem, keeping your security in place while still compressing the file. And if you've got a ton of PDFs to deal with, batch compression is a lifesaver. Just drag and drop the files, set your preferences, and let Compresto do its thing.
You'll return to a folder of neatly compressed PDFs, ready for sharing or archiving. This feature is seriously helpful when you're dealing with loads of documents.
Advanced Compression Strategies That Pros Use
So, you’ve got the basics of Compresto down. Great! Now, let's get into some of the finer points, the stuff that separates the amateurs from the pros. I’ve picked up a few tricks over the years dealing with those really stubborn files that just don’t want to shrink.
Troubleshooting Compression Roadblocks
Sometimes, you hit a wall. A file just won't compress as much as you need it to. There's almost always a reason. Often, it's because the file is already pretty compressed. Not much left to squeeze out, you know? I’ve found certain video codecs, for example, are just naturally tougher to compress. Understanding that saves me a lot of frustration.
Also, the content itself plays a big role. Compressing a video of a still image? Piece of cake. Compressing a fast-paced action sequence? Totally different story. Figuring out these nuances helps me tweak my compression strategy for different types of files.
Automation and Integration for Ultimate Efficiency
The data compression software market is exploding—expected to jump from $2.476 billion in 2024 to a whopping $4.306 billion by 2032. North America’s expected to hit over $1.395 billion by 2032 alone. That tells you something about how important file compression has become. Check out this report for more insights on the growing data compression market. To keep up, automation is key. Personally, I use macOS shortcuts all the time to speed things up. One keystroke can apply a specific compression preset to a bunch of files. Imagine automating something like turning videos into smaller GIFs. Huge time saver.
Optimizing for Performance and Compatibility
Large files can really slow down an older Mac. Compressing them, even a little, makes a noticeable difference in performance. I’ve seen it firsthand. Another thing I always check is compatibility. A video might look perfect on my MacBook, but will it play the same way on a phone? Making sure things are compatible across different devices is really important for a consistent experience.
These are the kinds of tricks that will take your compression skills to the next level. It's about making Compresto work for you, not against you.
Your Compression Mastery Roadmap
Let's turn all this compression talk into something you'll actually use every day. Think of this as your personalized guide to making compression a natural part of your Mac life, whether you're just trying to free up some space or you're a creative pro working with tons of media.
Timelines and Metrics for Success
My advice? Start small. Pick one file type—images, videos, or PDFs—and get your compression workflow perfect for just that one. Spend about 30 minutes setting up Compresto with custom presets and dedicated output folders. Then, over the next week, keep an eye on how much storage you're saving. Even a 5-10% reduction that first week is a fantastic start! Once you're comfortable, add in more file types and explore those more advanced techniques.
Troubleshooting and Complementary Tools
Run into a problem? No worries, it happens. Here’s a quick checklist:
- Check the file type: Some files, like videos that are already highly compressed, just don't have much wiggle room for further reduction.
- Double-check your Compresto settings: It’s easy to accidentally choose a preset that’s a bit too strong.
- Inspect the file itself: Is it corrupted? A damaged file can sometimes throw a wrench in the works.
Remember, Compresto works great with other tools, too. Think about your cloud storage services (Google Drive, Dropbox, OneDrive, etc.) or file management apps. Combining Compresto with those can really boost your compression gains.
Choosing the Right Compression Approach
So, how do you figure out the best compression method for a specific file? I use this simple framework:
- Purpose: Where will you be using this file? Is it for the web, for print, or for archiving?
- Quality: How much quality loss is acceptable? Are you going for lossless, near-lossless, or lossy compression?
- Size: What's your ideal final file size?
This little decision-making framework, combined with the right tools, takes the guesswork out of finding the perfect compression level. Let me show you what I mean with a comparison of some popular Mac compression tools:
To help illustrate the differences between Compresto and some other common compression tools available for Mac, I've put together this comparison table:
Compression Tools Comparison: Feature comparison between Compresto and other popular Mac compression tools
| Tool Name | Supported Formats | Batch Processing | Price | Best Use Case |
|---|---|---|---|---|
| Compresto | Videos, Images, PDFs, GIFs | Yes | Paid (free trial) | Versatile compression for various needs |
| Compressor | Videos | Yes | Paid | Professional video compression |
| iZip | Archives, Images | Yes | Paid/Free | Archiving and basic image compression |
| ImageOptim | Images | Yes | Free | Lossless image optimization |
| PDF Expert | PDFs | Limited | Paid | PDF editing and some compression |
As you can see, each tool offers a unique blend of features and pricing. Choosing the right tool depends on your specific needs and how you plan to use it.
Ready to take control of your files and free up some precious storage space? Download Compresto and start compressing! Get Compresto Now!