How to Make Files Smaller Without Losing Quality
When we talk about making files smaller, we're really talking about using smart software to shrink their digital footprint. This is done in one of two ways: lossless compression, which keeps every bit of the original data, or lossy compression, which cleverly removes non-essential information to get the smallest size possible. Mastering this skill is crucial for speeding up your website, cutting down on storage costs, and making it a breeze to share files.
Why Smaller Files Are a Big Deal
Have you ever tried to email a crucial presentation, only to be blocked by that dreaded "file too large" error? Or maybe you've tapped your fingers impatiently, waiting for a website's images and videos to crawl onto your screen. These frustrations almost always lead back to a single culprit: oversized files.
In our daily digital lives, knowing how to shrink files isn't just a neat trick for the IT crowd anymore—it’s a fundamental skill for just about everyone.
The issue goes deeper than simple inconvenience. Bulky files have a real, tangible impact on your workflow, your budget, and how others experience your content. For a business, a slow-loading website can directly cost you sales. For creators, massive project files can grind collaboration to a halt and send cloud storage bills through the roof. For the rest of us, it’s about sharing memories and information without hitting frustrating digital walls.
The Hidden Costs of Heavy Files
Think about the chain reaction a single large file can cause. Imagine a marketing team is ready to launch a new landing page featuring a stunning, high-resolution video. If that video file is massive, the page will lag. A potential customer clicks an ad, lands on the page, and bounces before the content even appears. Just like that, you've lost a lead and wasted ad money.
This isn't a rare problem; it's happening all the time. Our smartphones, drones, and professional cameras are creating higher-quality media than ever, which means we're generating an unprecedented amount of data. This explosion of data has put a spotlight on the need for smarter file management.
The real challenge isn't just about storing all this data—it's about making it easy to access and share. A 50GB project folder is worthless if it takes an hour to download or can't be sent to a colleague on the other side of the world. Good compression is what makes that data truly useful.
This demand for efficiency is clearly visible in the market. The global data compression software market was valued at around $1.11 billion in 2024 and is expected to hit $1.2 billion by 2025. This growth is a direct response to the tidal wave of data from our devices, all needing to be managed. For a deeper dive, check out the full data compression software market report.
Lossy vs. Lossless: What's the Difference?
To shrink files effectively, you need to know the two basic methods. The one you choose will hinge on a simple question: do you need absolute, pixel-perfect quality, or is getting the smallest possible file size your top priority?
-
Lossless Compression: This is like packing a suitcase with perfect precision. You’re reorganizing everything to fit into a smaller space, but you aren’t throwing anything out. When you unpack (or decompress), every single item is there, exactly as it was. This is the best method for text, code, and images like logos (PNGs) where losing even a single detail is not an option.
-
Lossy Compression: This approach is more like decluttering before you pack. It intelligently finds and gets rid of data that our eyes and ears are least likely to miss—think subtle color shifts in a photo or sound frequencies you can't hear in an audio file. The result is a dramatically smaller file, but it comes with a tiny bit of irreversible quality loss. This is the standard for photos (JPEGs), videos (MP4s), and music (MP3s).
Mastering Video Compression Without Sacrificing Quality
Let's be honest, video files are often the heavyweight champions of digital clutter. A short 4K clip can easily swell to several gigabytes, making it a real headache to share, upload, or even just store. Figuring out how to make files smaller, especially videos, is a crucial skill for anyone building a fast website or trying to free up hard drive space.
But here’s the thing: effective compression isn’t just about brute-force shrinking. It’s an art. It's about intelligently reducing file size without turning your beautiful, crisp footage into a pixelated, blurry mess.
The secret lies in understanding a video's two core components: its format (the container) and its codec (the compression recipe). Get these two right, and you've already won half the battle.
Choosing the Right Video Format
That file extension you see at the end of a video's name—like .mp4 or .mov—is what we call the container format. Think of it as the box that holds everything together: the video stream, the audio tracks, and all the metadata. Your choice of container really dictates compatibility and where the video will play nicely.
-
MP4 (MPEG-4 Part 14): This is the undisputed king of web video, and for good reason. MP4 gives you a fantastic balance of quality and file size, and it's supported by pretty much every browser, device, and platform you can think of. If your video is going on a website, social media, or any online service, MP4 should be your go-to choice.
-
WEBM: Developed by Google with the web in mind, WEBM is a brilliant open-source alternative. It often produces even smaller files than MP4 at a similar quality. While its compatibility is broad, it's not quite as universal as MP4, but it’s an excellent option for performance-heavy web projects where every kilobyte counts.
-
MOV: This is Apple's baby, the native format for QuickTime. MOV files are phenomenal for professional editing environments, particularly on a Mac, because they preserve incredible detail with minimal compression. The trade-off? They are often massive and completely unsuitable for web delivery. I always use MOV for archiving my master copies or during the editing process itself.
For most day-to-day needs, the workflow is straightforward. You start with your high-quality source file (likely a MOV), then export a compressed MP4 version for sharing and publishing.
Understanding Codecs: H.264 vs. H.265
Tucked inside that container is the codec (short for coder-decoder). This is the algorithm that does the actual heavy lifting of compressing and decompressing the video data. The codec is where the real magic of file size reduction happens.
A better codec can give you a dramatically smaller file at the same visual quality. For instance, the H.265 codec can shrink a file's size by up to 50% compared to the older H.264 standard, with no perceivable drop in clarity. For anyone working with 4K content, this is a total game-changer.
Here’s a quick rundown of the two most common codecs you'll encounter:
| Feature | H.264 (AVC) | H.265 (HEVC) |
|---|---|---|
| Efficiency | Good compression, the old reliable | Superior compression, files are ~50% smaller |
| Compatibility | Universal—works on all modern devices | Great support on newer devices and software |
| Best For | General web use, social media, older hardware | 4K/8K video, streaming, modern web platforms |
| Tool Support | Supported by everything | Supported by modern tools like Compresto |
Honestly, just switching to H.265 is often the single most impactful step you can take to make your video files smaller.
A Practical Walkthrough: Shrinking a Huge File
So, how does this all work in the real world? Imagine you have a 1 GB 4K video you want to use as a background banner on a client's website. Uploading a 1 GB file would absolutely kill the site's load time. The goal is to shrink it way down while making sure it still looks sharp.
Using a tool like Compresto, which makes all these technical settings easy to manage, here’s exactly how I would approach it:
-
Set the Codec and Format: First things first, I'd choose MP4 as the container and H.265 (HEVC) as the codec. This immediately puts us on the path to maximum efficiency.
-
Adjust the Resolution: The original video is 4K (3840x2160), which is complete overkill for a web banner. Downscaling it to 1080p (1920x1080) will slash the file size without anyone noticing a quality difference in that context.
-
Lower the Bitrate: Bitrate is all about how much data is used for each second of video. A background video is ambient—it doesn't need to be perfectly pristine. I’d feel comfortable dropping the bitrate to somewhere around 2,000-4,000 kbps for a 1080p clip.
-
Change the Frame Rate: Most video is filmed at 30 or even 60 frames per second (fps). For a smooth but lightweight background element, dropping it to 24 fps saves more space without making the motion look jerky.
By layering these simple adjustments, that original 1 GB file can easily be compressed down to under 25 MB. That’s a staggering reduction of over 97%, and the result is still perfectly crisp and ready for the web.
Smart Techniques for Reducing Image File Size

We've all been there: staring at a blank screen, waiting for a website to load. More often than not, the culprit is a bunch of oversized images. Whether it's for your website, a client presentation, or an email attachment, bulky images create frustrating delays that can kill the user experience.
Learning how to make files smaller is a non-negotiable skill. The good news is that you don't have to sacrifice beautiful, crisp visuals. The real trick is finding that perfect balance between file size and image quality, so your content loads fast on any connection.
Choose the Right Image Format
Before you touch any compression settings, the most critical decision is your file format. Think of it as the foundation—get it wrong, and everything you build on top will be shaky. Each format is designed for a specific job.
-
JPEG (or JPG): This is your go-to for pretty much any photograph. JPEGs are brilliant at handling the millions of colors and complex details you see in photos of people, products, and landscapes. Its compression algorithm is designed to shrink these types of images significantly.
-
PNG: Reach for a PNG when you need a transparent background. It’s perfect for logos, icons, and other simple graphics where you need clean edges and no backdrop. It uses lossless compression, meaning it keeps every single pixel intact, but this often leads to larger files for complex images like photos.
-
WebP: Developed by Google, WebP is a modern powerhouse. It can handle both photographic and graphic-style images, often creating files that are 25-35% smaller than their JPEG or PNG counterparts at the same visual quality. With near-universal browser support today, it’s an excellent choice for almost any image you put on the web.
Lossy vs. Lossless Compression: The Quality Trade-Off
Once you've picked your format, it’s time to compress. This is where you have to decide what matters more: absolute, pixel-perfect quality or the smallest possible file size.
Lossless compression, which PNG uses, is like perfectly packing a suitcase. It reorganizes all the data more efficiently to take up less space, but everything is still there when you unpack it—nothing is lost.
Lossy compression is the magic behind JPEGs and WebP. It intelligently throws away tiny bits of data that the human eye isn't likely to miss. A little bit of information is gone forever, but the file size shrinks dramatically. The goal is to apply just enough compression to get a tiny file without anyone noticing the change.
When optimizing a JPEG for an e-commerce site, I often find that a quality setting between 75-85 provides the sweet spot. The file size drops dramatically, but the product photo remains crisp and clear to the customer. Any lower, and you risk visible artifacts; any higher, and the file size savings diminish.
Strip Unnecessary Metadata
Every time you snap a photo, your camera or phone embeds a chunk of hidden information called EXIF data right into the file. This includes things like the camera model, shutter speed, lens details, and sometimes even the GPS location where the picture was taken.
While this can be useful for photographers, it's just dead weight for web images. It adds to the file size without contributing anything to the visual experience. Using a tool like Compresto to strip this metadata can easily trim another 5-15% off the file size without touching a single pixel. It’s a simple, no-risk optimization that really adds up when you’re dealing with hundreds of images.
A Real-World Optimization Scenario
Let's put this into practice. Imagine you're building a new e-commerce site with 50 high-resolution product shots. The designer sent you a folder of 5 MB PNG files. If you upload those as-is, that's 250 MB of images your customers' browsers have to download. Your site would be painfully slow.
Here’s a much smarter workflow:
- Convert to the Right Format: First, those PNGs have to go. Since they're photos, I'd convert them all to WebP for the best performance, keeping JPEG as a solid backup option.
- Apply Smart Compression: Next, I’d run them through a compression tool and set the quality to around 80. This is where the most significant size reduction happens.
- Remove EXIF Data: For the final touch, I’d strip all that useless metadata to squeeze out a last bit of savings.
Following this process, that 5 MB image can be shrunk down to just 200-300 KB. The total page weight from those images plummets from 250 MB to around 10-15 MB. That's a massive 94% reduction, and your site now loads in a snap.
For even more ideas, you can check out other file size reduction tips that don't sacrifice quality.
How to Shrink PDFs and Documents for Easy Sharing
We’ve all been there. You’re about to send off a critical proposal, a polished client report, or your latest academic paper, and then you see it: "Attachment size exceeds the limit." That sinking feeling is a universal frustration.
These bloated PDFs aren't just inconvenient; they're a bottleneck. The problem usually isn't the text itself. It’s the hidden heavyweights lurking inside—high-resolution images, embedded fonts that aren't even used, and complex vector graphics that can turn a lean document into a digital brick. The trick to making files smaller is knowing how to target these specific elements without compromising your document's professional look.
Key Strategies for Smaller PDFs
The most direct way to shrink a PDF is to go straight for its largest components. This isn’t about sacrificing quality, but about being smarter with how the file is constructed.
A few simple tweaks can make a massive difference:
- Tackle the images. This is almost always the biggest win. A PDF filled with a dozen crisp photos can easily balloon in size. Compressing those images, even slightly, can deliver huge savings.
- Strip out the junk. Many PDFs carry around extra baggage. Think of metadata, hidden layers from design programs, and embedded fonts for characters that don't even appear in your document. Removing all that trims the fat without touching the visible content.
- Flatten your layers. If your document started its life in a design program like Adobe InDesign or Illustrator, it likely has editing layers baked into the final PDF. Flattening these merges them into one static layer, which dramatically cuts down on complexity and file size.
Just look at what a little compression can do for a standard 10 MB report loaded with images.
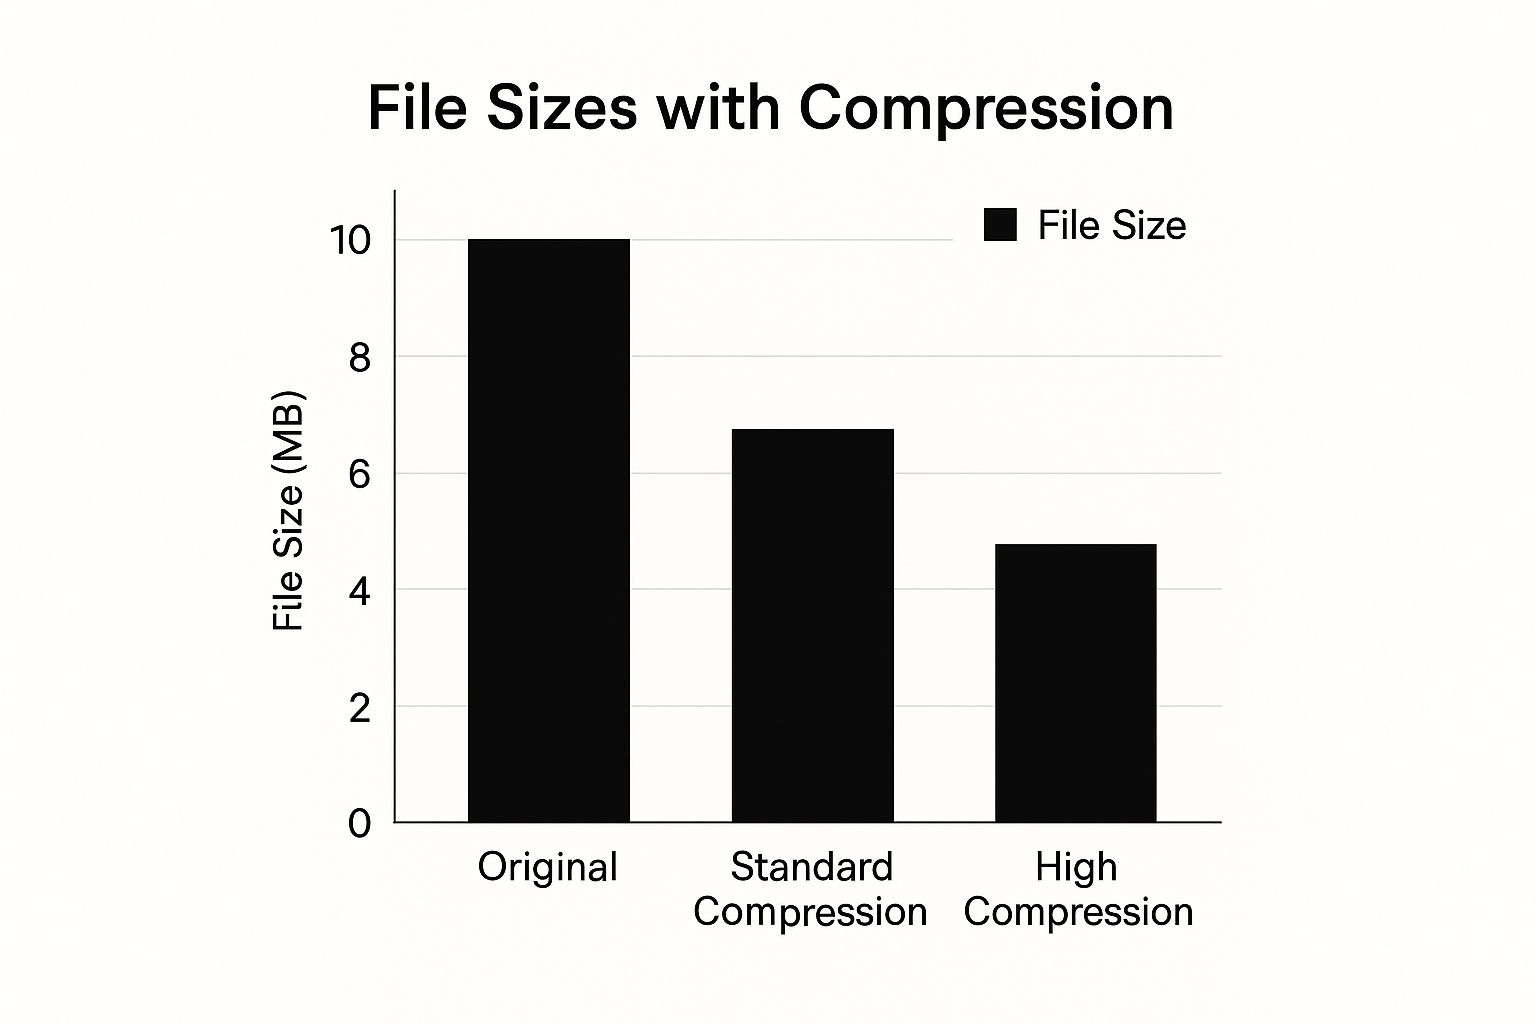
As you can see, even a standard compression pass can slash the file size by 40%, making it far more shareable.
Choosing the Right PDF Compression Method
How you decide to shrink a PDF really comes down to what you value most: quality, security, or pure convenience. Not all methods are created equal, and it’s important to understand the trade-offs. That quick, free online tool might seem tempting, but it’s probably not the right choice for sensitive business documents.
I always recommend using a dedicated desktop application like Compresto for compression. It gives you total control over your files. Unlike online tools where you’re uploading sensitive data to a random server, a local app keeps your documents private and secure right on your own machine.
To help you decide, let's look at how the most common methods stack up.
Comparing PDF Compression Methods
The right tool depends entirely on the job at hand. Here’s a quick breakdown of what you can expect from different approaches to PDF compression.
| Method | Effectiveness | Quality Impact | Security | Best For |
|---|---|---|---|---|
| Free Online Tools | Varies | Can be high | Low (files are uploaded) | Non-sensitive, one-off compressions |
| Adobe Acrobat | High | Controllable | High (local processing) | Professionals needing detailed control |
| macOS Preview | Moderate | Limited options | High (local processing) | Quick, basic size reduction for Mac users |
| Compresto | Very High | Excellent balance | High (local processing) | Batch processing and easy, quality-focused results |
Ultimately, choosing the right method means you can consistently produce lean, high-quality documents that are ready to go.
For anyone who deals with large documents on a regular basis, making compression a natural part of your workflow is a game-changer. If you want to go deeper, this professional's guide to file compression is packed with tips for building more efficient habits.
In the end, the best strategy is a proactive one. Once you understand what makes your documents so big and have the right tools ready, you can sidestep the frustration of oversized files completely. Your documents will always be ready to share, without that last-minute scramble to shrink them down.
Choosing the Right Compression Tools and Software
 With so many options out there, picking the right software to shrink your files can feel overwhelming. You've got everything from quick online converters to heavyweight desktop applications, and it's easy to get lost in the noise. But the truth is, the "best" tool is simply the one that solves your immediate problem.
To make a smart choice, you first need to understand what you're trying to accomplish. Are you just trying to shrink a single PDF so you can finally email it? Or are you a web developer who needs to optimize a hundred product photos for a new website launch? Figuring this out will immediately point you in the right direction.
Online Converters For Quick Tasks
If you need to compress something right now and don't want the hassle of installing software, web-based tools are incredibly handy. You just drag and drop your file, wait a few seconds, and download the smaller version. They're perfect for those one-off tasks where speed and simplicity are all that matter.
But that convenience comes with a major catch: security. When you upload a file to a free online service, you’re sending your data to a server you know nothing about. For a few vacation photos or a non-sensitive document, that might be fine. But if it's a confidential business report or a client contract, using one of these tools is a serious gamble.
Always ask yourself: "Would I be okay with this file being public?" If the answer is no, a free online converter is the wrong tool for the job. Your data privacy is worth far more than a few seconds of convenience.
Desktop Software For Power and Control
For professionals, content creators, or anyone who handles large files on a regular basis, dedicated desktop software is the way to go. These applications run directly on your computer, which means your files never leave your control. That alone is a huge win for security and peace of mind.
But desktop tools also offer a whole different level of power and advanced features you just don't get online:
- Batch Processing: Need to compress 500 images at once? A desktop app can chew through them in minutes, saving you hours of tedious work.
- Precise Quality Control: You can meticulously adjust compression settings, letting you find that perfect sweet spot between a tiny file size and beautiful visual quality.
- Workflow Integration: Modern tools like Compresto can even watch a specific folder and automatically compress any new files you add—a game-changer for efficiency.
This is the kind of functionality that separates casual use from a professional workflow. Once you see how a dedicated tool can streamline your process, it's a real lightbulb moment. If you're curious, you can explore the 10 reasons Compresto outperforms other compression tools to see what a difference the right software can make.
All-in-One vs. Specialized Tools
Another thing to consider is whether you need a Swiss Army knife or a scalpel. Some programs are masters of one thing, like PDF optimization, while others are built to handle a whole range of file types—videos, images, documents, GIFs, you name it.
An all-in-one suite like Compresto can be a huge asset because it gives you a consistent, reliable workflow for all your compression tasks. Instead of juggling three or four different apps, each with its own quirks, you have a single process. This doesn't just save time; it reduces the mental energy you spend learning and remembering how everything works.
The demand for these kinds of powerful, feature-rich solutions is exploding. The data compression software market was valued at around $2.48 billion in 2024 and is expected to hit over $4.3 billion by 2032. This isn't just because we have more data; it's because we need tools that do more than just shrink files. We need security, cloud integration, and real-time processing to keep up. You can dig deeper into these data compression software market trends to see where the industry is heading.
Ultimately, choosing the right tool comes down to matching its capabilities to your specific needs. Take a moment to think about security, volume, and file types, and you'll be able to confidently pick a solution that not only makes your files smaller but makes your entire workday easier.
Going Beyond Basic Compression: Smart Habits and Pro Workflows
Moving from basic compression to a truly professional approach means changing your mindset. Instead of scrambling when you hit an upload limit, you build a proactive system. It’s about creating smart habits and using expert techniques that not only shrink your files but save you a ton of time down the road, especially when consistency is crucial.
One of the most powerful habits you can build is creating presets in your compression software. Think about it: instead of fiddling with the same settings over and over, you can create a one-click profile for 'Web-Ready Images' or 'Email-Attachment Video'. This simple move ensures every file meant for a specific purpose is optimized perfectly, every single time. It's a game-changer for efficiency.
The push to make files smaller has been a driving force in digital technology for decades. Better file compression is what enables faster downloads, lowers bandwidth costs, and makes cloud storage affordable on a massive scale. In fact, these advancements are a huge part of what made modern streaming services and cloud computing possible in the first place. You can learn more about the market impact of compression technology if you're curious about the bigger picture.
The Finer Points of Optimization
To really get the smallest possible files without sacrificing quality, you need to look beyond the obvious. It's in the smaller details where you can find those extra performance gains.
-
Tackle Audio and Video Separately: When you're working with video, the audio track is often just along for the ride. But by compressing the audio track on its own with dedicated settings, you can often trim off a surprising amount of data before muxing it back with the video.
-
Get a Handle on Color Depth: For images, color depth is a major factor in file size. An image with a 24-bit color palette (that's millions of colors) is naturally going to be much larger than one using an 8-bit palette (just 256 colors). For logos, icons, or simple graphics, dropping the color depth is a fantastic way to make a file leaner.
-
Start with the Best Possible Source: This might sound backward, but it's the absolute golden rule of compression. You can always make a high-quality file smaller. You can never add quality back to a file that was poorly compressed to begin with.
Always, always begin your optimization process with the original, uncompressed source file. Trying to re-compress an already compressed file (like running a JPEG through another round of compression) is a recipe for ugly, pixelated artifacts. This "generational loss" destroys quality for almost no benefit in file size.
Building a Workflow That Works for You
When you start using these advanced strategies, file optimization stops being a chore and becomes a natural part of your creative or business process. The goal is to set up a system that makes every digital asset you create as lean and efficient as possible from the start.
Imagine a simple, repeatable workflow:
- Archive Your Master: The first thing you should always do is save a full-quality, uncompressed version of your original file. This is your untouchable master copy.
- Create Purpose-Built Versions: Using that master file, fire up a tool like Compresto and use your presets to export optimized versions for every need—one for your website, another for social media, and maybe a super-lightweight one for email.
- Put Your Folders to Work: For peak efficiency, look into features like folder monitoring. You can set up a system where any file you drop into a "Compress This" folder gets automatically processed with your predefined settings.
This kind of systematic approach takes all the guesswork out of the equation and guarantees you get consistent, high-quality results on every single project.
Frequently Asked Questions About File Compression
Diving into file compression often brings up a handful of common questions. As you start shrinking files, you'll naturally wonder about the trade-offs and the best approach for your specific needs. Let's tackle some of the most frequent queries we get from users.
Can I Compress a File More Than Once?
Technically, yes, but I almost always advise against it. Think of it this way: every time you compress a file with a lossy method (which is common for JPEGs and MP4 videos), you're permanently discarding a little bit of data. Doing it again just throws away more, compounding the damage.
This process is known as generational loss. You'll often see a sharp drop in quality with very little extra space saved. For the best results, always, and I mean always, work from your original, high-quality source file. Compress it once for its final destination.
Expert Tip: The golden rule of any optimization workflow is to guard your original master file. You can always create a smaller version from a high-quality source, but you can never restore quality to a file that's been over-compressed.
What’s the Best Way to Shrink a File Without Losing Quality?
To reduce file size with absolutely zero quality loss, you need to use a lossless compression format. Think of formats like PNG for images or a ZIP archive for documents. These methods cleverly reorganize data without deleting a single bit.
The catch? The file size reduction is usually pretty modest. For the significant savings needed for web pages or emails, especially with rich media, a carefully managed lossy compression is the way to go. Using a tool like Compresto, you can dial in the settings to find that sweet spot where the file is dramatically smaller, but the visual quality difference is virtually impossible to spot.
Does Zipping a File Hurt Its Quality?
Not at all. Zipping a file is a completely safe, lossless process. It works like a digital vacuum-packer, finding redundant patterns in the data and storing them more efficiently. When you unzip the archive, the file is restored bit-for-bit to its original state.
This makes zipping a fantastic choice for bundling documents, project folders, or software for sharing or storage. It’s all about making the package smaller for transport, with a guarantee of perfect data integrity on the other end.
Ready to stop wrestling with oversized files and start optimizing your workflow? Compresto gives you the power to shrink videos, images, and PDFs with precision and ease, all while keeping your files secure on your Mac. Download Compresto today and see how much time and space you can save.