How to Free Up Space on Mac: Clean Up Application Support Files (2026)
Understanding Where Your Storage Actually Goes
Ever get that sinking feeling when your Mac flashes a "Your startup disk is almost full" warning? You swear you haven't downloaded anything huge recently, yet your available space has vanished. This common frustration often starts with not knowing where your storage is actually going. Before you can effectively free up space on your Mac, you need to play detective and identify the real culprits.
Your first stop should be the storage manager built right into macOS. You can find it by going to the Apple menu > About This Mac > Storage. This gives you a colorful bar chart that breaks down your usage into categories like Apps, Photos, Documents, and the often-troublesome System Data. While this tool gives you a decent starting point, its categories can be a bit vague and don’t always tell the whole story.
Decoding the Colorful Storage Bars
Think of the storage bar as a general estimate, not a precise map. For instance, the 'Apps' category shows the size of the application files themselves, but their related cache files and temporary data often get lumped into 'System Data'. This is where a lot of the confusion—and storage bloat—comes from.
The most notorious category by far is System Data. This is a catch-all bucket for everything from temporary files and system caches to local Time Machine snapshots and old iOS backups. It’s the digital equivalent of a junk drawer, and it can grow to a massive size for no obvious reason.
This isn't just a minor annoyance; for some, it's a huge problem. In fact, over 60% of macOS users report unexpected 'System Data' growth. I’ve seen users with new M2 and M4 Macs, including powerful Mac Studio and Mac mini models, report this category ballooning to over 400 GB, sometimes eating up almost half the space on a 1 TB drive. You can see how widespread this issue is by checking out the experiences shared on Apple's community forums.
Setting Realistic Cleanup Expectations
Knowing what these categories really mean is key to setting realistic cleanup goals. Some files, like large downloads in your Downloads folder, are easy to find and delete. Others are buried deep in system folders for a good reason. To help you prioritize, let’s look at what you’re up against.
Before you start a deep clean, it's useful to understand where your efforts will have the most impact. The table below breaks down the common storage hogs, their typical size, and how hard they are to tackle. This will help you focus on the areas that offer the biggest wins.
| Storage Category | Typical Size Range | Cleanup Difficulty | Priority Level |
|---|---|---|---|
| Applications | 10-100 GB | Easy | High |
| Documents | 5-200+ GB | Medium | High |
| Photos Library | 20-500+ GB | Medium | Medium |
| System Data | 20-400+ GB | Hard | High |
| macOS | 15-30 GB | N/A (Do Not Touch) | Low |
As you can see, Applications and System Data are high-priority targets. While 'macOS' files are essential and shouldn't be touched, everything else is fair game. Now that you have a better idea of where your space is going, you can start taking targeted action.
Conquering System Data Without Breaking Your Mac
That ever-expanding ‘System Data’ category on your Mac can feel like a mysterious black hole, but it’s often where you can find the most storage to reclaim. Going after it requires a bit of care since it’s a mix of disposable junk and files your Mac needs to run properly. Let's pull back the curtain on this category and see how you can safely free up space on Mac without causing any system meltdowns. The usual suspects are cache files, old device backups, and local Time Machine snapshots.
Safely Clearing Cache Files
Your Mac creates cache files to help things run faster, but over time, they can get bloated, outdated, or even corrupted. While you should never just start deleting random files from your Library folders, clearing out application-specific caches is usually a safe and very effective first move.
Here’s a real-world scenario: maybe you used a heavy-duty video editing app for a big project a few months back. Even if you've since uninstalled the app, gigabytes of its temporary render files and cache could still be hanging around in your ~/Library/Caches folder. It can be a little intimidating to poke around in there, but this is where you’ll find folders named after all the apps you use (or once used). Deleting the contents of these folders—not the folders themselves—is a solid way to get space back. I once reclaimed over 50 GB just by cleaning out old cache from video and design software I didn't even have on my Mac anymore.
Managing Local Snapshots and Old Backups
Time Machine is an amazing tool, but it also creates local snapshots right on your internal drive. Think of these as temporary, on-the-go backups that your Mac holds onto until you can connect to your main external Time Machine drive. If you don't connect that drive very often, these snapshots can pile up and take a huge bite out of your storage, all falling under the "System Data" label. Your Mac is supposed to clear these out automatically, but sometimes it needs a little encouragement.
It's a similar story if you've ever backed up your iPhone or iPad to your Mac using Finder (or iTunes on older versions of macOS). Those backups can be absolutely massive. A single iPhone backup can easily eat up more than 100 GB of space. It’s a good idea to periodically check for and get rid of old device backups you don’t need anymore. You can find them tucked away in this folder: ~/Library/Application Support/MobileSync/Backup/.
Apple's built-in storage management tools, shown below, can help you find some of these bigger files without having to dig through system folders yourself.
This tool gives you helpful suggestions like "Reduce Clutter," which points you toward large files and documents you might have completely forgotten about. It’s a great, risk-free place to start before you venture into the more hidden corners of your system.
Smart File Management Beyond The Obvious
To truly stay on top of your Mac's storage, you have to move past just clearing caches and deleting old backups. The real goal is to build a smart, sustainable system for managing your files so you never have to deal with a "disk almost full" emergency again. This means paying attention to the small, everyday digital habits that slowly but surely consume your gigabytes. A great way to free up space on Mac is to manage the digital clutter before it piles up.

This forward-thinking approach starts with the two biggest culprits: your Desktop and your Downloads folder. It’s best to treat these spaces like temporary workbenches, not permanent storage lockers. We’ve all done it—saved a PDF for a single task, only to let it sit on the desktop for months. By simply setting a weekly reminder to sort through these folders, you can stop this slow creep of clutter. When I checked my own system, I realized that around 70% of the files in my Downloads folder were one-time-use items like software installers or temporary images I no longer needed.
Taming Your Digital Collections
Your photo library and document folders are also prime candidates for more intelligent organization. Instead of letting thousands of photos accumulate, make it a habit to go through them after a trip or event. Delete the blurry shots, the obvious duplicates, and those nearly identical burst photos. The same logic applies to your documents—not every file needs to live on your Mac's speedy internal SSD. For instance, a photographer I know keeps his current projects and Lightroom catalog on his Mac Mini's main drive, but he moves all his completed projects to a network-attached storage (NAS) drive for archiving.
This way of thinking leads to a key part of smart file management: moving files to the right place. You can explore effective methods for large file transfer to external drives or cloud services. This frees up space on your Mac right away while ensuring your files are still safe and accessible. Here are a few more practical ideas:
- Audit Email Attachments: Your Mail app can silently hoard gigabytes of attachments on your local drive. Take a few minutes to use the "Remove Attachments" feature for old email threads you don't need anymore.
- Find True Duplicates: Don't just look for files with the same name. Sometimes
Report_Final_v2.docxis the exact same document asReport_Final_v3.docx. Specialized tools can scan file content to find these hidden duplicates. - Compress, Don’t Just Delete: For important files that you rarely open, compression is the perfect compromise. Check out our guide on how to optimize files without losing quality for some handy techniques.
By adopting these habits, you’ll shift from being a frantic cleaner to a savvy digital organizer, which is the secret to keeping your Mac feeling fast and uncluttered.
Choosing Cleanup Tools That Deliver Results
When your Mac’s storage starts to feel tight, it’s easy to grab the first cleanup tool you see. But the market is full of options, and not all of them will give you the results you need. To actually free up space on your Mac, you need to look past the flashy ads and see what a tool really does. The best choice isn't always the one with the most features, but the one that fits how you work.
Some people prefer to get their hands dirty and manually sift through system folders, while others want a simple, one-click fix. There’s no single correct approach; it's all about understanding the differences. Many cleanup apps bundle services like malware scanning and duplicate finders, but we'll focus on their main job: reclaiming your valuable disk space.
Third-Party Utilities vs. Built-in Tools
Apple's built-in storage management tools are a decent starting point, but third-party utilities often give you a much deeper look. They can show your disk usage in more intuitive ways, revealing exactly which folders are hogging the most space at a glance. For instance, some tools create a visual "tree map" of your drive, where folders appear as blocks sized according to how much space they consume. This makes it incredibly simple to spot a forgotten 50 GB folder.
This level of detail is becoming more critical. As macOS changes, so do the challenges of managing storage, leading more people to use specialized apps. Utilities like CleanMyMac X, iStat Menus, and DaisyDisk are popular because they offer detailed analysis and specific cleanup suggestions. You can learn more about this trend and how to check disk space on your Mac effectively. These applications often find leftover files from uninstalled programs or deep system caches that macOS's own tools might overlook.
Before you run any cleanup tool, it helps to identify the biggest culprits yourself. The Downloads folder, for example, is a classic offender. This chart shows just how quickly a seemingly harmless folder can turn into a major storage problem.
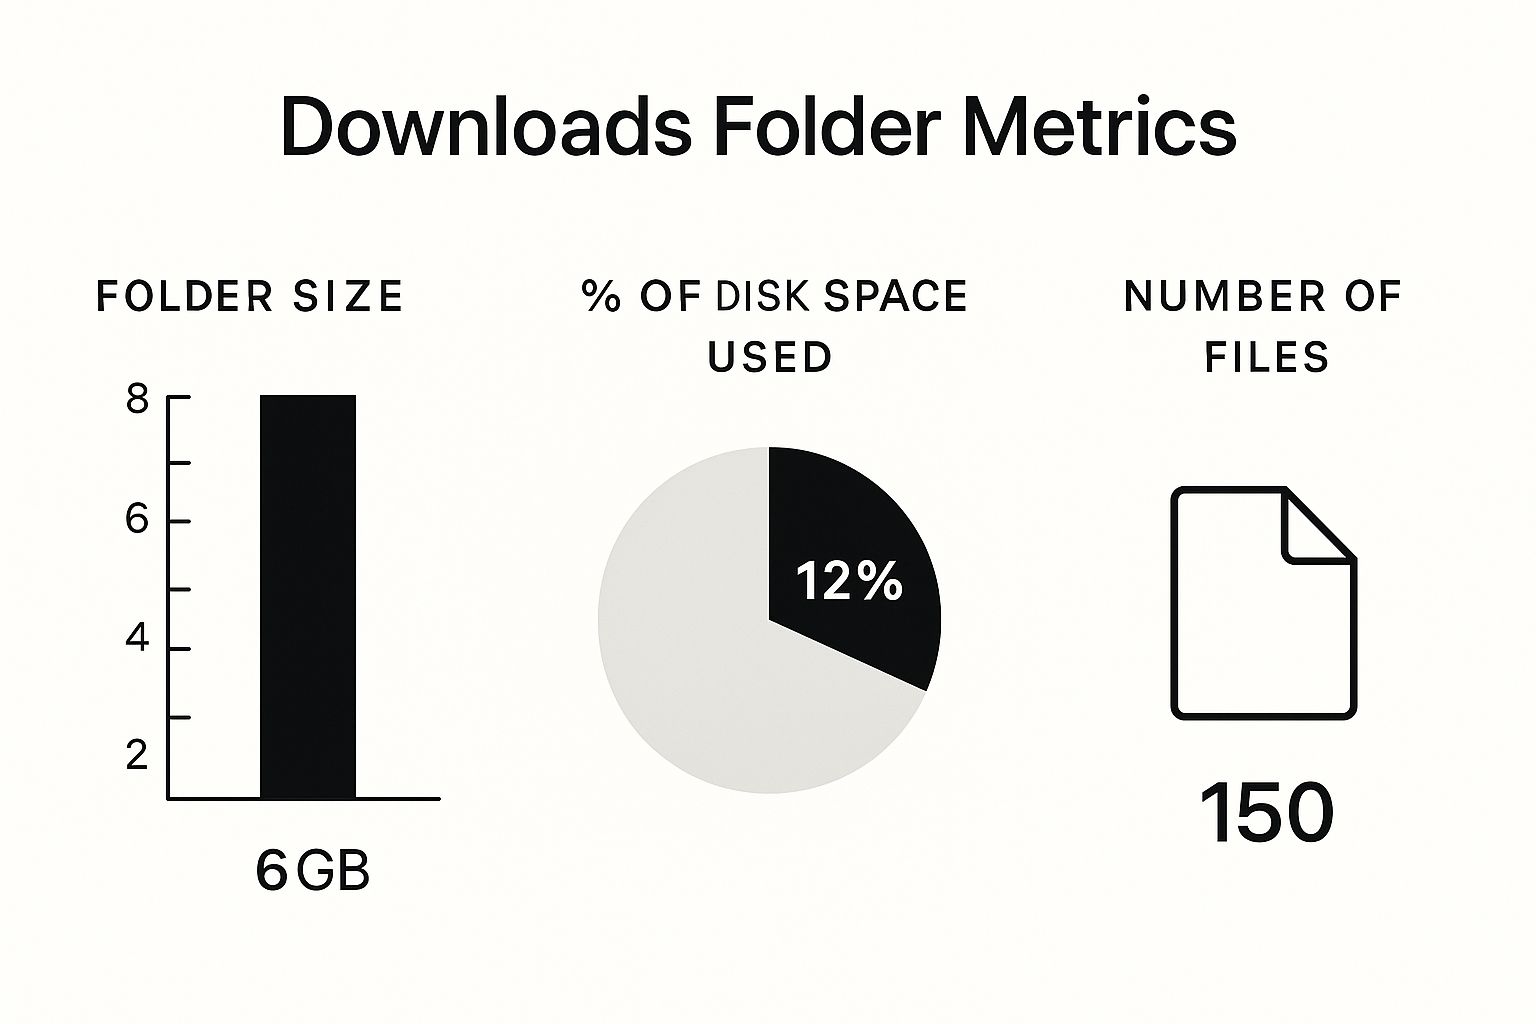
As you can see, a single folder can easily account for a large portion of your total storage, which really underlines the need for focused, regular cleanups.
To help you decide, here’s a quick comparison of some popular Mac cleanup tools.
Popular Mac Cleanup Tools Comparison
Feature comparison of leading Mac cleanup applications
| Tool Name | Price | Key Features | Safety Rating | Best For |
|---|---|---|---|---|
| Compresto | Free trial, then from $19/yr or $49 lifetime | Specialized in high-quality compression of videos, images, and PDFs; batch processing; customizable compression settings. | High | Content creators and professionals who need to reduce large file sizes without losing quality. |
| CleanMyMac X | Subscription-based | All-in-one suite: system junk cleaner, malware removal, uninstaller, large file finder, and optimization tools. | High | General users looking for a comprehensive, easy-to-use solution for overall Mac maintenance. |
| DaisyDisk | One-time Purchase | Visual interactive map of your disk space, making it easy to identify and delete large files and folders. | High | Visual thinkers who want to quickly see what's taking up space and manually manage their files. |
| CCleaner for Mac | Free & Pro Versions | Cleans browser caches, cookies, and temporary files; includes a duplicate finder and uninstaller. | Medium-High | Users focused on privacy and clearing out web-related clutter from their system. |
This table shows there's a tool for almost every need. If your main goal is shrinking large media files, a specialist like Compresto is a better fit than an all-in-one utility.
When to Use a Dedicated Compression Tool
While many cleanup suites offer basic file compression, sometimes you need more power and control, especially when dealing with large media files. This is where a dedicated tool like Compresto shines. Instead of just stuffing files into a zip archive, it intelligently reduces the size of videos, images, and PDFs while maintaining their visual quality.
This is perfect for archiving big project folders or prepping files for transfer without having to delete them. If you're a content creator, designer, or any professional who regularly works with large files, a specialized compression tool can be a game-changer. You might find our professional's guide to file compression helpful to see it in action. This strategy lets you keep important files accessible on your main drive while dramatically cutting down their storage footprint.
Advanced Techniques For Serious Space Recovery
When the usual tricks aren't cutting it and you need to free up space on your Mac, it’s time to pull out the more advanced strategies. These are the methods seasoned Mac users rely on when every gigabyte is precious. We're moving past just emptying the trash and into the world of smart storage management, like fine-tuning system backups, handling specialized work files, and even using the command line for precise cleanups.
Taming Time Machine and Pruning User Accounts
Time Machine is fantastic for backups, but its local snapshots can quietly eat up a huge amount of your drive space, often hidden under "System Data." While your Mac is supposed to clear these out automatically, it doesn’t always get the job done. A great power-user move is to manually thin these snapshots yourself using the Terminal. By running tmutil listlocalsnapshots /, you can see a list of all snapshots saved on your drive. From there, you can remove older ones with sudo tmutil deletelocalsnapshots <snapshot_date>, which can free up a ton of space without you having to turn off your backup protection.
Another area that’s easy to miss is the other user accounts on your Mac. If you share your computer or have old accounts kicking around, they could be hoarding gigabytes of data in their own Documents, Downloads, and Library folders. You can see how much space each account is using by going to System Settings > Users & Groups. Deleting an account you don't need anymore can instantly reclaim a surprising amount of storage.
Managing Bulky Workflows and Compressing Files
Certain professional tasks, like video editing or software development, are famous for generating massive files. Virtual machines, for instance, can easily grow to 50-100 GB or even more. Fortunately, most virtualization software includes tools to "compact" or "shrink" these virtual disks. This process reclaims unused space inside the file itself, reducing its size without deleting any of your data.
If you're a developer, you know the struggle. Clearing out old build artifacts, package caches from tools like Homebrew or npm, and simulator data can make a huge difference. I once cleared out an Xcode derived data folder that had ballooned to over 70 GB with old build info from past projects. It had no effect on my current work but immediately gave me back a massive chunk of my SSD.
This is where a visual tool can really open your eyes.
The "Reduce Clutter" feature in macOS is a perfect starting point for spotting those forgotten, multi-gigabyte files that are prime candidates for deletion or compression. When you can't just delete a file, compressing large project archives or media files with a tool like Compresto can shrink their footprint significantly while still keeping them around for when you need them.
Building Habits That Prevent Storage Disasters
The best way to free up space on your Mac isn’t a frantic, one-time cleanup—it’s preventing the clutter from building up in the first place. When you shift from panicked purges to simple, proactive habits, storage management becomes a background task instead of a stressful chore. The trick is to build routines that fit naturally into your daily work, stopping digital messes before they even have a chance to start.

This approach is all about rethinking how you treat your digital space. For most of us, the Downloads folder and Desktop become graveyards for single-use files we've long forgotten. A powerful habit I've adopted is treating these locations as temporary workbenches, not permanent storage. I set a weekly calendar reminder to sort through them, which keeps gigabytes of old installers and forgotten PDFs from piling up.
Creating Sustainable Maintenance Routines
Good habits go beyond just the Downloads folder. For example, a photographer I know keeps only his active projects and his Lightroom catalog on his Mac mini’s fast internal drive. As soon as a project is complete, he moves the entire folder to an external network drive. This smart system keeps his main storage lean and snappy. You don’t need a complex setup to do this; a simple external SSD will work just as well.
This points to a key idea: intentional file placement. Before you save anything, get into the habit of asking yourself, "Does this file really need to live on my Mac?" More often than not, the answer is no. Here are a few routines that have made a huge difference for me:
- Practice the "One-In, One-Out" Rule: When you download a new app installer, find the old one and delete it immediately.
- Monthly Photo Review: Set aside 30 minutes each month to scroll through your Photos library and delete blurry shots, duplicates, and screenshots you no longer need. It’s amazing how fast this clears up space.
- Compress Archives, Don't Hoard Them: For large project folders you need to keep but won't touch daily, use a tool like Compresto to shrink them down. This is much smarter than letting them hog precious SSD space. You can learn more about how file compression reduces digital waste and helps keep your system tidy.
Monitoring Usage Before It Becomes a Crisis
Finally, the best way to avoid a storage emergency is to stay ahead of it. You don't need to obsessively check your storage every day, but a quick glance every couple of weeks can help you spot problems early. If you see the "System Data" category suddenly ballooning, you can address it before it eats up all your free space. By putting in these small, consistent efforts, you’ll keep your Mac running clean and fast without ever needing a drastic, time-consuming cleanup again.
Your Complete Storage Recovery Action Plan
Now that we’ve covered the different ways to find and deal with space-hogging files, let's put it all together. Think of this as your practical, prioritized game plan for reclaiming your disk space. We'll start with the quick fixes that give you immediate results and then move on to habits that keep your Mac clean for the long haul.
Quick Wins for Immediate Relief
We've all been there: that dreaded "Your startup disk is almost full" warning pops up right when you're in the middle of something important. When you need space now, these are the first things you should do. They're low-effort but have a huge impact.
- Empty All the Trash Bins: Don't just stop at the Trash icon in your Dock. Remember to check the separate trash bins inside the Photos and Mail apps, too. You’d be surprised how much can accumulate there.
- Tackle the Downloads Folder: This folder is a magnet for clutter. Sort it by file size to quickly spot the biggest offenders. Get rid of old software installers, ZIP archives you've already unpacked, and any other files you only needed once.
- Clear Out Your Caches: Focus on the caches for your web browsers and any large applications you use daily, like design software or video editors. This one action alone can often free up several gigabytes in just a few minutes.
Long-Term Maintenance for Lasting Freedom
To stop storage warnings from becoming a regular occurrence, a little routine maintenance makes a world of difference. You don't need to spend hours on it; a few minutes here and there will keep things tidy.
- Weekly: Take five minutes to tidy up your Desktop and Downloads folder. Dragging files to their proper homes or deleting junk before it piles up is a simple but powerful habit.
- Monthly: Check for and delete old iOS backups and Time Machine local snapshots. These can quietly consume a massive amount of storage without you even realizing it.
- Quarterly: Set aside a bit more time to audit your large files and old project folders. This is when you decide what's truly essential. Ask yourself: Can I delete this? Should I move it to an external drive for archiving? Or can I just shrink it down?
For those big project files you absolutely need to keep, compression is your secret weapon. Instead of being forced to delete valuable work, you can simply make it smaller. With an app like Compresto, you can compress videos, images, and documents to a fraction of their original size without sacrificing quality. This turns a major storage headache into a simple, organized archive.