A Guide to Export Video Final Cut Pro Workflows
When it's time to export video from Final Cut Pro, you're immediately faced with a choice: Do you create a high-quality Master File, or use a quick-and-dirty Share preset? The path you take here sets the tone for your entire delivery workflow.
Professionals almost always start by exporting a high-quality ProRes Master File. Think of this file as your digital negative—it's the pristine, uncompromised version of your edit. From this master, you can create all the other compressed versions you need for clients, social media, or archives. The golden rule is to avoid re-compressing an already compressed file, which is a surefire way to introduce ugly artifacts and degrade your video quality.
Your Essential Final Cut Pro Export Roadmap
Opening up the export window in Final Cut Pro can feel like stepping into the cockpit of a 747. You're hit with a wall of technical jargon—codecs, containers, bit rates, color spaces. It's a lot to take in.
But here’s the secret: your entire export process boils down to one simple question you need to answer right at the start.
What is this video for?
Seriously, that's it. Are you creating a final, archival-quality version of your masterpiece? Or are you just trying to get a quick cut up on Instagram before your lunch break? Your answer to that single question will guide every decision that follows and make the whole process much less intimidating.
Master File vs. Share Preset: The Core Choice
The two main paths you can take are creating a Master File or using a built-in Share Destination preset. These are two fundamentally different approaches.
A Master File, usually in a ProRes format, is your highest possible quality output. It contains the most data, offers the most flexibility for future use, and serves as the definitive version of your project. It's perfect for long-term storage or for creating other compressed deliverables later.
On the other hand, a Share preset (like the one for "YouTube & Facebook") is a shortcut. It's a convenient, one-click option that applies a specific set of compression settings tailored for that platform. It spits out a smaller, web-ready file fast. While it’s great for speed, it's a destructive, one-way street. Using that compressed export to make another version is a recipe for quality loss.
This flowchart maps out that initial decision, helping you see which path makes sense based on your goal.
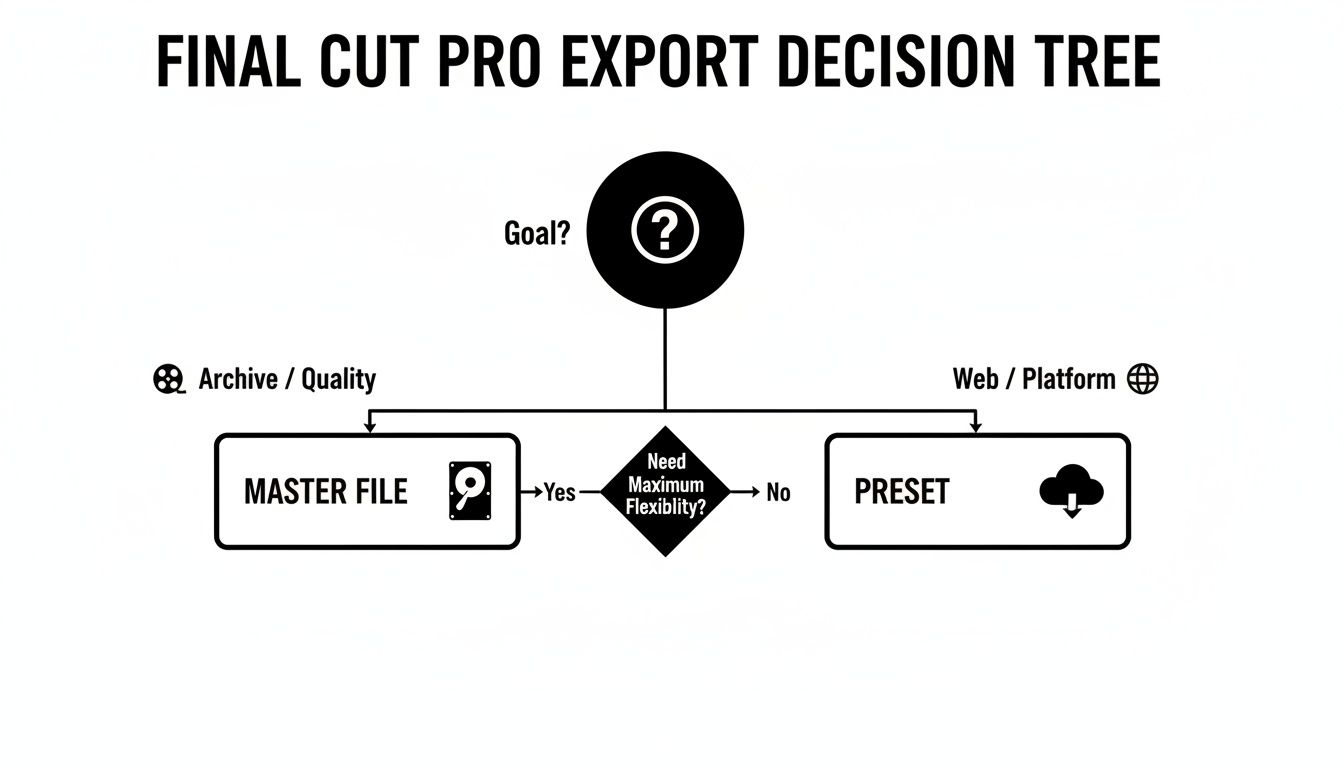
As you can see, if quality and future-proofing your work are even remotely on your radar, the Master File is the non-negotiable first step. But if speed is the only thing that matters for a quick web upload, a preset can get the job done.
To simplify this even further, here's a quick table to help you decide at a glance.
Quick Export Guide: Your First Step in FCP
| Export Goal | Recommended FCP Method | Primary Reason |
|---|---|---|
| Archiving & Future-Proofing | Master File (ProRes) | Preserves the absolute highest quality for long-term storage and future exports. |
| Sending to a Client for Review | Master File (ProRes) | Provides the client with the best possible version; you can compress it later for final delivery. |
| Uploading to YouTube/Vimeo | Master File, then compress | You get a high-quality source file and can create a perfectly optimized version for the web. |
| Quick Instagram/TikTok Post | Share Preset | Speed is the priority, and the platform will heavily re-compress it anyway. |
| Creating Multiple Versions | Master File (ProRes) | This is your "digital negative" from which all other versions should be made. |
Ultimately, choosing the right starting point saves you from headaches, re-exports, and disappointing results down the line.
Choosing The Right Codec: ProRes vs H.264
This is easily the single biggest decision you'll make when you export from Final Cut Pro. It’s the fork in the road that directly impacts your final quality, file size, and where your video can even play.
Get this wrong, and you could end up with a beautiful edit that looks like a pixelated mess online, or a file so huge you can't even get it to your client.
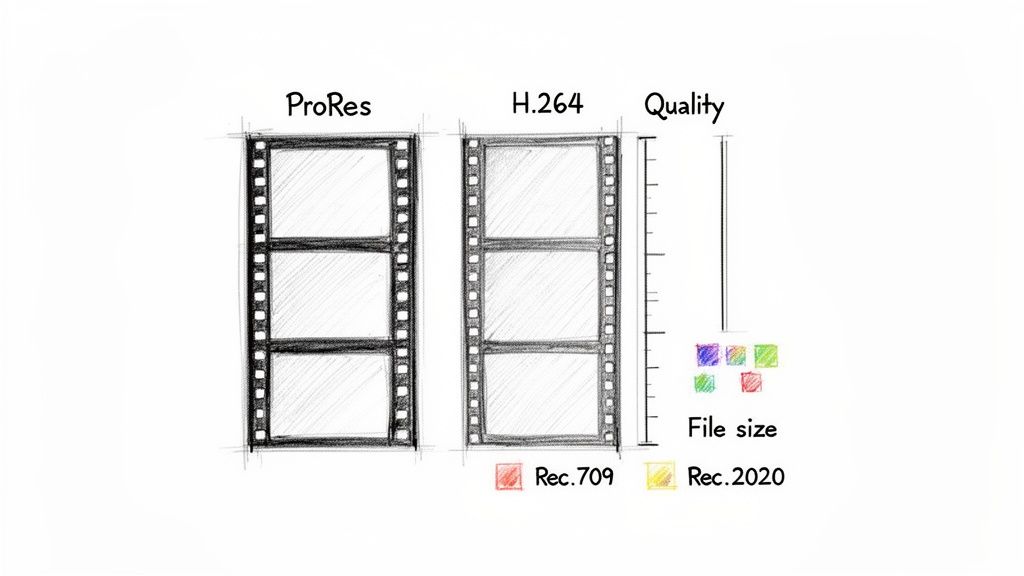
Think of codecs as different languages for video. A codec like ProRes is rich and descriptive, capturing every last detail and nuance. On the other hand, a codec like H.264 is more like a universal shorthand—concise, efficient, and understood by just about everyone.
ProRes: The Professional’s Choice
When quality is non-negotiable, you use ProRes. It’s Apple’s family of professional codecs and the gold standard for any serious production work.
ProRes uses what’s called intra-frame compression, which is a fancy way of saying it compresses each frame of video individually. This makes it incredibly easy for your Mac to decode, which translates to buttery-smooth playback and editing performance. But that quality comes at a price: file size. ProRes files are notoriously massive.
Here are the flavors you'll use most often:
- ProRes 422 HQ: This is the top tier for most projects. Use it for your final master file, especially if it's heading off for a serious color grade or heavy VFX work. It holds onto the maximum amount of image information.
- ProRes 422: The workhorse. It offers a fantastic balance of pristine quality and slightly more manageable file sizes. It's my go-to for most high-quality master exports.
- ProRes 422 LT: A great option when you need to send a high-quality version for client review. It's still a beautiful image, but significantly smaller than its bigger siblings, making it much easier to upload and share.
The core philosophy here is to always export a ProRes master file first. Think of this file as your "digital negative." From this one pristine source, you can create all the smaller, compressed versions you need for different destinations without repeatedly losing quality.
H.264 and HEVC: The Delivery Kings
If ProRes is for mastering, then H.264 (also known as AVC) is for delivery. It is, without a doubt, the most universally compatible video codec on the planet. Your phone, your laptop, YouTube, Instagram—they all speak H.264 fluently.
H.264 uses inter-frame compression. It cleverly analyzes groups of frames and only stores the differences between them. This is wildly more efficient and results in dramatically smaller files, often 90% smaller than an equivalent ProRes file. The trade-off? It takes more processing power to encode and decode.
Then there's HEVC (H.265), the successor to H.264. It’s roughly 40-50% more efficient, which means you get the same quality at about half the file size. This makes it an absolute game-changer for 4K and HDR content. The only catch is that it isn't quite as universally supported yet, and older devices might struggle with smooth playback.
Making the Right Call
So, when do you use which? It's actually pretty simple once you get the hang of it.
| Scenario | Recommended Codec | Why? |
|---|---|---|
| Archiving a project | ProRes 422 HQ | Preserves maximum quality for any future edits or repurposing. |
| Sending for color grading | ProRes 422 HQ | Gives the colorist the most data and flexibility to work with. |
| Uploading to YouTube | ProRes 422 | Give YouTube’s compression algorithm a high-quality source, and your final video will look much better. |
| Client review (online) | H.264 | Small file size makes for easy sharing and guaranteed playback for the client. |
| Final web delivery | H.264 | The most compatible format for websites and social media platforms. |
| Exporting 4K for modern devices | HEVC (H.265) | The best quality-to-size ratio, perfect for crisp, high-resolution content. |
Getting a grip on these fundamental differences is the key to a smooth and professional workflow. For a much deeper dive, our guide to Mac video file formats breaks down exactly how containers and codecs work together.
Optimizing Presets for YouTube, Instagram, and Clients

It’s tempting to just hit the default export button and call it a day, but that’s a rookie mistake. A one-size-fits-all approach to exporting is a surefire way to let platforms and clients ruin the beautiful edit you just spent hours on.
Think of your export settings as the final touch—the last chance you have to control how your video looks out in the world. Each platform has its own weird quirks and technical demands, so tailoring your export is non-negotiable if you care about quality.
The YouTube Quality Trick
This is going to sound completely backward, but to get the best-looking video on YouTube, you need to upload the biggest file you can. Why? Because the moment you upload, YouTube’s servers attack your video with aggressive re-compression to create all the different playback versions (1080p, 720p, etc.). This process always degrades your video.
Your best defense is to feed their algorithm a massive, high-quality ProRes 422 master file. By giving it a source with tons of data and minimal compression, the final versions that viewers see will have fewer artifacts and look significantly cleaner. If you export a compressed H.264 file first, you’re just handing YouTube a lower-quality source to begin with, guaranteeing a mushy, blocky result after its second round of compression.
Your goal is to minimize the damage done by YouTube's compression algorithm. A high-bitrate ProRes file gives the platform’s encoder the best possible source material to work with, resulting in a cleaner, crisper video for your audience.
Getting a handle on how online video compression works is a massive advantage for any editor. For a deeper dive into the technical side, check out our guide on https://compresto.app/blog/video-compression-for-you-tube-tik-tok.
Nailing Your Instagram Export
Instagram is the land of vertical video, and getting your export settings dialed in is the difference between looking sharp and looking amateur. The platform is incredibly picky about its specs. If your video doesn’t match them, it gets re-compressed into oblivion, leaving you with a soft, pixelated mess.
Here are the settings I use to get a crisp, clean Instagram Reel or Story every time:
- Resolution: 1080x1920 (this is the standard 9:16 vertical aspect ratio).
- Frame Rate: 30 fps is the sweet spot.
- Codec: H.264 is the most reliable choice for Instagram.
- Bit Rate: I aim for a variable bit rate (VBR) between 10-15 Mbps.
Go ahead and create a custom export preset with these exact settings in Final Cut Pro. It'll save you a ton of time and ensure every vertical video you post looks fantastic.
Professional Client Delivery Workflows
Sending cuts to a client is a completely different ballgame. Here, it’s all about clarity, communication, and technical precision. This is a workflow you'll see from editors in media production, advertising, and even higher education—sectors that make up a huge chunk of Final Cut Pro's user base, with over 27,480 companies using the software.
For those initial review copies, your goal is simple: make it easy for them to give feedback. Export an H.264 file at 1080p and, most importantly, add a "burned-in" timecode overlay. This lets clients give precise notes like, "at 01:15:10, can we change the title?" instead of "around the middle part."
When it's time for the final delivery, always ask for the client’s spec sheet. Never assume. They might need a ProRes 422 HQ file for broadcast, a specific H.264 file under a certain bit rate for their website, or something else entirely. If you’re delivering for other platforms, it’s just as important to know the rules. For example, you can consult this guide on Twitter video length and specifications to see how much they differ.
Unlocking Advanced Workflows with Compressor
Sooner or later, you’ll hit the limits of Final Cut Pro’s built-in "Share" menu. When you need to do more than just a single export, it's time to bring in the heavy machinery: Apple's Compressor. Think of it less as an add-on and more as the command center for your entire delivery pipeline. This is where you go for serious automation and efficiency.
Imagine this scenario: you've just picture-locked a project. The client needs a full-quality 4K ProRes master for their archive, a 1080p H.264 file for YouTube, and a square, vertically-cropped version for an Instagram Reel. Kicking out each of those one-by-one from Final Cut would be a total drag. It’s tedious, and it ties up your machine.
With Compressor, you knock this out in one move. You just send your timeline over to Compressor, apply a whole batch of presets at once, and hit go. It’ll crank out all three versions from your original source file simultaneously. Set it and forget it.
Offload Rendering and Keep Editing
One of the biggest wins when using Compressor is its ability to take the entire encoding process off Final Cut Pro's plate. When you export video directly from final cut pro, your computer's resources are locked down. The whole application often becomes sluggish or completely unusable until that progress bar finally hits 100%.
Compressor, on the other hand, runs as a separate application, doing all the heavy lifting in the background. This frees up Final Cut Pro almost instantly. You can jump right into your next edit or start prepping a new project without any downtime. For any professional editor, that’s a non-negotiable workflow. Time is money, and waiting on renders is just burning daylight.
This is exactly why Final Cut Pro remains so popular in dedicated production environments. Among creative authorities, FCP has 1,810 known installations compared to Adobe Premiere Pro’s 1,039. Studios that prioritize fast, integrated workflows often build their pipelines around this FCP-to-Compressor handoff. You can dig into more detail on Final Cut Pro's market presence to see a deeper comparison.
Automating Delivery with Droplets
For those truly repetitive tasks, Compressor’s "Droplets" feature is an absolute game-changer. A Droplet is basically a tiny, standalone app that you can create from any custom export preset.
Let's say you frequently need to create watermarked 720p H.264 screeners for client review. You can build a preset in Compressor with those exact bitrate and watermark settings, then save it as a Droplet right on your desktop. From now on, you just drag any video file onto that Droplet icon, and it automatically encodes it to your specs. You don't even have to open Compressor.
This kind of automation is precisely how high-volume production houses manage their deliverables. By setting up Droplets for common formats, editors can bypass manual settings completely, ensuring total consistency and saving countless hours every week.
Beyond just batch processing and automation, Compressor also unlocks a ton of advanced features that you just can't get in Final Cut Pro’s native export window.
- Advanced Captioning: Need to embed different caption formats? Compressor lets you burn in CEA-608, iTT, or SRT files directly into your video exports.
- LUT Application: You can apply a corrective or creative Look-Up Table (LUT) during the export. This is perfect for creating dailies with a preliminary color grade or sending review copies to a client with a specific look already baked in.
- Frame Rate Conforming: Convert your project to different frame rates—like going from 24fps to 29.97fps—with much more sophisticated control over motion interpolation and quality.
Once you integrate Compressor into your workflow, you're no longer just "exporting." You're running a powerful, automated delivery system.
The Post-Export Compression Workflow
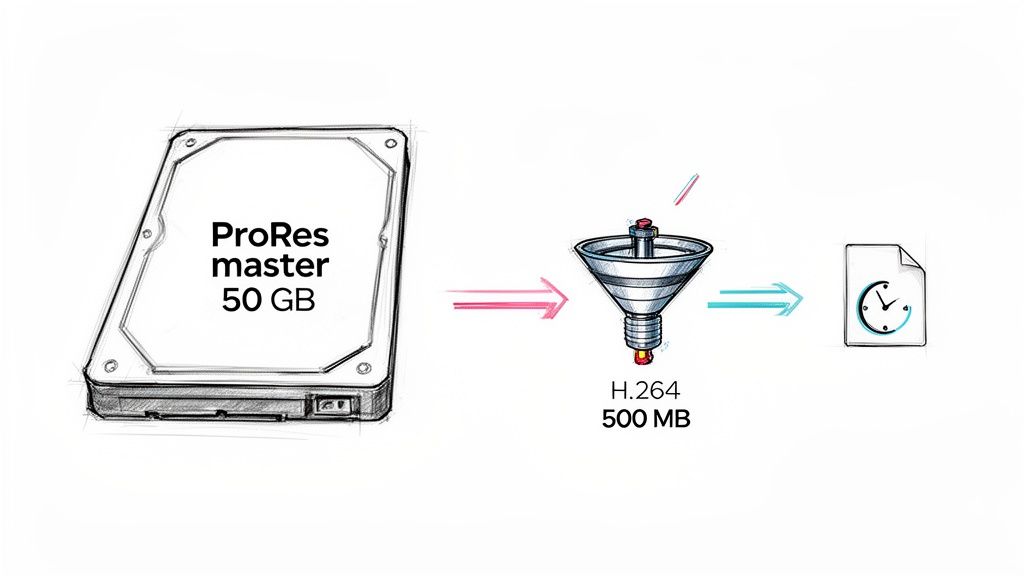
So, you did everything right. You skipped the quick-and-dirty presets and exported a beautiful, uncompromised ProRes master file from Final Cut Pro. It looks absolutely perfect.
There’s just one tiny problem: it's 50 GB.
Good luck emailing that to a client or dropping it into Slack. This is the exact moment where a professional workflow separates itself from an amateur one. The crucial next step isn't to go back and try again—it's post-export compression.
Instead of re-exporting from FCP with different settings, you take that pristine master file and use a dedicated compression tool to shrink it down without any noticeable loss in quality. This two-step process—export high-quality first, then compress separately—is an absolute game-changer for your efficiency.
Why Not Just Re-Export from Final Cut Pro?
Look, re-exporting from Final Cut Pro for every single deliverable is a massive time sink. Each time you hit that export button, your entire system gets tied up, preventing you from moving on to your next edit.
A dedicated compression app handles this heavy lifting for you, often running quietly in the background while you get back to what you do best.
More importantly, these tools give you way more granular control. You can fine-tune bitrates, resolutions, and encoding parameters with a level of precision that FCP’s built-in presets just can't offer. This lets you create files that are perfectly optimized for specific platforms, which saves a ton of storage and gets your work into clients' hands much faster.
Your New Two-Step Workflow
This approach splits your export process into two distinct, powerful phases. Here’s what it looks like in practice:
- Export the Master: From your timeline, export one single master file. A ProRes 422 file is the gold standard here because it preserves all the color and quality from your edit. Think of this as your digital negative—your pristine, archival copy.
- Compress for Delivery: Now, take that huge ProRes file and drop it into a compression tool. From that single master, you can create every version you could possibly need: a lightweight H.264 for email, a 1080p version for a website, or a 4K HEVC file for Vimeo.
This workflow saves your bacon. If a client comes back six months later asking for a different format, you don't have to reopen the Final Cut Pro project and re-render everything. You just grab your master file and compress it again in seconds.
The need to manage files efficiently is only getting bigger. With the global video editing market projected to hit USD 4.99 billion by 2031, creators are juggling more footage than ever. A solid compression workflow is no longer a "nice-to-have"—it's essential. You can dive deeper into these market trends on Mordor Intelligence.
For anyone new to this, a tool like HandBrake is a fantastic, free starting point. To get up and running, check out our step-by-step guide on how to use HandBrake for some seriously impressive results. Trust me, adopting a post-export workflow will fundamentally change how you deliver your videos.
Common Final Cut Pro Export Questions
Even with the slickest workflow, you're going to hit a snag exporting from Final Cut Pro eventually. It happens to every editor, trust me. Here are some quick fixes for the most common headaches that pop up, so you can get back to what you do best.
Why Does My Exported Video Look Washed Out?
This is the big one. Nine times out of ten, it’s a color space mismatch, and it's probably the most frequent problem editors run into.
Your Final Cut Pro library is likely working in a wide color gamut like Rec. 2020, but the vast majority of web players, social media apps, and devices are expecting the standard Rec. 709. When those colors aren't mapped correctly on export, they get flattened out, looking desaturated and lifeless.
Thankfully, the fix is dead simple. When you go to export a Master File, click over to the 'Settings' tab. Find the 'Color Space' dropdown and manually override it to Rec. 709. This forces FCP to perform the correct color conversion, ensuring your video looks exactly as you intended, everywhere it's viewed.
What Is The Best Format For Archiving A Project?
When you’re archiving, your only mission is to preserve every last drop of quality. You need a format you can pull up years from now to re-edit, re-grade, or repurpose without losing a single bit of data.
For this, the undisputed champ is Apple ProRes 422 HQ.
- Visually Lossless: It holds onto so much image information that it's practically indistinguishable from the original, uncompressed camera files.
- 10-Bit Color Depth: This is non-negotiable for any future color grading. It prevents that ugly banding and artifacting you see in lesser formats.
- Built for Editing: The codec is optimized to be less taxing on your system, making it a dream to work with if you ever need to open the project up again.
The files are hefty, no doubt about it. But hard drive space is a lot cheaper than a reshoot. A ProRes 422 HQ master is your definitive digital negative.
Archiving isn't just about saving a file; it's about preserving future possibilities. A high-quality codec like ProRes ensures you aren't closing the door on creative or technical needs that might pop up down the road.
How Do I Export Just One Clip From My Timeline?
You absolutely don't have to render out your entire hour-long timeline just to send a ten-second clip for review. Final Cut Pro has a super-fast range selection tool built right in for this.
Just park your playhead where you want the export to start and hit the 'I' key on your keyboard to set an In Point. Glide the playhead to the end of the section you need and hit the 'O' key for the Out Point. You'll see a yellow box highlight that specific range on your timeline.
Now, when you hit the Share button, Final Cut Pro knows to only export that selected portion. It’s perfect for firing off quick revisions to a client without the long wait.
Should I Upload ProRes or H.264 To YouTube?
This one feels backward, but for the absolute best quality on YouTube, you should upload a massive ProRes 422 file.
Here's why: YouTube is going to re-compress any video you upload, and its compression algorithm is aggressive.
If you feed it an already-compressed H.264 file, you're essentially giving a low-quality source to a heavy-handed compression process. The result is often a blocky, artifact-riddled mess. But if you give YouTube a high-bitrate ProRes file, its encoder has way more data to work with. The final video that your audience sees will be noticeably cleaner, sharper, and much more faithful to your original edit.
After creating that pristine master file, the next step is shrinking it for delivery without losing quality. Compresto is a macOS app designed for exactly this workflow, compressing your large video files in seconds with a simple drag-and-drop. Reclaim your storage and speed up sharing by downloading it from https://compresto.app.