Shrink PDF Mac Files Like a Pro: No More Huge Documents
Your Mac's Hidden PDF Compression Superpowers
You might be surprised to learn that you’re already sitting on some powerful PDF compression tools. Before you rush to download a third-party app, it's worth exploring the magic built right into your Mac. Many users completely miss the robust features hidden in native macOS applications, so let's uncover how you can make them work for you.
The Power and Pitfalls of Preview
Your first stop should be the Preview app. While most people use it just for viewing documents, it has a capable compression engine working behind the scenes. Tucked away under File > Export, you’ll find the Quartz Filter menu, where "Reduce File Size" is the most direct option. This feature is perfect for making a large file email-friendly in a pinch. Imagine you’ve just finished a 40-page client proposal loaded with charts; a quick export can slash the file size and get it under attachment limits.
However, this one-click fix isn’t always the best solution. The convenience comes at a price, as the standard "Reduce File Size" filter can be overly aggressive with image quality. For a graphic designer sending a high-resolution portfolio or a researcher sharing detailed medical scans, the resulting loss of visual detail is simply not an option. It's crucial to understand this limitation to know when Preview is good enough and when you need a tool that offers more control.
The growing need to shrink PDF Mac files for professional and personal tasks is part of a much larger trend. Demand for capable PDF software is soaring; the market was valued at roughly $2.15 billion in 2024 and is projected to reach $5.72 billion by 2033. North America is a significant force in this growth, with its market expected to expand at a CAGR of 13.8% this decade, proving just how essential these document tools have become. You can explore the full market insights here.
Mastering Preview's Compression Arsenal
Most Mac users know Preview can shrink a PDF, but many treat its Export function like a sledgehammer. The default "Reduce File Size" option is a blunt instrument that often does more harm than good. A better way to think of it is as a set of adjustable wrenches for your documents, known as Quartz Filters, that offer surprising control when you know how to use them. While the standard filter is fast, it's notorious for over-compressing, turning crisp images into a pixelated mess.
The Quality vs. Size Dilemma
This trade-off becomes a real headache when visuals matter. Imagine sending a design portfolio to a dream client, only to discover the compressed version makes your high-res work look like it was saved on a flip phone. The default filter aggressively drops image resolution, which is why it can destroy scanned documents or reports where visual clarity is essential. It puts small file size above everything else, which isn’t always the right call.
For more precise control, you can create custom filters in macOS using the built-in ColorSync Utility. This lets you define your own image sampling and compression levels, giving you a much better balance between size and quality.
To help you decide which approach to take, here’s a look at how different compression settings in Preview stack up against each other.
Preview Compression Options Comparison
A detailed comparison of different Quartz filters and their impact on file size and quality.
| Filter Type | Typical Size Reduction | Best Use Case | Quality Impact |
|---|---|---|---|
| Reduce File Size (Default) | High (60-90%) | Sharing text-heavy documents where image quality is not a concern. | High. Often pixelates images and makes them blurry. Avoid for visual work. |
| Custom 150 DPI Filter | Medium (40-70%) | Portfolios, presentations, and reports with important images or charts. | Moderate. A great balance that preserves detail while still reducing file size significantly. |
| Grayscale | High (60-85%) | Documents with color images that are not essential, reducing size by removing color data. | Moderate. Removes all color information but preserves shades of gray and image detail. |
| Black & White | Very High (70-95%) | Scanned text-only documents, forms, and line art. | High. Converts everything to stark black and white, ideal for legibility but not for photos. |
As the table shows, the best option depends entirely on your document's content. The default setting is rarely the best choice for anything visual, but a custom filter can save the day.
This chart visualizes the kind of impact effective compression can have on your file sizes.
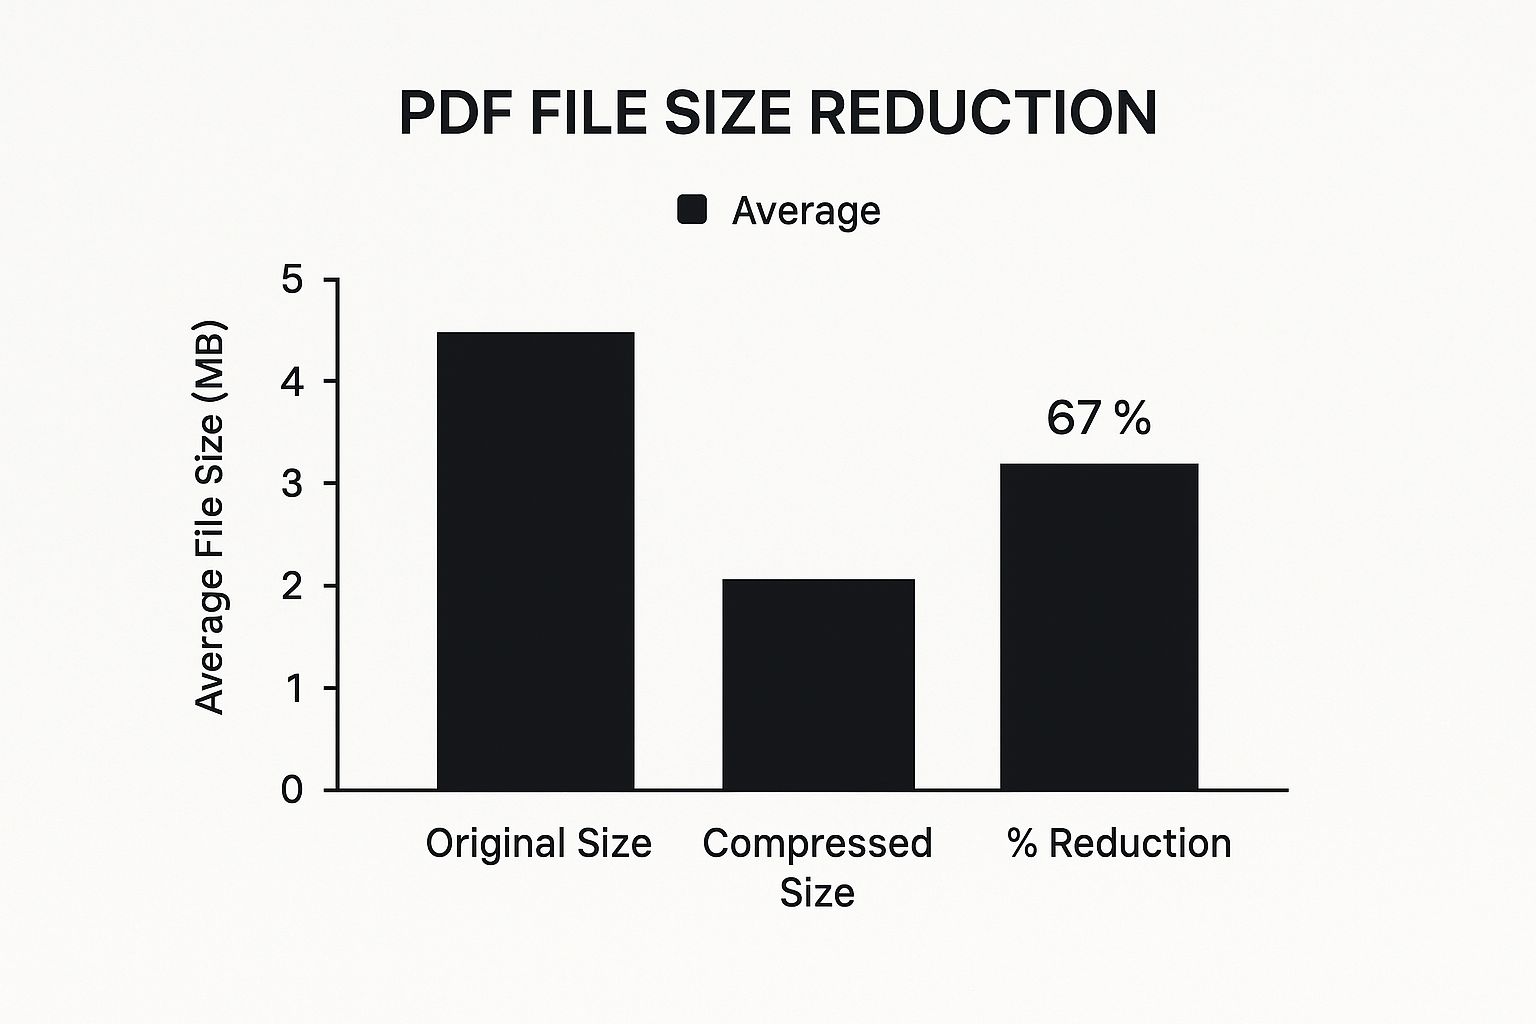
It's common to achieve a size reduction of over 70% while carefully managing quality. This frees up significant storage and makes your files much easier to send and share.
Strategic Filter Application
To sidestep disappointing results, you need to match your filter to your PDF’s content. Here are a few practical tips:
- For PDFs heavy with images: Don't use the default filter. Instead, create a custom Quartz filter that sets image sampling to 150 DPI instead of the aggressive default of 72 DPI. This keeps your visuals sharp.
- For text and vector graphics: These files usually compress nicely with the standard filter because there aren't any complex, pixel-based images to ruin.
- For scanned documents: Treat these like photographs. A high-quality scan needs gentle compression to stay legible. A custom Grayscale or Black & White filter often works wonders here.
While Preview offers fantastic built-in tools for everyday tasks, there are times when its options just aren't enough for complex professional documents. For those scenarios where you need maximum compression with minimal quality loss, you might be interested in learning about the 10 reasons Compresto outperforms other compression tools.
When You Need Heavy-Duty Compression Tools
While Preview is a great go-to for quick jobs, there are times when it just doesn’t cut it. Have you ever tried to email a massive, 500-page scanned manual or a design portfolio packed with high-resolution graphics? In these cases, Preview’s simple “Reduce File Size” filter often falls short.
This is where you need to call in the specialists: dedicated tools built for serious compression. When your goal is to shrink PDF Mac files with precision and power, these applications give you the control that built-in tools simply can't offer.
The Online vs. Offline Dilemma
Your first big decision is whether to use an online service or a desktop application that lives on your Mac.
-
Online Tools: Services like Smallpdf are incredibly easy to use—you just drag, drop, and download your smaller file. The catch, however, is a major one: security. You're uploading your document to a third-party server, which is a non-starter for anything sensitive like contracts, financial records, or client work.
-
Desktop Apps: Applications such as Compresto or PDF Squeezer keep everything on your machine. The entire compression process happens locally, meaning your data remains completely private and secure. For any confidential documents, this is the only truly safe path.
Paid Power vs. Free Convenience
The next thing to consider is cost. Free online tools are fine for a one-time, non-sensitive file, but they usually come with strings attached, like limits on file size, the number of compressions per day, or locked features.
Investing in a paid tool like Adobe Acrobat or a dedicated Mac app gives you access to a much deeper level of control. This is where you can handle complex documents, such as those with OCR (Optical Character Recognition) layers, without breaking their functionality. For example, if you're compressing a batch of scanned invoices, a paid tool can shrink them all at once while ensuring the text layers remain searchable—saving you a ton of manual effort.
This demand for more capable tools is growing. Industry analysis indicates that cloud-based PDF software is set to grow significantly, with large businesses driving growth rates as high as 15% annually. You can explore the full report on PDF software trends to see the data. Ultimately, the right tool depends on the job's complexity, your security requirements, and how often you find yourself battling oversized PDFs.
Strategic Compression for Every Situation
Compressing every PDF with the same settings is a recipe for disappointment. It's a common mistake that often leads to either a file that's still too large or one that's a pixelated shadow of its former self. A one-size-fits-all approach just doesn’t cut it.
The beautifully designed client presentation you poured weeks into needs a delicate touch, while that 100-page, text-only manual can handle a much more aggressive squeeze. The real key to successfully shrinking a PDF on a Mac is to match your compression strategy to the document's purpose and its content.
Analyze Your PDF's DNA Before You Compress
Before you even open a compression tool, take a moment to understand what your file is made of. Is it filled with high-resolution photos, or is it mostly text and vector-based charts? This is a critical distinction.
Photos are made of pixels, and they suffer permanent quality loss during most types of compression. In contrast, vector graphics and text are based on mathematical equations, which allows them to be resized and compressed more gracefully. Knowing this helps you set realistic expectations for the final file size and quality.
Matching Your Method to the Mission
Let's look at how this plays out in a few common situations:
- Sharing Client Presentations: Here, visual impact is non-negotiable. The goal is to get the file size down for emailing, usually under the common 25MB attachment limit, without turning crisp graphics into a blurry mess. A high-quality setting in a tool like Compresto or a custom 150 DPI filter in Preview is perfect for this.
- Submitting Forms to Portals: Many government or job application websites enforce strict upload limits, sometimes as low as 2MB. In this scenario, file size is the only thing that matters. You'll need to use aggressive compression. If you're working with a scanned document, a simple trick like converting it to black and white can slash the file size without affecting readability.
- Archiving Important Records: When you need to shrink a PDF on your Mac for long-term storage, the priority shifts from size to data integrity. You must ensure the document remains perfectly legible for years to come. For this, use light or, ideally, lossless compression to keep 100% of the original data intact.
To make this even clearer, here’s a quick-reference table that breaks down which approach to use for different situations.
Compression Strategy by Use Case
Recommended compression settings and tools for different document sharing scenarios
| Use Case | Recommended Tool | Quality Setting | Target Size Reduction |
|---|---|---|---|
| Client Presentations | Compresto / Preview | High / 150 DPI | Moderate (30-50%) |
| Online Form Submissions | Compresto / Preview | Low / Aggressive / B&W | High (70-90%+) |
| Archival Records | Compresto / Preview | Light / Lossless | Minimal (10-20%) |
As the table shows, the "best" setting is entirely dependent on your end goal. By taking a moment to consider the use case, you can choose the right tool and setting every time, avoiding the frustration of poor-quality results or files that are still too big.
Automating Your PDF Compression Workflow

Compressing PDFs one by one is a tedious task, especially if you deal with dozens of documents every week. The real jump in productivity comes from setting up a smart, automated process. What if you had a special folder on your Mac that could instantly shrink any PDF you drop into it? This isn't a complex hack; it's a feature you can set up using your Mac's own built-in tools.
Using Automator for Hands-Free Compression
The key to this setup is your Mac's Automator application. With it, you can build a simple but incredibly effective "Folder Action." Think of it as a rule you assign to a folder. Whenever a PDF is moved or saved there, Automator triggers your compression settings automatically, without you needing to do a thing. This is perfect for a shared team folder where people are constantly adding large, unoptimized files.
Setting it up is surprisingly simple. Here's the general idea:
- First, create a new folder anywhere you like. For example, make one on your Desktop called "PDFs to Compress."
- Open the Automator app and start a new Folder Action.
- At the very top of the workflow window, assign it to the "PDFs to Compress" folder you just created.
- Find the “Apply Quartz Filter to PDF Documents” action in the library and add it to your workflow. From there, you can select your desired compression level, like the custom 150 DPI filter we discussed earlier.
Once you save this action, any PDF that lands in that folder will be compressed instantly. This small change can save you a surprising amount of time each month.
Take Your Automation to the Cloud
This hands-off approach gets even more powerful when you connect it to cloud services. You can easily sync your automated folder using tools like Dropbox or Google Drive. Imagine a client uploads a huge 50 MB design proof to a shared Dropbox folder. By the time you open it, your Mac has already created a compressed, easy-to-share version for you.
For those who need even more compression power without losing document clarity, advanced tools like Compresto can be integrated into these workflows. Automating how you shrink PDF Mac files changes the task from a repetitive chore into a seamless background process. For a closer look at these methods, you might find our professional’s guide to reducing file size helpful. This is a fundamental shift that gives you more time to focus on your actual work.
Solving PDF Compression Nightmares
We've all been there. You’ve followed every guide on how to shrink a PDF on your Mac, but the file size stubbornly refuses to shrink. Or even worse, the final file is a jumbled, unreadable mess. These compression headaches are incredibly common, but the good news is they’re almost always fixable once you understand what's causing the problem.
Diagnosing the Problem File
Before you start blaming your compression tool, take a closer look at the PDF itself. More often than not, the file is the culprit. Some documents are just naturally resistant to being squashed down, especially PDFs that contain:
- Complex Interactive Forms: Scripts and fillable fields can add a surprising amount of bulk that standard compression methods often skip over.
- Security Restrictions: If a PDF is password-protected or has permissions that prevent editing, compression tools can't modify it.
- Corrupted Metadata or Fonts: Hidden errors in the file's data or embedded fonts can cause the compression process to fail entirely.
- Incompatible PDF Versions: Very old or non-standard PDF formats can cause unpredictable behavior when you try to shrink them.
The "Print to PDF" Lifesaver
When a difficult file just won't cooperate, there’s a fantastic trick built right into your Mac: re-printing the document to a new PDF. This simple action essentially "flattens" the file, stripping away all the complex layers, troublesome scripts, and corrupted data. You're left with a clean, simple version of your document that is much easier to compress.
To do this, open your PDF and act like you're going to print it (Command + P). In the print dialog box that appears, look for a small dropdown menu in the bottom-left corner, usually labeled "PDF."
Click on that menu and select “Save as PDF.” Instead of going to a printer, your Mac will create a brand-new, clean PDF file. This new version has shed all the invisible baggage that made the original so hard to shrink. If you ever find that compressing a file results in blurry images or unreadable text, it’s a sign your settings were too aggressive—just try again with a gentler, higher-quality filter.
This trick is a great one-off solution and can be a key part of implementing modern document management practices to keep your workflow running smoothly.
Your Complete PDF Compression Game Plan
It’s time to stop randomly clicking "compress" and hoping for the best. Having a reliable strategy to shrink PDF Mac files means getting the perfect balance of size and quality for any task, without wasting precious time. Think of this as your personal roadmap for every PDF situation you'll encounter.
A Framework for Every User
Your compression strategy should match what you're trying to accomplish. If you’re an occasional user who just needs to send a smaller email attachment, your Mac's built-in tools are often more than enough. The "Save as PDF" option in the print menu or Preview's basic "Export" function can handle simple documents perfectly.
However, if you're a professional sending a detailed client proposal or a high-resolution design portfolio, quality is everything. You can't risk sending a blurry, pixelated file. You need precise control over the compression, and that's where dedicated apps become non-negotiable. For a closer look at this, we've detailed some top solutions for managing large files.
Finally, for the power users out there who manage massive archives or process documents in bulk, automation is your best friend. Using Automator Folder Actions to process files silently in the background can save you an incredible amount of time and repetitive effort.
Your Quick-Reference Maintenance Checklist
A great system only stays great with a little upkeep. Here’s a simple checklist to keep your PDF workflow running at peak efficiency:
- Purge Originals: After you've compressed a file and confirmed it looks good, decide if you really need to keep the enormous original version. Deleting it can free up a surprising amount of disk space.
- Audit Automations: Every few months, especially after a major macOS update, take a moment to verify that your Automator scripts are still running correctly.
- Know Your Presets: Have a couple of go-to settings in mind for different jobs. For instance, a "client-safe" preset for high quality and an "email-friendly" one for maximum smallness. This saves you from having to guess the settings each time.
Your game plan is set, but having the right tool is what makes it truly effortless. Compresto was built to be the engine of your compression workflow, delivering powerful results while protecting image quality. It’s designed to handle everything from single files to automated batches through a clean, straightforward interface.
Stop fighting oversized files and boost your productivity. Try Compresto today and experience effortless file compression.