Compress Video for Mac: Easy Tips to Reduce File Size
Why Your Mac Videos Are Hogging Space (And How to Fix It)
We’ve all seen it: that dreaded "Storage Almost Full" notification popping up on our Mac. More often than not, the real culprits behind this are massive video files. It could be a crisp 4K screen recording of a product demo, a collection of family vacation videos from your iPhone, or a hefty client presentation. These files eat up your drive space faster than you can say "out of memory," turning simple tasks into a real drag.
You've probably felt this pain yourself—waiting forever for a YouTube upload to crawl to completion, getting a bounce-back from an email server because of an oversized attachment, or fumbling during a key meeting because a video just won't play. It's frustrating and can seriously slow you down.
The Real-World Impact of Bloated Files
This issue goes beyond just running out of storage. For content creators, huge files translate directly into hours of wasted upload time. For business professionals, it can lead to awkward moments when trying to share important project files with clients. The fix is to learn how to compress video for mac in a smart way. This isn't about crushing your videos until they're a pixelated mess; it's about striking the right balance between a manageable file size and clear visual quality. Nailing this balance is how you reclaim both your workflow and your Mac's hard drive.
Why Compression Is No Longer Optional
In nearly every industry, the need for better file management is becoming more urgent. In fact, the market for data compression software is expected to grow from USD 2.48 billion in 2024 to over USD 4.3 billion by 2032. This trend tells a clear story: as video resolutions get higher, the need for tools to manage those files grows right alongside it.
You can dive deeper into the data on why compression tools are becoming so important and see for yourself why this skill is a must-have for anyone dealing with digital media. Learning to compress your videos the right way is a simple fix that gives you back precious space and, more importantly, your time.
Unlocking Your Mac's Hidden Compression Superpowers
Before you go hunting for a third-party app, it's worth knowing that your Mac already has some powerful, free compression tools built right in. You don't need to download anything to start making your video files smaller. Apple’s own apps, like QuickTime Player and iMovie, are surprisingly effective if you know where to look. They're perfect for those everyday situations where you just need to compress a video on your Mac without any fuss.
QuickTime Player: The Unsung Hero
Many people think of QuickTime Player as just a video viewer, but it’s also a handy tool for basic compression that gets the job done fast. For example, I recently needed to email a 5-minute screen recording that was a hefty 500 MB. Instead of launching a heavy-duty program, I turned to QuickTime.
Here’s how you can do the same thing:
- Open your video file directly in QuickTime Player.
- From the top menu bar, navigate to File > Export As.
- You’ll be presented with a few resolution options, such as 1080p, 720p, or 480p.
Simply choosing 720p over the original 1080p can reduce the file size by over 70% with very little noticeable loss in quality for most videos. That 500 MB file of mine? It shrank down to a much more email-friendly 140 MB. It's the perfect quick fix when you need a smaller file without getting lost in technical settings.
iMovie’s Smart Sharing Options
When you need a bit more control, iMovie is your next stop. While it’s primarily an editing suite, its export feature—called "Share"—is a compression powerhouse in disguise. When you export a project, iMovie provides presets optimized for different platforms like email or YouTube. These presets automatically tweak the resolution, format, and bitrate for the intended use.
For instance, selecting the "Email" preset will aggressively shrink the file to fit within typical attachment size limits. The "YouTube" preset, on the other hand, strikes a better balance between file size and visual quality. While these built-in tools are great for many scenarios, you may wonder how they compare to specialized software. If you're curious about dedicated tools, you might find our article on why they can outperform native apps insightful.
Professional Tools That Actually Deliver Results
While Apple’s built-in options are great for quick fixes, they often fall short when your projects get more demanding. A social media manager juggling dozens of daily clips or a filmmaker preparing a festival submission needs more firepower. This is when turning to dedicated third-party software becomes essential to compress video for mac efficiently. These tools offer the granular control and batch processing features that professional workflows require, moving beyond the simple presets of QuickTime and iMovie.
The need for better video compression isn't just a hunch; it's a rapidly growing market. As 4K and 8K content becomes standard, the global video compressor market reached about USD 2.5 billion in 2023. It’s expected to grow to nearly USD 5.8 billion by 2032. This growth shows a clear demand from creators and businesses for better ways to manage massive video files.
HandBrake: The Free and Powerful Workhorse
For many Mac power users, HandBrake is the go-to choice, and for good reason—it’s completely free and incredibly powerful. While its interface might look a bit intimidating at first, its capabilities are unmatched in the free software space. I once had to process an entire folder of raw interview footage, over 50 clips in total. Doing this one by one in QuickTime would have taken hours.
With HandBrake, I could simply:
- Queue up the entire folder for batch processing.
- Create a custom preset with specific bitrate and audio settings.
- Let the software work through the queue overnight.
This kind of automation is a lifesaver for large projects. It supports a huge range of formats and codecs, giving you precise control over the final output without costing a dime.
Specialized Tools for Specific Needs
Beyond all-rounders like HandBrake, there are specialized tools built for certain tasks. For example, if you're deep in the Adobe ecosystem, Adobe Media Encoder integrates seamlessly with Premiere Pro and After Effects, making it a natural choice for video professionals.
Then there are tools like Compresto that are designed with a modern Mac user in mind. They often feature a drag-and-drop interface and smart features like folder monitoring, which automatically compresses any new videos you add to a specific location. These solutions are built to simplify the process without sacrificing professional-grade results.
To help you decide which tool is right for you, here’s a quick comparison of some popular options.
Mac Video Compression Software Comparison
| Software | Price | Best For | Key Features | Format Support |
|---|---|---|---|---|
| Compresto | Paid | Users needing speed, automation, and a simple interface | Folder monitoring, batch processing, drag-and-drop UI, custom presets | MOV, MP4, MKV, AVI, and more |
| HandBrake | Free | Power users who need deep customization and don't mind a complex UI | Batch processing, extensive codec control, custom presets, open-source | Nearly all modern and legacy formats |
| Adobe Media Encoder | Subscription (part of Creative Cloud) | Professionals already in the Adobe ecosystem | Seamless integration with Premiere Pro & After Effects, robust queueing | All professional video formats and codecs |
| QuickTime Player | Free (built-in) | Quick, simple compressions for non-critical tasks | Basic export presets, trimming, screen recording | Primarily MOV, MP4, M4V |
This table shows that your choice depends on your specific needs. For quick, one-off tasks, QuickTime is fine. For ultimate control, HandBrake is a fantastic free option. For professional workflows, Adobe Media Encoder is a must. And for automated, user-friendly compression, a tool like Compresto shines.
Getting Settings Right for Every Situation
Using one-size-fits-all compression settings for every video is a recipe for disappointment. A quick clip for your Instagram story needs a totally different approach than a detailed client presentation. Getting these settings right from the start saves you the headache of re-exporting files and ensures your video looks sharp wherever it’s seen.
The Codec Conundrum: H.264 vs. H.265
The two main codecs you’ll run into are H.264 (AVC) and H.265 (HEVC). H.264 is the old reliable—it’s compatible with pretty much every device and platform out there. This makes it a safe bet for anything you plan to share widely, like a YouTube video or an embed on your website.
H.265, on the other hand, is the newer, more efficient kid on the block. It delivers the same visual quality as H.264 but at a much smaller file size, often up to 50% smaller. This is a game-changer for archiving bulky 4K footage or sending high-quality previews to clients where every megabyte counts. The only catch is that some older devices might not play it smoothly. Understanding how different video file types and formats work is key, as they directly impact both size and quality.
Decoding Resolution and Bitrate
Let’s talk resolution and bitrate. A common mistake I see is keeping a video at 4K when it’s only ever going to be viewed on a 1080p screen. Downscaling is one of the quickest ways to shrink your file size. Even the basic presets in tools like HandBrake can achieve huge reductions just by lowering the resolution.
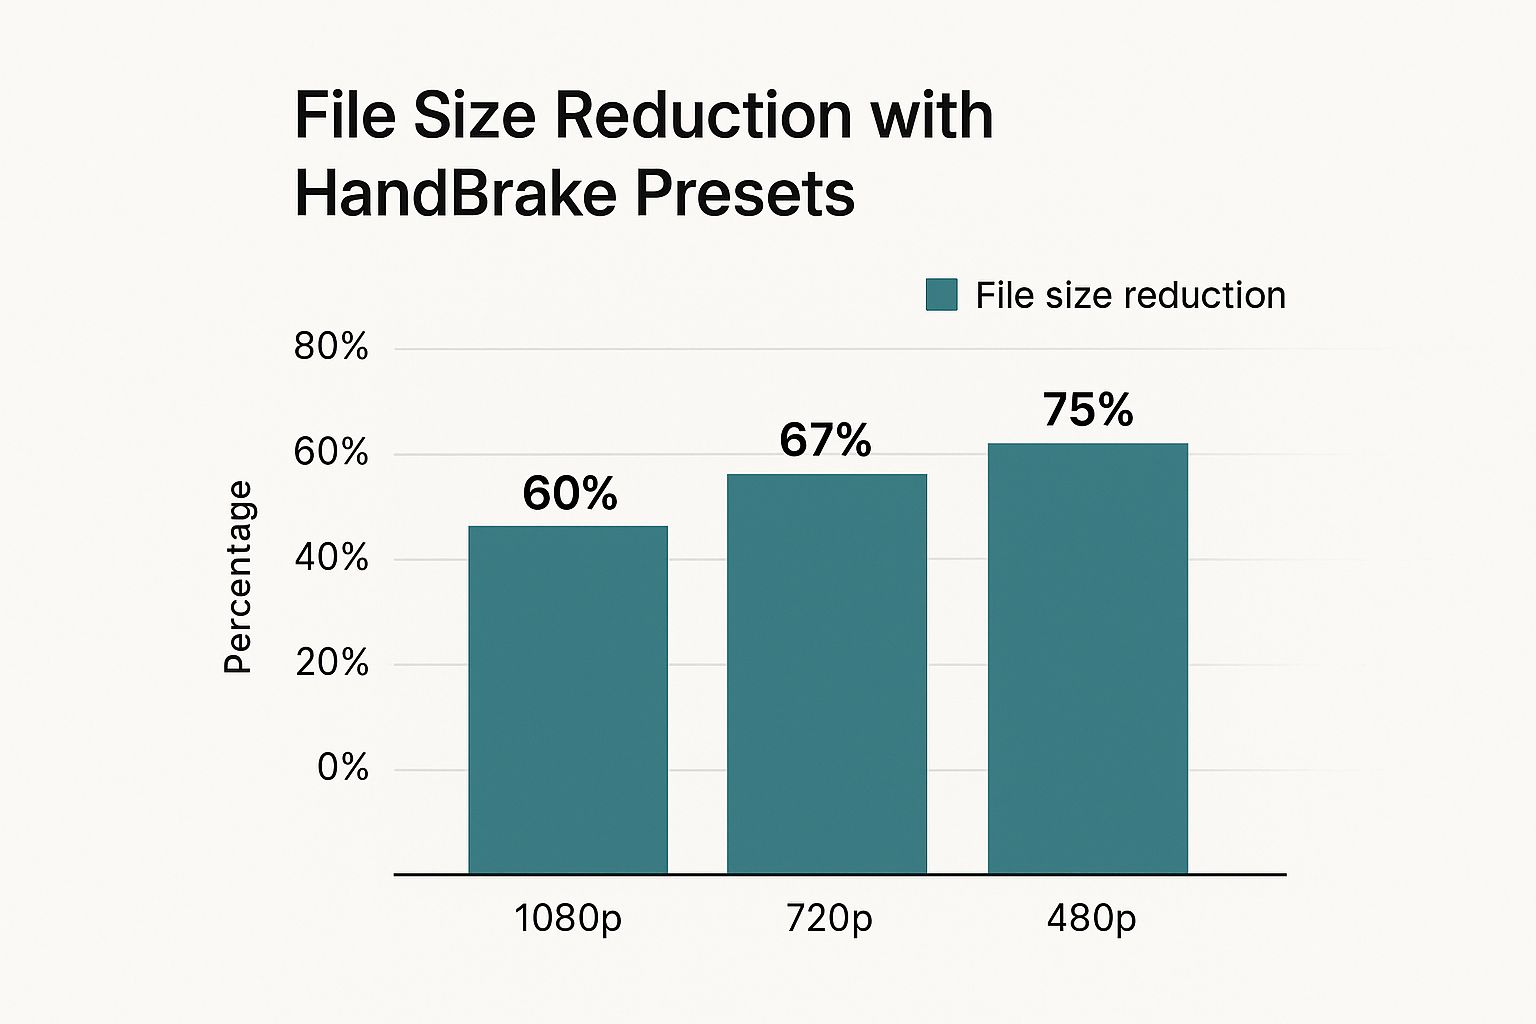
As you can see, dropping to a lower resolution like 480p can shrink a file by as much as 75%.
Bitrate is where you fine-tune the balance between quality and size. It controls how much data is used for each second of video. If you're compressing a crisp product demo with a lot of on-screen text, you’ll need a higher bitrate to keep everything readable. But for a simple talking-head interview, you can get away with a much lower bitrate without anyone noticing the difference. A good starting point for 1080p web video is around 5-8 Mbps.
To help you get started, here’s a table with some recommended settings for common scenarios.
Optimal Compression Settings by Use Case
Recommended video compression settings for different platforms and purposes
| Use Case | Resolution | Bitrate | Format | File Size Range |
|---|---|---|---|---|
| YouTube Upload (1080p) | 1920x1080 | 8-12 Mbps | MP4 (H.264) | 60-90 MB/min |
| Instagram Story/Reel | 1080x1920 | 4-6 Mbps | MP4 (H.264) | 30-45 MB/min |
| Client Preview (HD) | 1920x1080 | 10-15 Mbps | MOV/MP4 (H.265) | 75-115 MB/min |
| Archiving 4K Footage | 3840x2160 | 20-30 Mbps | MP4 (H.265) | 150-225 MB/min |
| Website Background Video | 1280x720 | 2-4 Mbps | MP4 (H.264) | 15-30 MB/min |
This table provides a solid foundation, but the best way to learn is by doing. Experiment with these settings to find the perfect balance for your projects. For a more detailed look at optimization, you can explore this professional's guide to reducing file size. Finding that sweet spot between quality and size is what will make your videos stand out.
Automating Your Way to Compression Freedom
If you find yourself handling more than a couple of videos, compressing them one by one can grind your productivity to a halt. Setting up each file manually to compress video for Mac is a tedious task that quickly becomes a major bottleneck. This is where smart automation steps in, turning a repetitive chore into a hands-off process.
Building Your Automated Workflow
The real magic happens when you can stop thinking about compression entirely and just let your Mac do the work. This is exactly how content creators who manage dozens of social media clips each week stay efficient. You can start with built-in macOS tools like Automator to create a simple "droplet" on your desktop. Just drag a video file onto it, and it will automatically be sent to a compression app with your go-to settings.
Picture this: you finish a recording session and simply dump all your raw footage into a folder named "To Be Compressed." A tool like Compresto can use a feature called folder monitoring to watch that specific folder. The moment a new file lands there, it gets automatically compressed and saved to a different output folder. For anyone with a regular video workflow, this is a huge time-saver.
To set up a successful automation system, keep these tips in mind:
- Design Specific Presets: Create a unique preset for each of your common tasks. You might have one for Instagram Reels, another for client previews, and one more for long-term archival.
- Organize Your Folders: Stick to a clear input and output folder structure. Something as simple as
Videos > RawandVideos > Compressedcan make a world of difference. - Test Your Setup First: Before you batch-process 100 files, run a couple of test clips. This ensures your preset gives you the quality and file size you're aiming for.
If you want to take it a step further, consider integrating compression into your larger automated content creation processes to save even more time. For platform-specific advice, you might also find our guide on how to optimize videos for social media helpful.
When Compression Goes Wrong (And How to Save the Day)
Even with the best tools, trying to compress video for Mac can sometimes hit a wall. We've all been there: you leave a large file to process overnight, only to wake up to a crashed app and no new file. Or even worse, the video shrinks successfully, but the audio is completely out of sync, making your work useless. These problems can really throw a wrench in your workflow.
When compression fails, don't just give up and restart the whole thing. The first step is to do a little detective work. If you're seeing unexpected quality loss, like heavy pixelation or weird color bands, the original source file might be the real problem. A low-quality source will always result in a low-quality compressed file. Before trying again, go back to your video editor and re-export the original.
Diagnosing Common Compression Errors
Sometimes, the issue is as simple as a format mismatch, especially if you're using native Mac tools like QuickTime Player. This is often when you'll get an "unsupported format" error that stops you before you even start.
You can usually find out the format and codec details right inside QuickTime Player by looking at the Inspector window.
This "Movie Inspector" screen reveals critical info like the format, frame rate, and data rate. If you discover your file is using a less common codec, the best fix is to convert it to a universal format like H.264 MP4. A dedicated tool like HandBrake or Compresto can handle this conversion for you before you move on to compression.
Here are a few other quick troubleshooting tips I've learned from experience:
- Audio Sync Issues: This often happens when a video has a variable frame rate. I've found that using a professional tool to re-encode the video with a constant frame rate (like 30 fps) before compressing usually solves it.
- Application Crashes: Heavy-duty compression can really tax your Mac and cause it to overheat. Make sure your computer has good ventilation, close out other resource-heavy apps, and think about breaking up very large files into smaller batches.
- Failed Exports: Always double-check that you have more than enough free disk space. A compression process will often fail if your hard drive runs out of room while it's trying to write the new file.
Your Compression Success Roadmap
Knowing which tool to grab for a video compression task can make all the difference on a busy day. To keep things simple, let's create a quick mental guide for picking the right approach. Think of it as a simple decision-making flow. If you just need to shrink one file to pop in an email, QuickTime is perfect. But what if you're facing a folder of 50 clips for a big social media push? That's when a dedicated batch-processing tool like Compresto or HandBrake becomes your best friend.
Your Go-To Checklist for Any Project
Before you click that "compress" button, it's a good idea to run through a quick mental checklist. This habit helps you sidestep common issues and get the results you want on the first try.
- Where is this video going to live? A clip for an Instagram Reel has very different requirements than one you're embedding in a client presentation. The destination dictates the settings.
- What's more important: quality or file size? If you're archiving footage for later use, you'll want to prioritize quality with a modern codec like H.265. For sharing online, the older H.264 codec is a safe bet for broad compatibility.
- How much time do you actually have? When you're up against a tight deadline, automated tools with saved presets are absolute lifesavers. No need to fiddle with settings every single time.
Measuring Your Success
Success here isn't just about making files smaller; it's about getting your time back. Try tracking how long your video workflow takes you right now. After you start using these strategies, check again. You'll likely find that spending a little time upfront to create presets or automate tasks saves you hours every month. By getting comfortable with how to compress video for mac, you shift from constantly fixing problems to creating work efficiently and proactively.
Ready to build a truly effortless workflow? Download Compresto and see how its powerful automation features can change the way you handle video projects.