How to Compress a 4K Video on Mac: Easy Guide & Tips
Breaking Down 4K Compression: What You Need to Know
4K video offers stunning visuals, but these high-resolution files come with a significant downside: enormous file sizes. These large files can quickly fill up your Mac's storage and cause problems when sharing or uploading. Compressing your 4K footage on your Mac is essential, not just for freeing up disk space, but also for improving your workflow. This means quicker uploads, smoother playback, and easier sharing across different platforms.
Why Compress 4K Videos?
Compressing 4K videos offers advantages beyond simply managing storage. Smaller files upload much faster to online platforms like YouTube or Vimeo. This speed is crucial for content creators working on tight deadlines. Compressed videos also stream more easily, even on devices with limited internet access, ensuring a better experience for your viewers.
-
Faster Uploads: Forget about spending hours uploading videos. Compression drastically reduces file size, resulting in faster transfer times.
-
Smoother Streaming: Compressed videos experience less buffering, providing seamless viewing even on slower internet connections.
-
Reduced Storage Needs: Reclaim valuable hard drive space on your Mac without losing your 4K video library.
-
Improved Sharing: Sharing large video files can be difficult. Compressed files are much simpler to send via email or messaging services.
Understanding Key Compression Concepts
Before getting into the practical steps, let's clarify some key concepts that affect compression results:
-
Bitrate: Bitrate is the amount of data used per second of video. Higher bitrates generally result in better quality, but also larger files.
-
Resolution: Resolution refers to the number of pixels in your video. 4K (3840 x 2160 pixels) looks amazing, but you can often slightly lower the resolution for compression without a noticeable loss in visual quality.
-
Codec: A codec (coder-decoder) is a software algorithm that compresses and decompresses video data. Different codecs offer various levels of compression and compatibility. Common codecs include H.264 and HEVC (H.265).
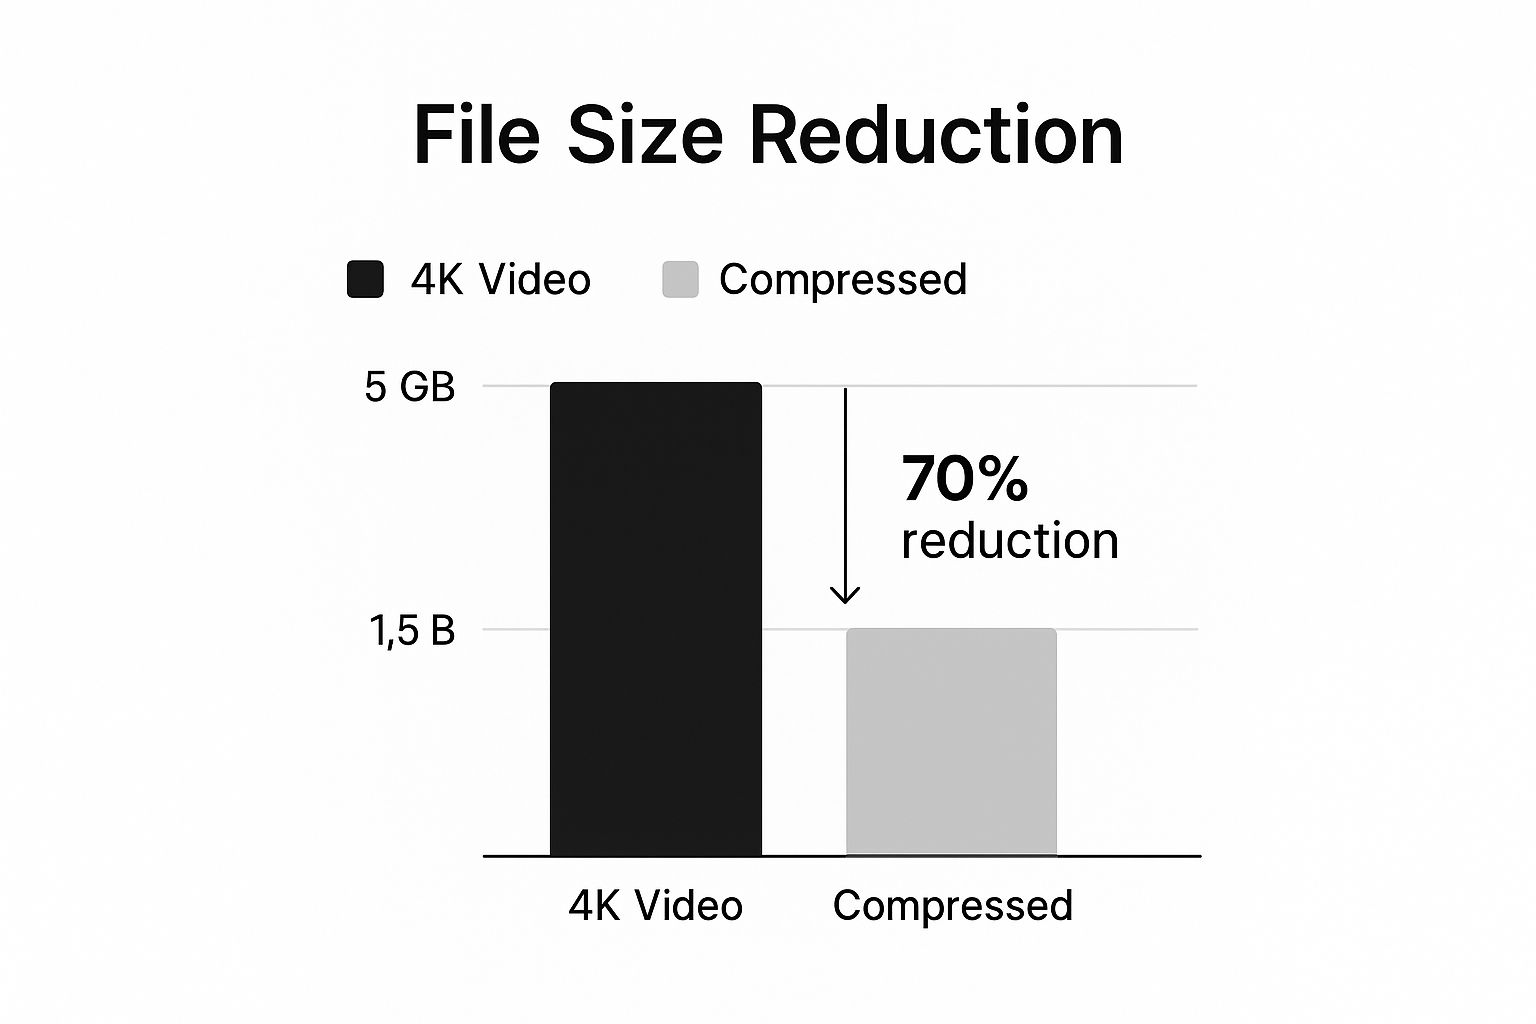
Compressing 4K videos on a Mac successfully means balancing quality and file size. Software like VideoProc Converter can significantly reduce file sizes. For instance, VideoProc Converter can achieve up to a 90% reduction without major quality loss. This is particularly useful for sharing high-resolution videos online where large files are a concern. Learn more about the best video compressors for Mac here.
Choosing the Right Compression Approach
The ideal compression method depends on what you need and how you plan to use the video.
-
Sharing on Social Media: For social media, a moderate level of compression with a slightly reduced resolution is often enough. Many platforms re-compress videos anyway.
-
Archiving Footage: When archiving, prioritize preserving video quality. Opt for a higher bitrate and a detail-preserving codec, even if it creates a larger file.
-
Streaming on Your Website: For website streaming, balance quality and file size for smooth playback. Using a variable bitrate, which adjusts based on the scene's complexity, can be a good approach.
By understanding these core concepts and the intended use of your video, you can make smart compression choices that free up space and improve your workflow.
Mac Compression Tools That Actually Deliver Results
Choosing the right video compression tool can be the difference between a smooth, efficient workflow and hours of frustration. We've explored the options available for Mac to bring you a selection of tools that truly deliver, from free options perfect for casual users to professional-grade software designed for demanding video projects.
Free and Easy: Built-in Mac Options
For basic compression needs, your Mac already comes equipped with powerful tools you might overlook:
-
iMovie: iMovie is pre-installed on most Macs and offers a user-friendly interface, perfect for beginners. While not specifically a 4K compression tool, iMovie allows you to export videos in various resolutions and formats, effectively reducing file size. It’s a great choice for quick edits and sharing videos on social media.
-
QuickTime Player: QuickTime Player, another readily available option, provides basic compression through export settings adjustments, like resolution and frame rate. This is a simple way to quickly trim down large 4K video files. For those interested in exploring further compression options, you might find this article helpful: How to master FFmpeg and an easier alternative.
Power and Control: Dedicated Compression Software
When you need finer control and more advanced features, dedicated compression software offers a significant step up:
-
HandBrake: This free and open-source software is a popular choice among Mac users. HandBrake provides a wide array of codecs, presets, and granular control over compression settings, allowing users to fine-tune every parameter.
-
VideoProc Converter: This paid software combines user-friendliness with a robust feature set. VideoProc Converter offers hardware acceleration support, which speeds up processing, especially on Macs with Apple silicon. It also handles a broad range of video formats and codecs.
-
Adobe Media Encoder: For professional video editors, Adobe Media Encoder integrates seamlessly with other Adobe Creative Cloud applications. This professional-grade tool provides extensive control, batch processing capabilities, and support for advanced codecs.
Professional Powerhouse: Apple Compressor
For Mac video professionals, Apple Compressor, part of the Final Cut Pro suite, remains a staple. Continual updates have enhanced its performance. As of version 4.4.5 (released in October 2019), Compressor leverages multiple GPUs and supports up to 28 CPU cores on Mac Pro models, significantly accelerating demanding tasks like HEVC encoding. You can find more detailed performance statistics here.
Choosing Your Tool: A Comparative Look
Selecting the optimal compression tool hinges on your specific needs and workflow. To help you decide, we've compiled a comparison of the tools discussed in this article.
To help illustrate the performance differences between various compression tools, we've included a data chart below. This chart visualizes the average compression time for a 1-minute 4K video clip using different software.
As the data chart clearly shows, tools with hardware acceleration, such as VideoProc Converter, provide significantly faster compression times. VideoProc Converter completes the compression in under a minute, while HandBrake, without hardware acceleration, takes over five minutes. The chart highlights the performance boost you can achieve by choosing a tool that takes advantage of your Mac's hardware. It also illustrates how professional tools like Adobe Media Encoder, while powerful, can sometimes take longer due to their comprehensive feature set and emphasis on preserving video quality.
| Tool Name | Free/Paid | Hardware Acceleration | HEVC Support | Batch Processing | Ease of Use | Price |
|---|---|---|---|---|---|---|
| iMovie | Free | Limited | Yes | No | Easy | Included with macOS |
| QuickTime Player | Free | No | Limited | No | Easy | Included with macOS |
| HandBrake | Free | No | Yes | Yes | Moderate | Free |
| VideoProc Converter | Paid | Yes | Yes | Yes | Easy | Varies |
| Adobe Media Encoder | Paid | Yes | Yes | Yes | Moderate | Part of Adobe Creative Cloud |
| Apple Compressor | Paid | Yes | Yes | Yes | Moderate | Part of Final Cut Pro suite |
This table summarizes the key features and pricing of each tool, offering a quick overview to help you select the best fit for your video compression projects. Remember, the best tool for you will depend on your specific balance of speed, quality, and features.
From Import to Export: Your 4K Compression Path
So, you’ve picked your video compression tool. Now, let's actually compress that 4K footage. This guide provides clear steps for several popular Mac apps, taking the mystery out of video compression.
Compressing With HandBrake
HandBrake is a free, open-source powerhouse known for its detailed control over video settings.
-
Import: Open HandBrake and click "Open Source" to choose your 4K video.
-
Preset Selection: Pick a preset designed for your device or online platform. HandBrake offers many presets for Apple TV, iPads, and general web use.
-
Custom Settings (Optional): Want more control? The "Summary" tab lets you fine-tune settings. Adjust the video codec (H.264 or H.265 are recommended), frame rate, and quality. A lower quality setting means more compression.
-
Output Settings: The "Dimensions" tab adjusts resolution. To save space, consider slightly lowering the resolution from 4K to 1440p or 1080p.
-
Start Encoding: Hit the green "Start Encode" button to begin. The time it takes depends on your video's length and your Mac's processing speed.
Streamlining With iMovie
iMovie, Apple's easy-to-use video editor, makes compression simple, especially for beginners.
-
Project Creation: Make a new iMovie project and import your 4K video.
-
Export Options: Click "Share" (the square with an upward arrow) and choose "File".
-
Quality and Resolution: iMovie has quality presets (Low, Medium, High, 4K). Lower quality means more compression. You can also adjust the resolution.
-
Export: Pick a save location and click "Next" to export the compressed video.
Leveraging QuickTime Player For Quick Compression
QuickTime Player, already on your Mac, handles fast, basic compression.
-
Open and Export: Open the 4K video in QuickTime Player. Go to "File" > "Export As".
-
Resolution Selection: Choose your resolution. A lower resolution compresses the video. For instance, picking 1080p for a 4K video shrinks the file size.
-
Save: Pick the save location and click "Save."
Batch Processing For Efficiency
Many tools, like HandBrake and Adobe Media Encoder, offer batch processing. Compress multiple videos at once! A real time-saver, especially with lots of 4K footage. This is invaluable for content creators handling large video files regularly.
Creating Custom Presets
Frequently using the same settings? Create custom presets! Skip manual adjustments every time. This is particularly helpful for compressing similar videos often. If you use WordPress for your videos, compression matters. This resource may help: WordPress video compression.
By following these instructions, you can compress 4K videos effectively on your Mac, maintaining good quality while saving storage space and making sharing smoother. Your videos will be ready for various platforms and viewing experiences.
Mastering Video Codecs: The Compression Secret Weapon
Choosing the right compression settings is important, but understanding video codecs is the real key to efficient 4K video compression on a Mac. Think of codecs as translators for your video data. They determine how that information is packaged and unpacked, directly impacting both file size and quality. This section breaks down complex codec information into practical tips you can use right away.
Exploring Popular Codecs
Several video codecs are commonly used, each with its own set of strengths and weaknesses.
-
H.264: This codec offers a solid balance of file size and quality, and it’s compatible with nearly every device and platform. While a good all-around choice, H.264 isn't the most efficient option for 4K compression.
-
HEVC (H.265): HEVC is much more efficient than H.264, delivering smaller files at the same quality level—a big plus for 4K video on a Mac. Support is growing rapidly, though it’s not as universal as H.264. How to master H.264 and H.265 offers more in-depth information. HEVC (H.265) has become a leading standard for 4K and HDR video, making it a powerful tool for Mac users. Using HEVC for 4K compression can often create files roughly half the size of H.264-encoded videos without sacrificing noticeable quality. For more on the current video codec landscape, check out this article: The State of the Video Codec Market.
-
VP9 and AV1: These codecs are even more efficient than HEVC and are gaining popularity, particularly for online streaming. However, limited hardware acceleration support on Macs can slow down the compression process.
To help you choose the right codec, let's look at a comparison of their key features and uses. The following table summarizes the benefits and tradeoffs of each codec, specifically focusing on 4K compression on Mac systems.
Video Codec Comparison for 4K Compression Comparison of popular video codecs showing efficiency, compatibility, and performance on Mac systems
| Codec | Compression Efficiency | Mac Hardware Support | Compatibility | Ideal Use Case |
|---|---|---|---|---|
| H.264 | Good | Wide | Excellent | General use, older devices |
| HEVC (H.265) | Excellent | Excellent (Apple Silicon) | Very Good | 4K/HDR video, modern devices |
| VP9 | Very Good | Limited | Good | Web streaming |
| AV1 | Excellent | Limited | Growing | Future-proofing, high-efficiency streaming |
As you can see, HEVC strikes a good balance for 4K compression on Macs, offering excellent efficiency with broad compatibility. While VP9 and AV1 offer higher efficiency, their limited hardware support might be a drawback for some users.
Harnessing Hardware Acceleration
Macs with Apple Silicon chips often excel at HEVC encoding thanks to hardware acceleration, which can dramatically speed up compression. For older Macs, choosing a hardware-supported codec can still provide a noticeable speed boost.
Codec Compatibility Considerations
While newer codecs like HEVC offer impressive compression, compatibility is essential. Ensure your chosen codec is compatible with your target audience's devices, especially if you are sharing videos widely. If you’re preparing videos for platforms like YouTube, consider using a YouTube description generator to optimize visibility.
Matching Codecs to Your Goals
The ideal codec depends on your priorities.
-
Maximum Compatibility: H.264 is the best choice for reaching the widest possible audience.
-
Best Balance of Size and Quality: HEVC offers great compression without major quality compromises.
-
Smallest Possible File Size: If minimizing file size is paramount, VP9 or AV1 might be suitable, but consider potential compatibility and hardware acceleration limitations.
Understanding these codec principles lets you make informed decisions, optimizing your 4K video compression workflow on your Mac and effectively balancing file size, quality, and compatibility.
Pro-Level Compression Techniques That Make a Difference

Now that you understand the basics of 4K video compression on your Mac, let's explore some advanced strategies used by video professionals. These techniques can significantly improve the quality of your compressed videos and make your workflow more efficient.
Two-Pass Encoding: Enhancing Video Quality
Two-pass encoding, while more time-consuming, greatly enhances the final quality of compressed videos. During the first pass, the encoder analyzes the entire video. This identifies complex scenes requiring higher bitrates. The second pass then uses this analysis to distribute the bitrate effectively, resulting in better overall quality.
This intelligent allocation ensures scenes with lots of motion or fine details get the bitrate they need. Simpler scenes use less, optimizing the overall file size without sacrificing important details.
Variable Bitrate (VBR) Encoding: Smart Bitrate Allocation
Variable bitrate (VBR) encoding dynamically adjusts the bitrate based on the complexity of each scene. A fast-paced action scene, for example, needs a higher bitrate than a static shot. VBR intelligently allocates a higher bitrate to demanding scenes, preserving their detail.
In less complex scenes, VBR uses a lower bitrate, minimizing the final file size. This dynamic approach contrasts with constant bitrate (CBR) encoding. CBR uses a fixed bitrate throughout, regardless of scene complexity, often resulting in larger files or reduced quality where it matters most.
Keyframe Intervals: Finding the Right Balance
Keyframes are full frames in a video. Following frames only store changes from the previous keyframe. A shorter keyframe interval (like every 2 seconds) improves seeking and editing precision but increases file size. A longer interval (like every 5 seconds) reduces file size but can make editing slightly more challenging.
Finding the optimal keyframe interval depends on your specific needs. Consider how often you'll be editing or seeking within the video. This will help you determine the best balance between file size and editing flexibility.
Platform-Specific Optimization: Tailoring Your Approach
Different platforms have unique requirements. Optimizing for your target platform is crucial.
-
YouTube: YouTube recommends HEVC (H.265) for 4K uploads when possible, maximizing compression efficiency.
-
Vimeo: Vimeo also supports HEVC and offers detailed encoding guidelines for the best results.
-
Social Media: Social media platforms frequently re-encode uploaded videos. A widely compatible codec like H.264 with a slightly lower resolution often works well.
Handling Challenging Content: Specific Strategies
Certain video types benefit from specialized approaches.
-
Fast Action: Use higher bitrates and shorter keyframe intervals to preserve smooth motion and fine details.
-
Highly Detailed Scenes: Higher bitrates ensure intricate textures and subtle color variations are maintained.
-
HDR Footage: HDR (High Dynamic Range) video needs specific codecs and settings. Make sure your chosen codec fully supports HDR for accurate color reproduction.
By using these professional strategies and mastering tools like Compresto, you can optimize your 4K video compression on your Mac. Achieve smaller files without compromising the stunning visuals that make 4K so impressive.
Solving Common Compression Headaches Before They Start
Compressing 4K videos on your Mac can be tricky. Choosing the wrong settings might leave your footage looking pixelated or the audio out of sync. This section covers common compression problems Mac users face and offers practical solutions for maintaining professional-looking videos.
Understanding Quality Loss
Unexpected quality loss after compression is a frequent issue. This often stems from a bitrate that's set too low. Bitrate refers to the amount of data used per second of video. Lower bitrates save space, but they compromise visual quality. If you see a noticeable drop in quality, try increasing the bitrate in your compression software.
Another factor is the codec. Efficient codecs like HEVC (H.265) can shrink file sizes significantly, but they may introduce subtle artifacts or blurring, especially in complex scenes. Experiment to find the best balance between size and quality for your videos.
Eliminating Compression Artifacts
Compression artifacts are those blocky or pixelated areas that can appear in compressed videos. Aggressive compression settings, especially with older codecs like H.264, often cause them. A modern codec like HEVC can help minimize artifacts. Increasing the bitrate, particularly in detailed or high-motion scenes, can also smooth out these glitches.
Troubleshooting Audio-Video Sync Issues
Audio-video desynchronization, where the audio and video become misaligned, is a particularly frustrating problem. This can result from issues with the original file or problems during compression. Check your software's settings to ensure audio and video are handled correctly. Sometimes, re-encoding the video with different settings or using a different compression tool solves the problem. For more tips, see our guide on reducing file size.
Diagnosing Performance Issues
Several factors can cause slow compression speeds. An older processor or limited RAM can struggle with 4K video compression. Upgrading your hardware can make a big difference. Ensure your software uses your Mac’s hardware acceleration, especially with Apple Silicon Macs. Software limitations matter too. Some free tools lack the optimization of premium applications like Compresto.
Preventative Strategies: Avoiding Problems Altogether
Preventing problems is the best approach. Here's how:
-
Choose the Right Codec: Select a codec that balances file size and quality. HEVC is generally a good choice for 4K videos on a Mac.
-
Optimize Bitrate: Use a variable bitrate (VBR). VBR adjusts dynamically to the scene's complexity, minimizing file size while preserving detail.
-
Test Before Finalizing: Compress a short test clip before compressing the full video. This lets you preview the quality and adjust settings.
-
Keep Your Software Updated: Regular updates provide bug fixes and performance improvements.
By understanding these common compression issues and their solutions, you can create high-quality compressed 4K videos on your Mac without the hassle. Download Compresto today and improve your workflow!